linked/Options-dialog-page-TLS-Set-Server-Trusted-Store1.png
Authentication in TLS Protocol works as follows. When TLS Server sends its certificate to TLS Client, TLS Client has to check the validity of the Server's certificate and decide whether to continue with this connection or to disconnect. When TLS Client sends its certificate to TLS Server, TLS Server has to check the validity of the Client's certificate and decide whether to continue with this connection or to disconnect.
Proxy32 allows user to configure how peer certificate is validated in the TLS Protocol. Currently, only validation of the Client certificate in TLS Server is configurable. Validation of the Server Certificate in the Proxy32 built-in TLS Client is not yet configurable and hard-wired to use system stores and system default settings.
| Component | TLS Certificate validation Options |
| TLS Server (part of Telnet-TLS server for terminal Session Sharing (TSS). Present in every terminal.) |
Highly configurable. It can use following trusted certificate store configurations: - Windows System Certificate Stores, - Windows System Certificate Stores with system root store restricted or replaced by application-specific PFX-Store and/or TrustedPeople store replaced by application-specific PFX-Store, - dedicated application-specific PFX-Store. Uses Windows Built-in Certificate chain validation functions (with System Stores) and Proxy32 built-in validation logic (with dedicated application-specific PFX-Store). Supports both PEER TRUST and ISSUER TRUST models. Can use Application level, User level and Computer level of trust. |
| TLS Client (activated by using TELNET-TERMINAL Launcher with TLS check mark enabled. Present in every terminal.) | No configuration options yet. It is hard-wired to use only Windows system stores and system default validation setting. It reports results of validation into terminal, but does not disconnect automatically on failure. User has to read validation messages in terminal and decide whether to disconnect or to continue with the connection. |
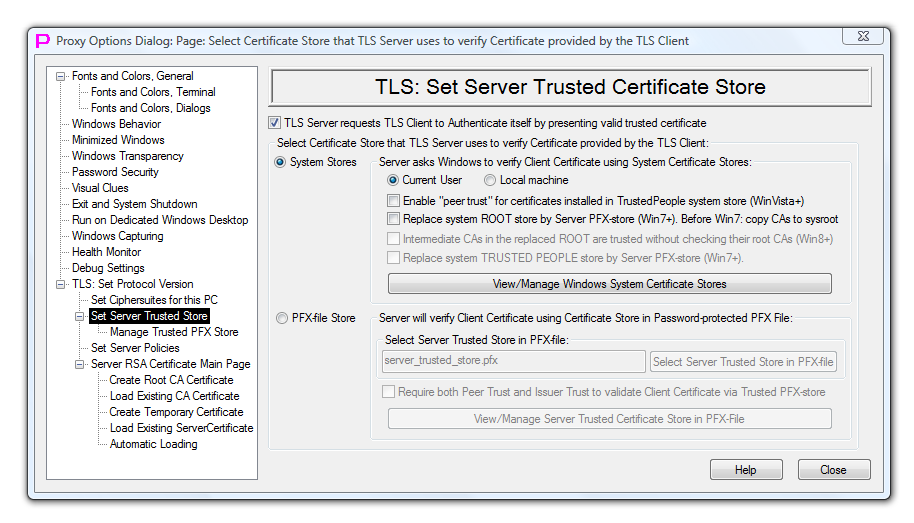
Client certificate is only validated if the check mark “TLS Server requests TLS Client to Authenticate itself by presenting valid trusted certificate” is set on Options Dialog Page “TLS Set Server Trusted Certificate Store”.
linked/Options-dialog-page-TLS-Set-Server-Trusted-Store1.png
When Client certificate Validation is enabled, there are two validation modes that are using different certification stores. The modes are selected via pair of radio buttons "System Stores/PFX-file Store". Tables 2 and 3 below explain those two modes.
| Feature | Implementation/Options |
| Level of the trust |
Current User or Local Computer level of trust. Configurable via radio buttons "Current User/Local machine" (on the Page “TLS Server Trusted Store” of the Options Dialog) |
| Certificate Validation Logic | Uses Windows Built-in certificate chain validation functions |
| Use of Windows System Certificate Stores | Yes, mandatory. |
| Use of PFX-file Certificate Store |
Optionally, to restrict (WinXP or WinVista) or replace (Win7 and Win8) system "Root" store. Validation is still using system stores but the root system store is restricted or replaced. Restricting/replacing of system root store by external PFX-store is controlled by the check mark “Replace system ROOT store by Server PFX-Store (Win7+). Before Win7: Copy CAs to sysroot” in the Options Dialog page “TLS: Set Server Trusted Certificate Store”. On WinVista and WinXP this option works differently: - On WinVista and WinXP system root store is not replaced but restricted. That means that trusted root certificates should also be installed into regular system root store, not only into user-supplied replacement of the system root store. - On WinVista and WinXP user-supplied replacement of the system root store should not contain any non-root certificates, otherwise user will receive error message when certificate checking is performed. On Win8 non-root CAs in the replaced root store can also be trusted if the check mark “Intermediate CAs in the replaced ROOT are trusted without checking their root CAs (Win8)” is selected. and/or Optionally, to replace (Win7 and Win8) system "TrustedPeople" store. Validation is still using system stores but the TrustedPeople system store is replaced. Replacing of system TrustedPeople store by external PFX-store is controlled by the check mark “Replace system TRUSTED PEOPLE store by Server PFX-Store (Win7+)” in the Options Dialog page “TLS: Set Server Trusted Certificate Store”. |
| Support for "ISSUER TRUST" | Yes. Controlled via content of System Root store (or replaced/restricted root store) and chain of intermediate CA certificates. |
| Support for "PEER TRUST" | Yes. Controlled via content of System TrustedPeople store (or replaced TrustedPeople store). |
| Option to completely disable "PEER TRUST" without changing the content of system stores |
Yes. Controlled via “Enable “”peer trust”" for certificates installed in TrustedPeople system store (WinVista+)” checkmark (on the Page “TLS Server Trusted Store” of the Options Dialog). Also indirectly, by replacing (Win7 and Win8) system "TrustedPeople" store by external empty PFX-store. Validation is still using system stores but the TrustedPeople system store is replaced. Replacing of system TrustedPeople store by external PFX-store is controlled by the check mark “Replace system TRUSTED PEOPLE store by Server PFX-Store (Win7+)” in the Options Dialog page “TLS: Set Server Trusted Certificate Store”. This will replace (Win7 and Win8) TrustedPeople system store only for the purposes of Proxy32 Client Certificate check without changing content of the TrustedPeople system store. |
| Option to completely disable "ISSUER TRUST" without changing the content of system stores | Yes. Indirectly, by restricting/replacing of system root store by external empty PFX-store. It is controlled by the check mark “Replace system ROOT store by Server PFX-Store (Win7+). Before Win7: Copy CAs to sysroot” in the Options Dialog page “TLS: Set Server Trusted Certificate Store”. This will restrict (WinXP or WinVista) or replace (Win7 and Win8) system “Root” store only for the purposes of Proxy32 Client Certificate check without changing content of the system "root" certificate store. |
| Option to require BOTH "ISSUER TRUST" and "PEER TRUST" to validate Client Certificate | No. |
| How to add "ISSUER TRUST" certificates | Use button "View/manage System Certificate Stores" (on the Page “TLS Server Trusted Store” of the Options Dialog) to start system certificate management console (certmgr.msc). In certmgr right click on "Certificates - Current user" on the tree in the left panel and then select "View/Options..." from the right-click popup menu. Select check mark "Physical certificate stores" from the dialog "View Options" and click "OK" button. Double-click on "Trusted Root Certification Authorities" in the right panel. There will be a choice of "Registry", "Local Computer", "Smart Card" in the right panel. Right Click on "Registry" and select "All Tasks/Import..." from the right-click popup menu to import root certificate from disk file into "Current User" Trusted Root Store. Right Click on "Local Computer" and select "All Tasks/Import..." from the right-click popup menu to import root certificate from disk file into "Local Computer" Trusted Root Store. |
| How to add "PEER TRUST" certificates | Use button "View/manage System Certificate Stores" (on the Page “TLS Server Trusted Store” of the Options Dialog) to start system certificate management console (certmgr.msc). In certmgr right click on "Certificates - Current user" on the tree in the left panel and then select "View/Options..." from the right-click popup menu. Select check mark "Physical certificate stores" from the dialog "View Options" and click "OK" button. Double-click on "Trusted People" in the right panel. There will be a choice of "Registry", "Group Policy", "Local Computer" in the right panel. Right Click on "Registry" and select "All Tasks/Import..." from the right-click popup menu to import peer certificate from disk file into "Current User" Trusted People Store. Right Click on "Local Computer" and select "All Tasks/Import..." from the right-click popup menu to import root certificate from disk file into "Local Computer" Trusted People Store. |
| How to delete "ISSUER TRUST" certificates | Use button "View/manage System Certificate Stores" (on the Page “TLS Server Trusted Store” of the Options Dialog) to start system certificate management console (certmgr.msc). In certmgr right click on "Certificates - Current user" on the tree in the left panel and then select "View/Options..." from the right-click popup menu. Select check mark "Physical certificate stores" from the dialog "View Options" and click "OK" button. Double-click on "Trusted Root Certification Authorities" in the right panel. There will be a choice of "Registry", "Local Computer", "Smart Card" in the right panel. Double Click on "Registry", double click on "Certificates", right-click on the certificate and select "Delete" from the right-click popup menu to delete root certificate from "Current User" Trusted Root Store. Double Click on "Local Computer", double click on "Certificates", right-click on the certificate and select "Delete" from the right-click popup menu to delete root certificate from "Local Computer" Trusted Root Store. |
| How to delete "PEER TRUST" certificates | Use button "View/manage System Certificate Stores" (on the Page “TLS Server Trusted Store” of the Options Dialog) to start system certificate management console (certmgr.msc). In certmgr right click on "Certificates - Current user" on the tree in the left panel and then select "View/Options..." from the right-click popup menu. Select check mark "Physical certificate stores" from the dialog "View Options" and click "OK" button. Double-click on "Trusted People" in the right panel. There will be a choice of "Registry", "Group Policy", "Local Computer" in the right panel. Double Click on "Registry", double click on "Certificates", right-click on the certificate and select "Delete" from the right-click popup menu to delete root certificate from "Current User" Trusted People Store. Double Click on "Local Computer", double click on "Certificates", right-click on the certificate and select "Delete" from the right-click popup menu to delete root certificate from "Local Computer" Trusted People Store. |
| Feature | Implementation/Options |
| Level of the trust | Application level (with dedicated application-specific PFX-Store) |
| Certificate Validation Logic | Uses Proxy32 Built-in certificate validation logic as described in Table 4. |
| Use of Windows System Certificate Stores | No. |
| Use of PFX-file Certificate Store | Yes, mandatory. |
| Support for "ISSUER TRUST" | Yes. Controlled by placing issuer (CA or Root CA) certificate into the PFX store. |
| Support for "PEER TRUST" | Yes. Controlled by placing peer (Client or end) certificate into the PFX store. |
| Option to completely disable "PEER TRUST" without changing the content of system stores | Yes. Indirectly, by removing all peer certificates from PFX store. |
| Option to completely disable "ISSUER TRUST" without changing the content of system stores | Yes. Indirectly, by removing all issuer certificates from PFX store. |
| Option to require BOTH "ISSUER TRUST" and "PEER TRUST" to validate Client Certificate | Yes. |
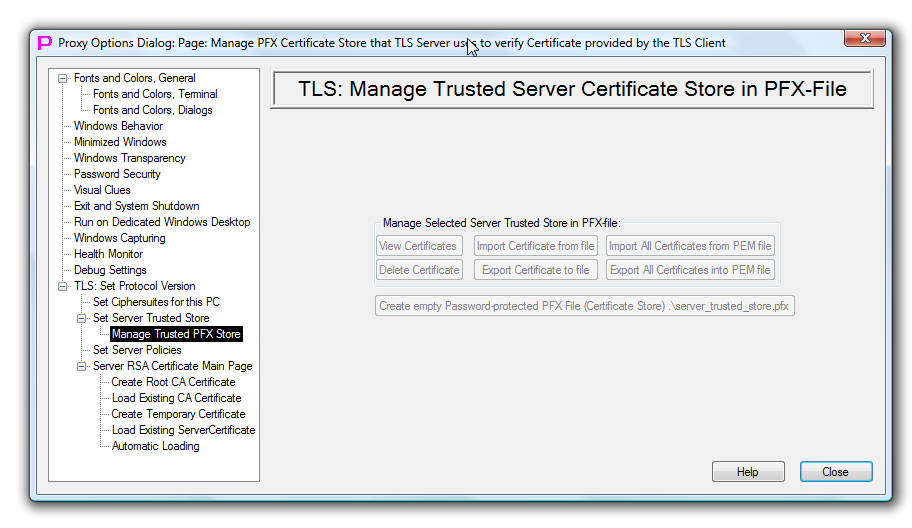
| How to add "ISSUER TRUST" certificates | Use button "View/manage Server Trusted Certificate Store in PFX-File" (on the Page “TLS Server Trusted Store” of the Options Dialog) to switch to the the Page "Manage Trusted Server Certificate Store in PFX-File" of the Options Dialog. On this page use "Import Certificate from file" button to add issuer certificate from file to Trusted Server Certificate Store in PFX-File. |
| How to add "PEER TRUST" certificates | Use button "View/manage Server Trusted Certificate Store in PFX-File" (on the Page “TLS Server Trusted Store” of the Options Dialog) to switch to the the Page "Manage Trusted Server Certificate Store in PFX-File" of the Options Dialog. On this page use "Import Certificate from file" button to add peer (client end) certificate from file to Trusted Server Certificate Store in PFX-File. |
| How to delete "ISSUER TRUST" certificates | Use button "View/manage Server Trusted Certificate Store in PFX-File" (on the Page “TLS Server Trusted Store” of the Options Dialog) to switch to the the Page "Manage Trusted Server Certificate Store in PFX-File" of the Options Dialog. On this page use "Delete Certificate" button to delete issuer certificate from Trusted Server Certificate Store in PFX-File. |
| How to delete "PEER TRUST" certificates | Use button "View/manage Server Trusted Certificate Store in PFX-File" (on the Page “TLS Server Trusted Store” of the Options Dialog) to switch to the the Page "Manage Trusted Server Certificate Store in PFX-File" of the Options Dialog. On this page use "Delete Certificate" button to delete peer (client end) certificate from Trusted Server Certificate Store in PFX-File. |
Picture below shows Options Dialog Page to manage PFX-store. This page activates only when PFX-store is used (on the Page “TLS Server Trusted Store” of the Options Dialog).
linked/Options-dialog-page-TLS-Manage-Trusted-Server-Store-in-PFX-file.png
When Dedicated application-specific PFX-Store is used, Proxy32 implements its own certificate validation logic instead of using Windows built-in certificate chain validation functions. This logic is explained in Table 4 below.
| step # | Description |
| 0. | If all cert checks are ignored, go to SUCCESS |
| 1. | Check time validity of the client Certificate |
| 2. | If time is invalid and no bypass of time check is enabled, then go to FAILURE |
| 3. | Check the Extended key usage extension of the Client Certificate |
| 4. | If Extended key usage is invalid (EKU Extension is present and does not contain Client AUTH in it) and no bypass of usage check is enabled, then go to FAILURE |
| 5. | Check if the Client Certificate is pre-installed in PFX store |
| 6. | If pre-installed (PEER TRUST is valid) and no "BOTH PEER TRUST and ISSUER TRUST are required", then go to SUCCESS |
| 7. | Look for the next issuer (signer) of the client certificate in the PFX store |
| 8. | if no next issuer found, or Client Cert is self-signed, go to FAILURE |
| 9. | Check signature of the issuer on the Client Cert and time validity of the issuer Cert |
| 10. | if signature of the issuer is bad and no bypass is enabled, go to step 7 to look for the next issuer |
| 11. | if time validity of the issuer is bad and no bypass is enabled, go to step 7 to look for the next issuer |
| 12. | ISSUER TRUST is valid. If no "BOTH PEER TRUST and ISSUER TRUST are required", then go to SUCCESS |
| 13. | if "BOTH PEER TRUST and ISSUER TRUST are required" and the Client Certificate is pre-installed in PFX store (result of step 5), then go to SUCCESS |
| 14. | FAILURE/EXIT |
| 15. | SUCCESS/EXIT |
Note: Bypass of various certificate checks can be configured with the fine granularity via "Set TLS Server Policies" page in Options Dialog.
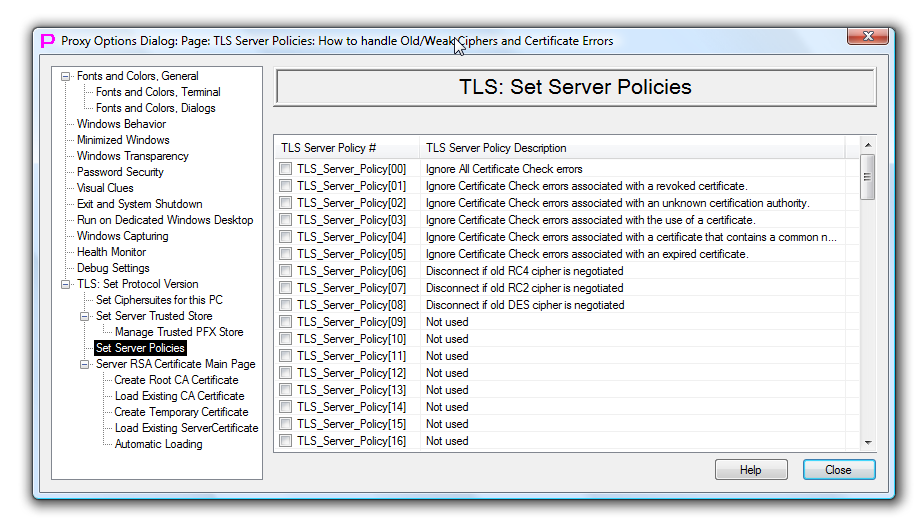
linked/Options-dialog-page-TLS-Set-Server-Policies.png