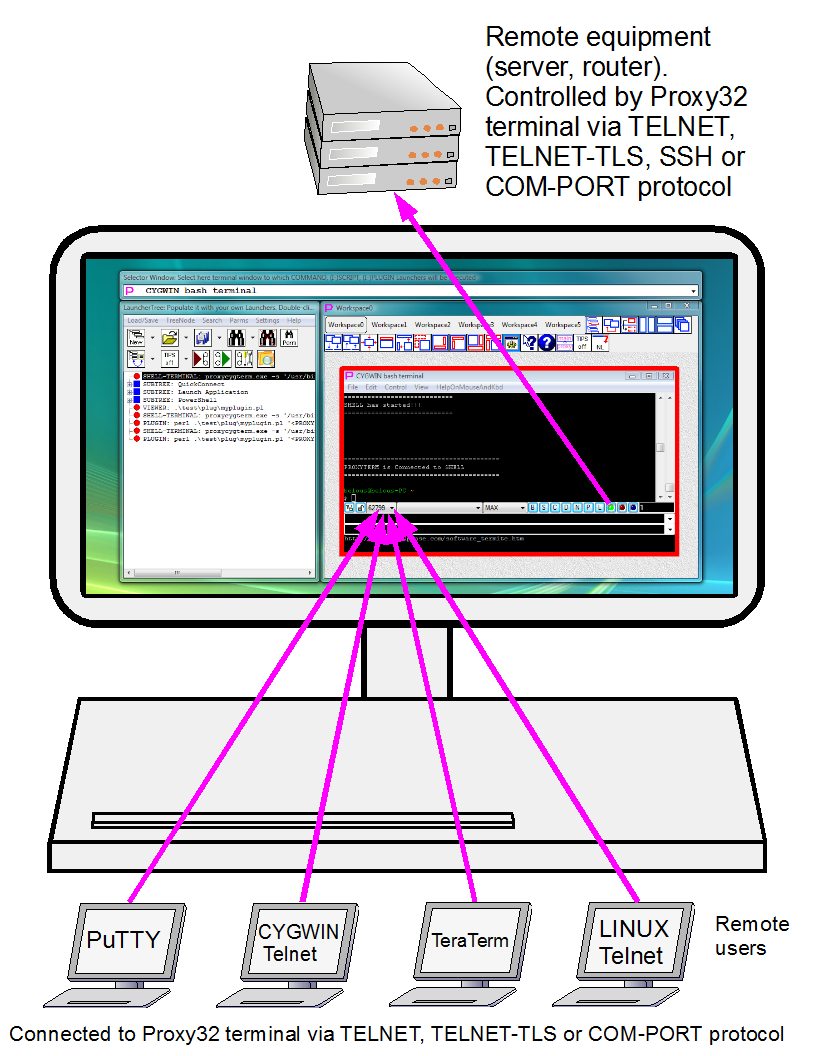
Fig.1. Terminal Session Sharing
1. General information
2. Step-by-step example, two terminals in the same Proxy32 workspace share the same session via TELNET
2.1. Step 1
2.2. Step 2
2.3. Step 3
2.4. Step 4
2.5. Step 5
2.6. Step 6
3. Step-by-step example, two terminals in the same Proxy32 workspace share the same session via TELNET-TLS
3.1. Step 1: Prepare shared terminal session window and turn on TLS for TELNET sharing
3.2. Step 2: Prepare TERMINAL Launcher with information needed to connect to shared terminal session window
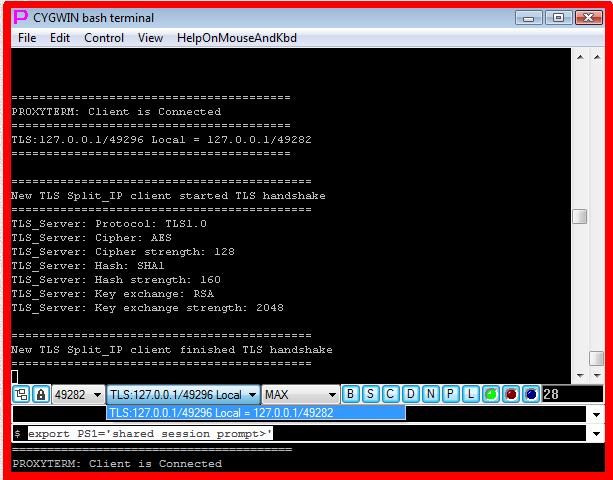
3.3. Step 3: DoubleClick on TELNET-TERMINAL Launcher to connect to shared terminal session window
3.4. Step 4: Typing commands from new terminal window into to shared terminal session window via TLS-telnet connection
3.5. Step 5: Disconnecting new terminal window from shared terminal session window
Often the whole team of people working on different computers and even from different locations should share single terminal session. Shared session means all team is typing on "remotely-shared" keyboard (one at the time) and viewing "remotely-shared" screen with output of remote host (simultaneously). This "shared" Proxy32 terminal session can be login session to remote host or session of local Proxy32 terminal CYGWIN bash shell activities.
Fig.1. Terminal Session Sharing
When such "sharing" may be needed:
Every Proxy32 terminal window has built-in TELNET/TLS server and one "serving/listening" COM-PORT to share existing terminal session with remote users. Remote users connect via TELNET, TELNET/TLS or Serial protocol to Proxy32 terminal to receive copy of the output from remote host and to be able to type commands into shared terminal session. One user at the time can type commands to the remote host (shared session means shared keyboard and shared screen), otherwise remote host will be confused. Local User at the Proxy32 terminal can switch Remote users into "read only" mode when they will receive output from remote host but they cannot type commands to the host.
Create terminal and connect it to remote equipment. This is terminal session that will be shared.
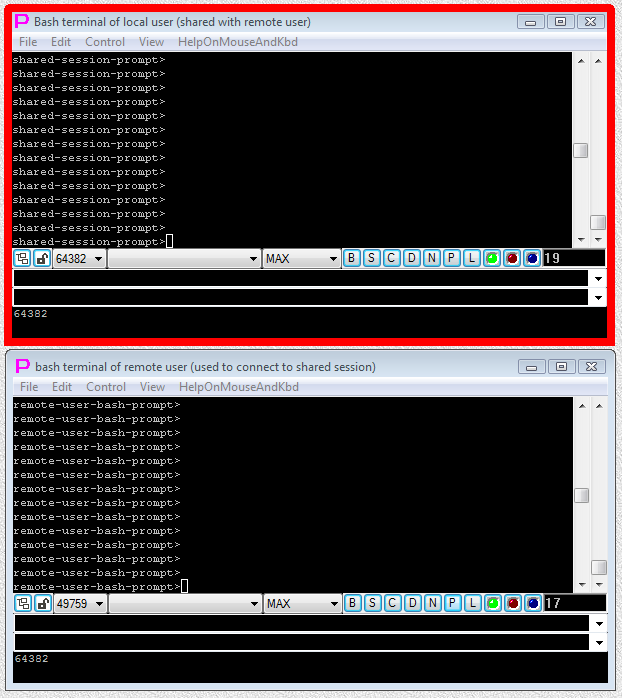
Fig.2 Terminal of the shared session (above) and terminal that will be used to connect to shared session (below) are both ready to use.
Obtain information that remote users will need to connect to the shared session (to the terminal created on Step 1). Shared session owner should open drop-down list (reference 10) in the shared terminal and select desired item in this list.
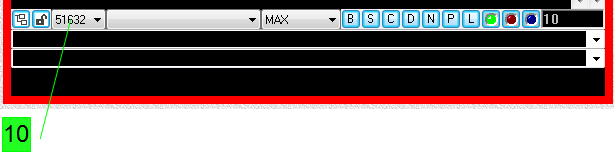
This drop-down list contains information how to connect to this terminal window to share its session
Text of the selected item is copied to clipboard to make it easy to paste it into text message or e-mail and send this info to the remote user who will use this info to connect to the shared session. Content of the list has 3 parts separated by horizontal lines. Upper part contains TCP port number that should be used to connect to the shared session (each shared session - aka terminal window - has its own unique port number). Middle part of the list contains list of the IP addresses which can be used to connect to the shared session. Bottom part of the list contains all possible combinations "protocol/IP-address/port" that can be used to connect to the shared session. Protocol can be either TELNET or TELNET-TLS depending on the state of the button "TLS on/off" (reference 9).
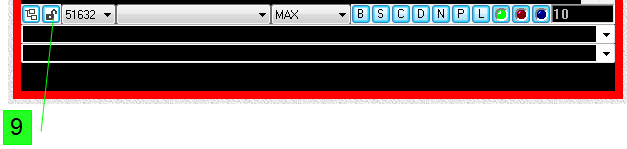
This button toggles TLS mode
List of IP addresses can contain single IP address 127.0.0.1 if option "TSS Server listens only on loopback IP" is turned on in the terminal menu "Control/Sharing Terminal Session with other users/TELNET/TLS SERVER". Drop-down list contains information about different combinations so that owner of the shared session can choose which list element he/she wants to copy to clipboard for sending to remote user. List content is refreshed every time when it is opened. Next time drop-down list is opened, list of IP addresses or protocol may be different if configuration of the terminal or the computer has changed. User also has to make sure that option "TSS Server denies new connections" in terminal menu is not enabled. When TELNET-TLS is used for terminal session sharing, it may be necessary to set parameters for TLS protocol, including selection of the certificate that will be used to authenticate session sharing connection.
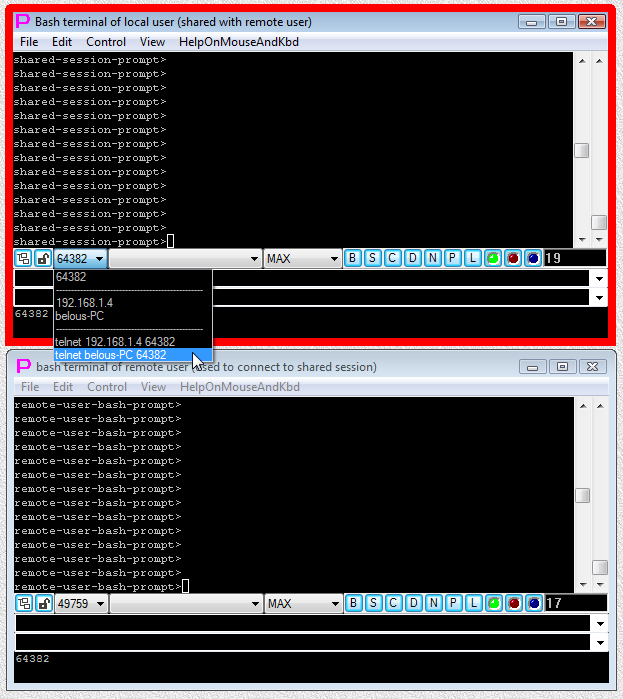
Fig.3 Owner of the shared session copies to clipboard (by selecting it from the drop-down list) line "telnet belous-PC 64382" that is needed for connection to the shared session .
Telnet server in each terminal window is using its own unique TCP port number in order to receive connection requests coming from telnet terminals of the remote users. Therefore, by choosing connection port number remote user can choose to which terminal window of the main user he/she will be connected.
By default, in Proxy32 when the new terminal window is created TCP port number for the built-in telnet server is selected from the list of available ports that is kept in the system. If several windows of the built-in terminal created one by one then TCP port numbers for those windows may happen to be sequential. When window of the built-in terminal is closed, TCP port number that is used by this window is freed and later can be assigned to one of the newly created windows. By default, user doesn’t have control over the port numbers assigned to the newly created terminal windows. When telnet server is located behind the firewall user can choose an option when every newly created window will try to use the same fixed initial port number, for example, 1300. If this port number is available, it will be used and if it is already assigned then window will try to use next port number, 1301. This process will continue by increasing port number by one every time until available port will be found and used. Next created terminal window will use the same algorithm for the port number selection. As a result, all newly created terminal windows will have port numbers in the range 1300 and above assuming that this port range is available in the system. User can turn on and off this port selection algorithm. Also, user can choose initial port number that is set by default to 1300. Those settings are located in the menu “Settings/Initial Terminal Settings/Terminal Session Sharing” in the LauncherTree window. Default value of the initial port number is selected for Windows XP. If Proxy32 is running on the other Windows operational systems initial port number may have to be corrected, so that its value will get into the range of the free ports that are available for use in this particular Windows operational system. If Proxy32 is running behind the firewall port range that is used by the built-in terminal windows (in our example this is the port range starting from 1300 and above) has to be open in the firewall to let remote users connect to the terminal windows.
Remote user connects to shared session using information received from the owner of the shared session. If remote user received from the owner of the shared session line "telnet belous-PC 64382", that is copied from the drop-down list in the shared terminal, then he/she can paste this line into his/her bash terminal and press "Enter" key to connect to shared session. When TELNET-TLS is used for terminal session sharing, it may be necessary to set parameters for TLS protocol, including selection of the certificate that will be used to authenticate session sharing connection.
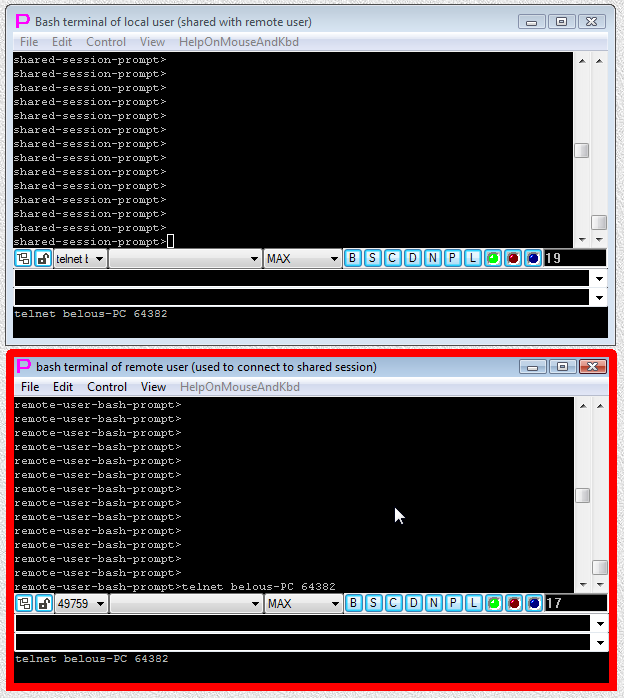
Fig.4 Remote user pastes line "telnet belous-PC 64382", that is needed to connect to the shared session, at the bash prompt ("Enter" key is not yet pressed).
Owner of the shared session is notified when remote user has connected to the shared session. This information appears as the message in the window of the shared terminal. In addition, list of all remote users connected to the shared session is contained in the drop-down list (reference 11) in the lower part of the window of the shared terminal.
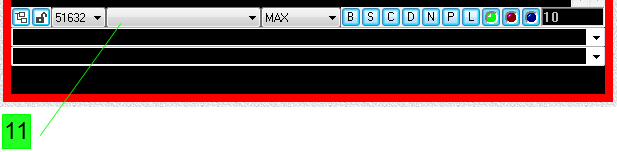
This drop-down list conains list of remote users with whom this terminal session is shared

Fig.5. By pressing "Enter" key remote user has connected to shared session and owner of the shared session is notified when remote user has connected to the shared session.
Owner of the shared session and remote user connected to the shared session can type commands in turn into the shared session. Command execution results are printed simultaneously into both terminals.
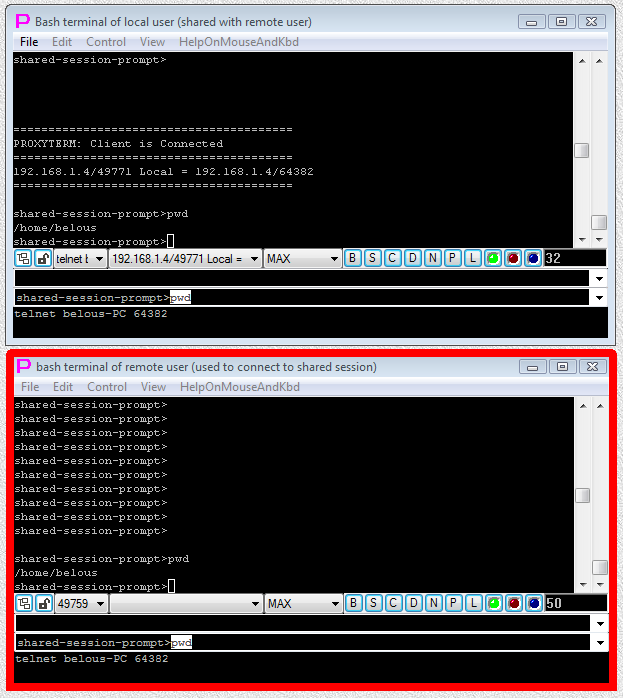
Fig.6. Owner of the shared session or remote user connected to the shared session has typed "pwd" command at the prompt of the shared session and received printout of command execution results into both terminals.
Remote user disconnects from the shared session by disconnecting his/her terminal (for example, by pressing "Ctrl-]", and then typing "quit" at the "telnet>" prompt). Owner of the shared session is notified when remote user has disconnected from the shared session. This information appears as the message in the window of the shared terminal. In addition, list of all remote users connected to the shared session is contained in the drop-down list (reference 11) in the lower part of the window of the shared terminal. Owner of the shared session can disconnect remote user (or prevent him/her from typing into shared session) by using commands in the terminal menu.
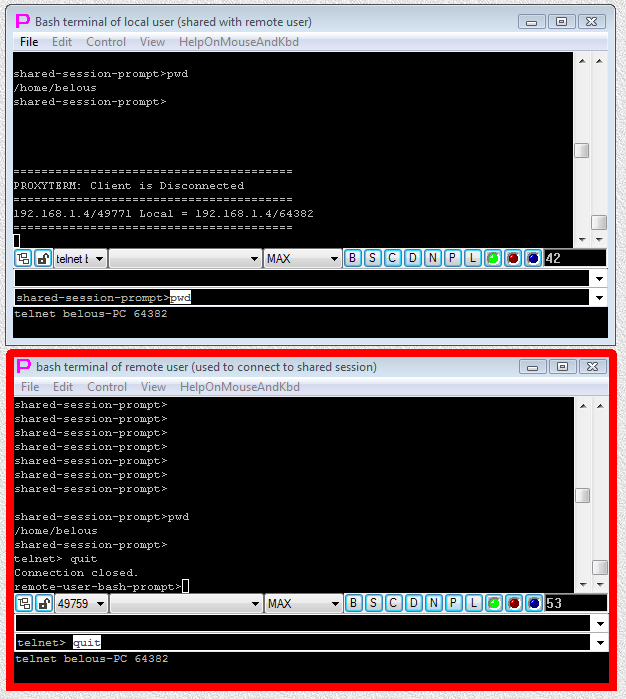
Fig.7. Remote user has disconnected telnet link from shared session and owner of the shared session is notified when remote user has disconnected from the shared session.
proxycygterm.exe -s '/usr/bin/bash -i -l'). This is terminal session (terminal window) that will be shared.shared session prompt>) to identify shared terminal session easier (in our case we are sharing local CYGWIN bash shell session, so we can change shell prompt). Our goal is to be able to type to this prompt from another terminal window that is connected to shared terminal window via TELNET-TLS connection.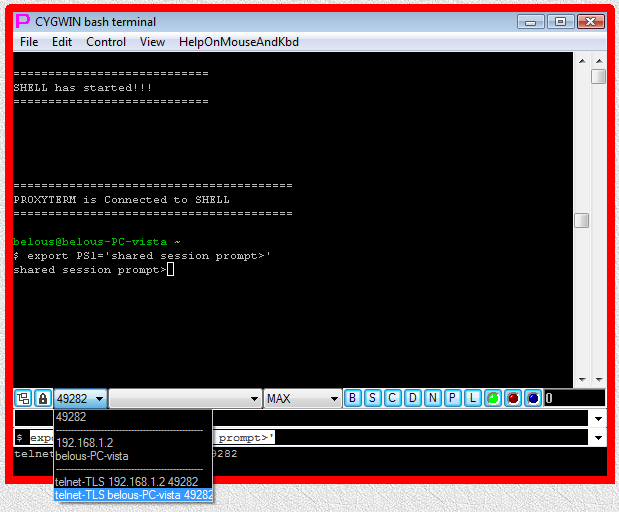
Add Launcher to the Tree/Add TELNET-TERMINAL Launcher from the RightClick popup menu. You will see TELNET-TERMINAL Launcher Edit dialog window.127.0.0.1, port = 49282 and select check mark Use TLS+TelnetOK button to close TELNET-TERMINAL Launcher Edit dialog window and create TELNET-TERMINAL Launcher.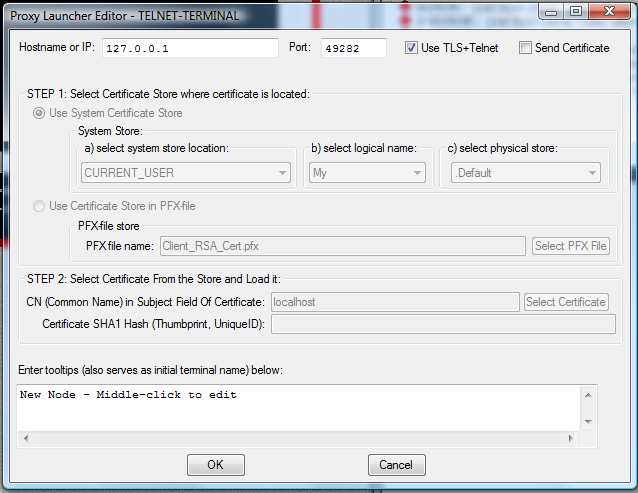
TELNET-TERMINAL Launcher Edit dialog window - populated according to our requirements

TELNET-TERMINAL Launcher that was created (appended at the bottom of LauncherTree) after closing TELNET-TERMINAL Launcher Edit dialog window
========================================
PROXYTERM: Client is Connected
========================================
TLS:127.0.0.1/49296 Local = 127.0.0.1/49282
========================================

===========================================
New TLS Split_IP client started TLS handshake
===========================================
TLS_Server: Protocol: TLS1.0
TLS_Server: Cipher: AES
TLS_Server: Cipher strength: 128
TLS_Server: Hash: SHA1
TLS_Server: Hash strength: 160
TLS_Server: Key exchange: RSA
TLS_Server: Key exchange strength: 2048

===========================================
New TLS Split_IP client finished TLS handshake
===========================================

New Terminal window (on the bottom) is connected to shared session (on the top) via TLS-Telnet handshake after DoubleClick on TELNET-TERMINAL Launcher
Information about new TLS-Telnet client is added to drop-down list in shared terminal window
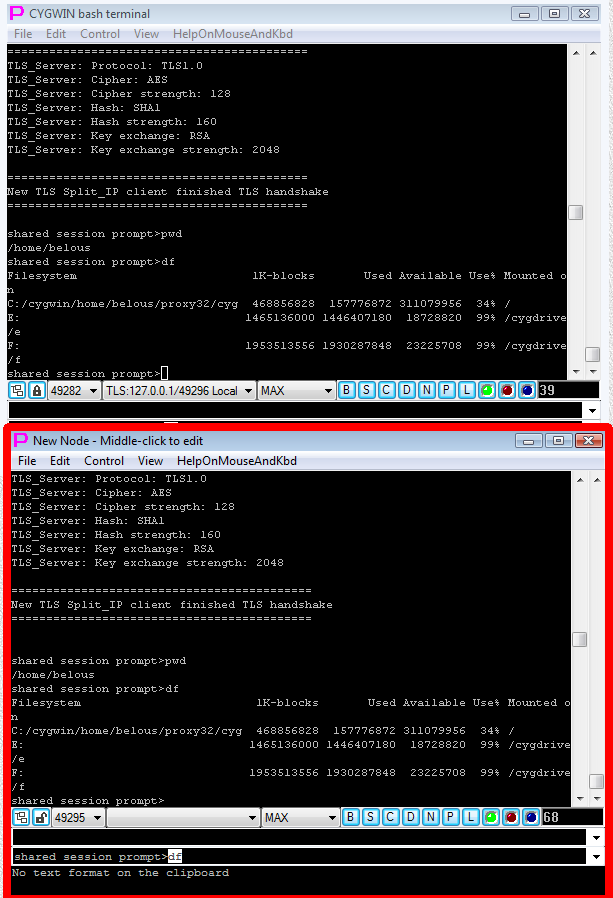
Typing commands from new terminal window into to shared terminal session window via TLS-telnet connection
===========================================
Shutting down TLS encrypted pipe from our TLS_Server side
===========================================


========================================
PROXYTERM: Client is Disconnected
========================================
TLS:127.0.0.1/49296 Local = 127.0.0.1/49282
========================================
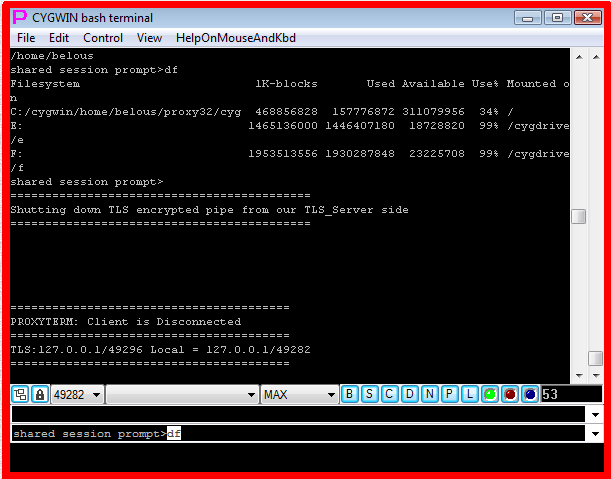
Report in shared window after client (bottom window) was disconnected by closing its window
Control/Sharing Terminal Session with other users/TELNET/TLS SERVER/Disconnect all clients or Control/Sharing Terminal Session with other users/TELNET/TLS SERVER/Disconnect selected client from terminal menu. Second option disconnects client selected in the drop-down list of connected clients. Such client can aslo be put in read-only mode (cannot type but will see terminal output) by selecting Control/Sharing Terminal Session with other users/TELNET/TLS SERVER/Flip ReadOnly mode for selected client from terminal menu.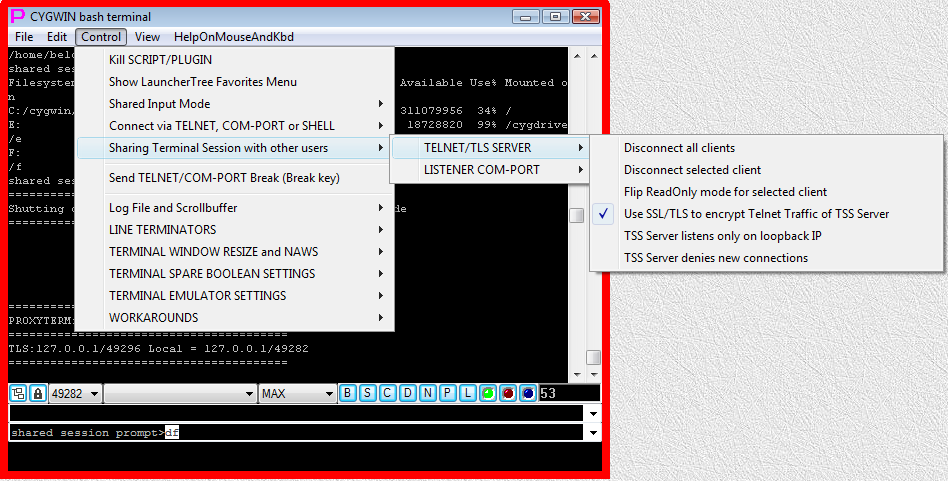
Terminal menu commands that can be used in sharing window to disconnect clients connected to sharing window
1. General information
2. Step-by-step example, two terminals in the same Proxy32 workspace share the same session via TELNET
2.1. Step 1
2.2. Step 2
2.3. Step 3
2.4. Step 4
2.5. Step 5
2.6. Step 6
3. Step-by-step example, two terminals in the same Proxy32 workspace share the same session via TELNET-TLS
3.1. Step 1: Prepare shared terminal session window and turn on TLS for TELNET sharing
3.2. Step 2: Prepare TERMINAL Launcher with information needed to connect to shared terminal session window
3.3. Step 3: DoubleClick on TELNET-TERMINAL Launcher to connect to shared terminal session window
3.4. Step 4: Typing commands from new terminal window into to shared terminal session window via TLS-telnet connection
3.5. Step 5: Disconnecting new terminal window from shared terminal session window