 to open popup menu and then selecting
 Options Dialog in the popup menu (fig.1).How to invoke Options Dialog
How to Reset all or some Settings to their Default Values
Font and Colors, General
Font and Colors, Terminal
Font and Colors, Dialogs
Windows Behavior
Minimized Windows
Windows Transparency
Password Security
Visual Clues
Exit and System Shutdown
Run on Dedicated Windows Desktop
Windows capturing
Health Monitor
Debug Settings
TLS Set Protocol Version
TLS Set CipherSuites for this PC
TLS Set Server Trusted Certificate Store
TLS Manage Server Trusted Certificate Store in PFX file
TLS Set Server Policies
TLS Server RSA Certificate Main Page
TLS Create Root CA Certificate and place it to the Store
TLS Load Root CA Certificate
TLS Create and Sign Temporary Server RSA Certificate
TLS Load Server RSA Certificate
TLS Configure Automatic Certificate Loading and Preparation
Options Dialog is called from the Menubar of the Main Window by pressing the button to open popup menu and then selecting Options Dialog in the popup menu (fig.1).
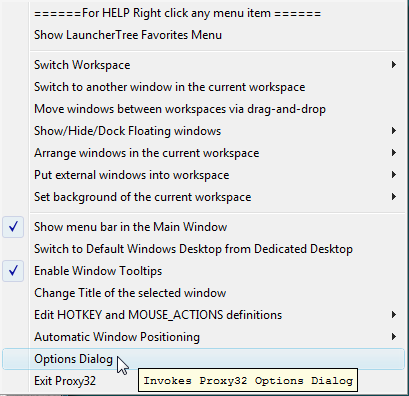
Fig.1 Invoking Options Dialog
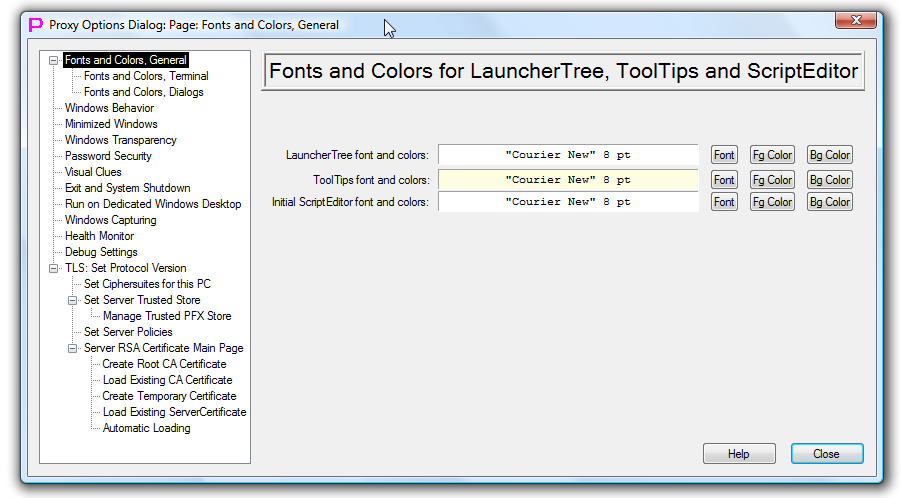
Fig.2 Options Dialog
To reset all Proxy32 settings to built-in default values, one should shut down proxy32, then delete file Settings.xml in the start-up directory of proxy32 application. If this file is missing, proxy32 will use built-in default values for all configuration settings. This file will be re-created on the exit of proxy32 and will contain built-in defaults.
To reset some individual group of Proxy32 settings to built-in default values, one should shut down proxy32, then use text editor to delete questionable group of settings from the file Settings.xml in the start-up directory of proxy32 application. This file will be re-read on the next start of proxy32 and proxy32 will use built-in defaults for selected group of settings that is missing in the file. Later this file will be saved with built-in default values for the missing group of settings.
Font and Colors, General
This dialog page allows to set font and colors for LauncherTree Window, ToolTips floating window and ScriptEditor window. One can also preview how selected font and colors will look. Changes will be applied immediately.
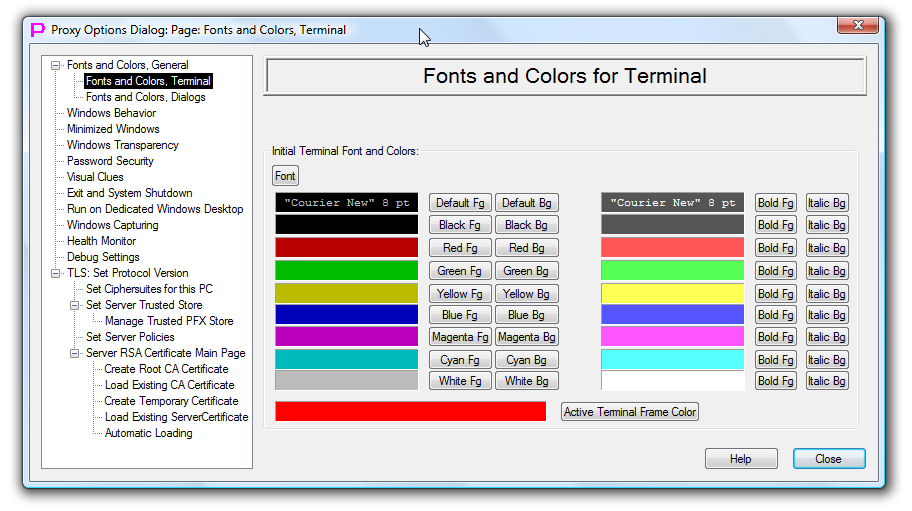
Font and Colors, Terminal
This dialog page allows to set Initial Terminal Font and Colors and also Active Terminal Frame color.
Terminal uses only one monospace (fixed width) font. It can be selected via first button.
In Monochrome mode terminal can use 4 colors: Default foreground, Default background, Default Bold Foreground and Default Italic Background. None of those four colors should be the same, otherwise Bold/Italic/Inversion character attributes will not be distinguishable, or, worse, text will become invisible. Those four colors can be selected with the first row of buttons. There is also terminal font preview in the first row.
For each of the 8 ANSI colors (Black, Red, Green, Yellow, Blue, Magenta, Cyan, White) one can select 4 different variations. For example, 4 red variations can be used: Red foreground, Red background, Red Bold Foreground and Red Italic Background. If all 4 variations are set to be different, then Bold/Italic/Inversion character attributes will still be distinguishable in color mode. If this is not required, all 4 variations for each color can be made the same.
Active Terminal is the one that will receive execution of automation launchers (COMMAND, SCRIPT/I-SCRIPT/PLUGIN/I-PLUGIN) from LauncherTree. Active Terminal is highlighted by red frame by default. Color of the frame can be changed on this page.
One can also preview how selected font and colors will look. Changes will be applied immediately.
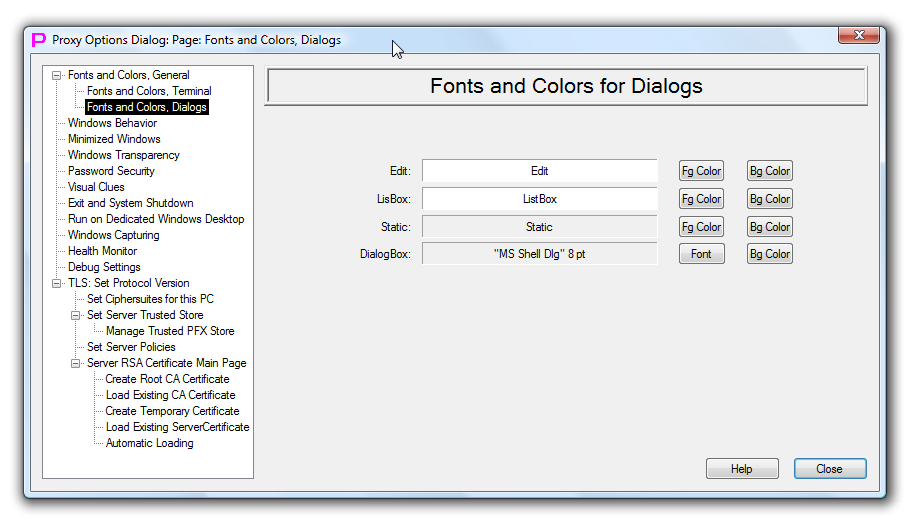
Font and Colors, Dialogs
This page allows to change font and some colors for all built-in dialog boxes in Proxy32. One important case is when dialogs look too small on the screen and user wants to increase dialog font from default 8pt to, say, 16pt. This will double the size of all built-in dialogs as dialogs are automatically scaled to match selected font.
After Dialog font/color modification Options Dialog itself will not be displayed correctly. It has to be closed and re-opened to reflect the changes correctly.
One can also preview how selected font and colors will look. Changes will be applied immediately.
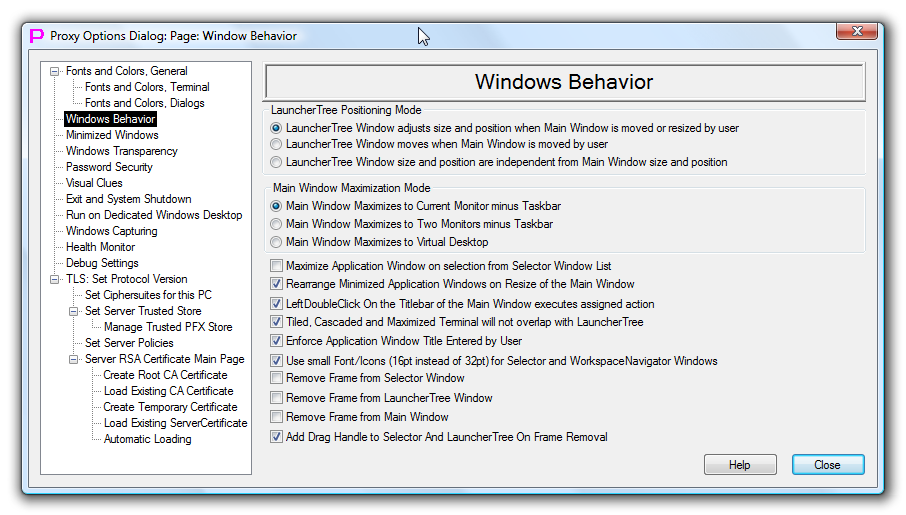
Windows Behavior
This dialog page allows user to customize some aspects of proxy32 windows behavior.
First group of the 3 radio buttons will select how satellite floating windows will behave when main window is moved or re-sized. The radio button names refer to the LauncherTree Window but this setting will affect both LauncherTree window and Selector Window, because they are working together and considered to be one single unit (Floating Windows). There are three possible settings: - Floating windows move with main window and resize to match size of the main window - Floating windows move with the top-left corner of the main window, but do not resize to match size of the main window - Size and Position of Floating windows are independent from Size and Position of the Main window.
Next chekmark tries to change maximization behavior for the main window. Normally, on maximization main window would expand to cover all primary monitor minus space that is occupied by Windows Explorer TaskBar. If this Checkmark is selected, main window will try to span two monitors on maximization. Space that is occupied by Windows Explorer TaskBar is still preserved, which can in some monitor configurations prevent this option from working. Also, monitors should have common side as long as possible, to maximize spanned main window size. This function is only tested with two monitors. Behavior of the function on the system with more than two monitors is not defined. By default this function is off. Regardless of the state of this checkmark, user can always manually span NON-MAXIMIZED main window over any number of monitors.
Next checkmark changes behavior of the terminal window (this also applies to the windows of external processes that are located inside of the workspace) when it is selected from the windows list in Floating Selector Window. Normally, on selection terminal window goes to foreground and becomes active but does not maximize. If this checkmark is selected, terminal window will also maximize inside of the workspace. By default this function is off. Regardless of the state of this checkmark, user can always manually maximize any window inside of the workspace.
Next checkmark changes the behavior of minimized windows inside of the workspace, when workspace is re-sized. Normally, minimized windows are automatically laid out along the bottom of the workspace window. If workspace window changes its size, then minimized windows will not move (relatively to top-left corner of the workspace) and can end up in the invisible area of the workspace. If this checkmark is selected, minimized windows will be automatically rearranged on every re-size of the main window, so they will never end up in the invisible part of the workspace. This function is on by default.
Next checkmark changes the default behavior when user double-clicks on the titlebar of the main window. Normally double-click on the titlebar of any window would switch between maximized and normal state of the window. If this checkmark is selected, double-click on the titlebar of the main window will instead show/hide floating windows. This function is on by default. When background of the main window is filled with terminal window(s), only the title of the main window is available for double-click to control visibility of the floating windows. On the other hand the old function of the double-click (Maximize/Restore) is still available via Maximize/Restore button on the titlebar of the main window.
Next checkmark controls how Tile/Cascade/Maximize of the terminal windows is done inside of the workspace. When floating windows are visible, they will be always in front of the main window when they overlap with the main window. That would obstruct the view of some areas inside of the workspace. When terminal windows are positioned inside of the workspace using Tile/Cascade/Maximize, they may be partially obstructed by the floating windows. If this checkmark is selected, Tile/Cascade/Maximize will position terminal windows inside of the workspace in such a way that they will not use parts of the workspace that are obstructed by floating windows. This function is on by default.
Next checkmark controls the size of the font in the selector window and in Workspace Navigator Window. As those windows show application window icons and application window titles, there are two choices (16pt and 32pt) that are matching standard application ICON sizes. When switching the font size, the size of the displayed application icons is also changing. User can pick the size that looks better depending on monitor size and resolution. This function is on by default (smaller font/icon - 16pt - is selected).
Next checkmark controls whether application windows inside of the workspace are allowed to change title of their own window. Normally, applications are allowed to change the title of their own window to reflect activity in the window and to help user to better identify the window. For example, PuTTY terminal can change its window title on command from the remote equipment. When user creates Launcher (LAUNCH/VIEWER) to start external application (for example, PuTTY) that will create window inside of the workspace, and original title of the window is taken from the Launcher ToolTip field. This title of the window is given by the user and is expected to stay the same to help user to identify the window by its original title. Later user can manually change the title of the window using button in the menubar of the workspace. If this checkmark is selected, external processes are not allowed to change their window title from the original title that was given by the user (via launcher tooltip field or via menubar button command). This function is on by default. It does not apply to the proxy32 built-in terminal. Whether or not the title of built-in terminal can be changed on the command from the remote equipment is controlled from the terminal's own settings.
Changes will be applied immediately.
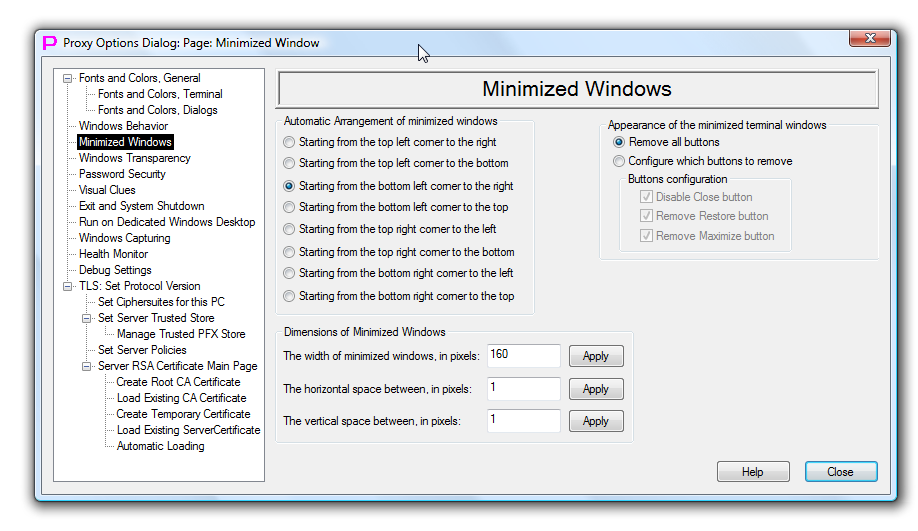
Minimized Windows
This dialog page allows user to customize auto-arrangement, size and appearance of the minimized windows.
Eight radio buttons in the top left corner of the page allows to choose the side of the main window along which the minimized windows will be automatically stacked. They also allow to choose the direction of the stacking.
Three text input windows in the left bottom corner allows to change width of the minimized window and the space between minimized windows when they stacked automatically.
Above settings are system-wide, but they would not normally matter on Windows Desktop as they are masked because of the Windows Explorer running. If you are running proxy32 on the Dedicated Windows Desktop without running copy of Windows Explorer on this Desktop, you would notice that selected behavior applies not only to the minimization inside of the workspace window but also to minimization of any window on the Dedicated Desktop.
Last group of setting in the top right corner of the page applies only to the window of the proxy32 built-in terminal. This group of settings controls which buttons will be shown on the minimized window of the built-in terminal.
Changes will be applied immediately (except for the few settings that have their own Apply button).
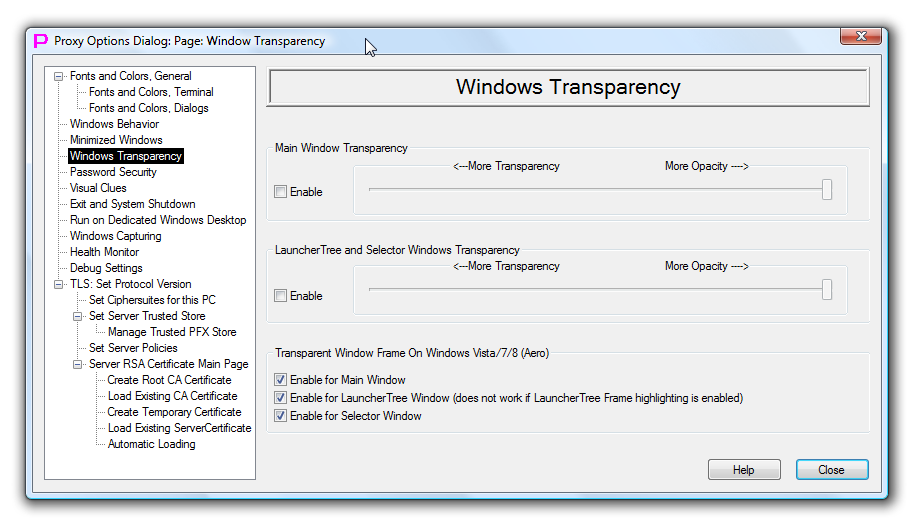
Windows Transparency
This dialog page controls transparency for the main window and for the floating windows.
First slider controls transparency for the main window, which also includes transparency of all windows inside of the workspace. Second slider controls transparency of Floating windows (LauncherTree and Selector Windows). By default, transparency is disabled.
Last group of settings controls whether to allow the window to use glass frame (Aero Theme) which is enabled by default on Windows Vista/7/8. The settings are separate for the Main Window and for the LauncherTree Window. Disabling glass frame works right away (after impacted window was hidden or minimized). After enabling glass frame back, proxy32 should be restarted for the new setting to take effect. By default, glass frame is enabled. This setting does not apply to Windows XP.
Changes will be applied immediately.
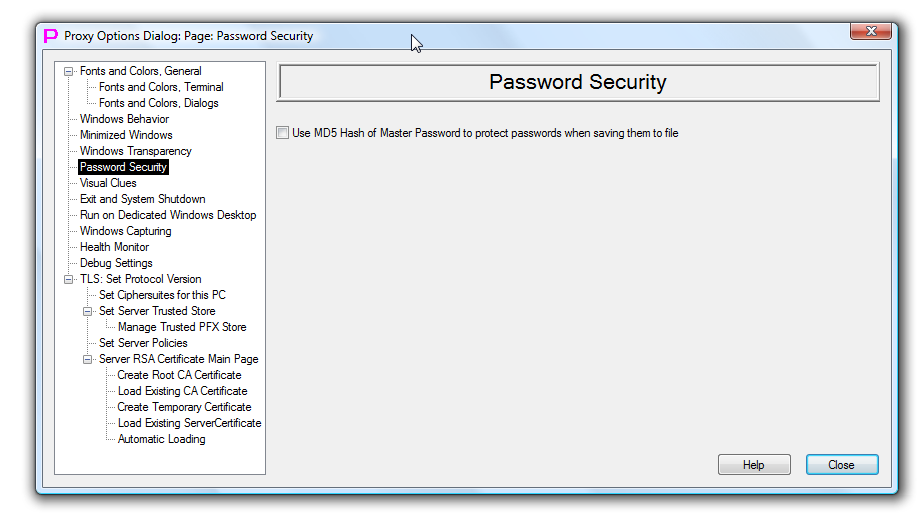
Password Security
This page controls how the substitution values of the named passwords will be encrypted when they are saved to disk.
By default, substitution values of the named passwords are hashed with constant string when they are saved to disk. While this prevent anyone from reading password values from the text file, it does not prevent attacker from loading stolen password file into his own copy of proxy32 to gain access to password values. As one can see this way legitimate user does not need to worry about password encryption, but the security of this method is not very high.
If one need better protection for the substitution values of the named passwords, one can select the checkmark on this dialog page. In this case user will be requested to supply MASTER password once per proxy32 session. MASTER password is requested from the user either on enabling this option or on the start of the proxy32 when password file has to be loaded from disk. MASTER password is not saved to the disk but its md5 hash is stored in memory and used to garble the substitution values of the named passwords when they are saved to disk.
Of course, no protection is strong enough for all cases. If some substitution values of the named passwords are too important, do not save them to disk at all (uncheck Save on Exit checkmark in the named password config) and enter them manually only when they are requested via parameter input dialog on the Launcher execution. Beware, that even in this case passwords can still be stolen from proxy32 process memory, for example, by crashing proxy32 and stealing the memory dump created on the crash.
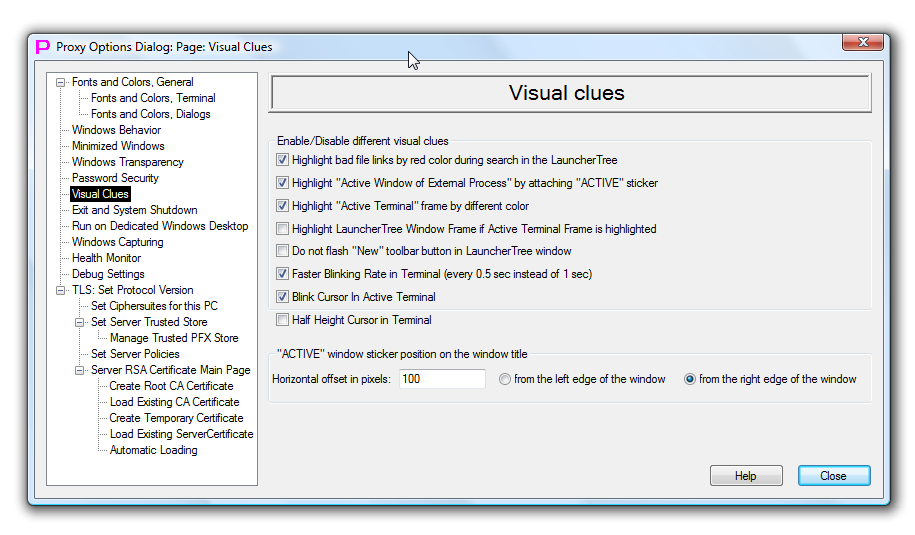
Visual Clues
This page controls whether different visual clues are enabled in the proxy32 user interface.
First checkmark changes behavior of the search through the launchers on the LauncherTree. Normally, when searching through the Launchers on the LauncherTree, user supplies search pattern and proxy32 will highlight matching launchers with the blue color and open nested SUBTREE nodes as needed to make sure that pattern-matching launchers are visible. During such search, text files linked to certain launchers (SCRIPT/I-SCRIPT/VIEWER) are also searched for match (line by line). If the file is referred to in the launcher but is not found on the disk, then file link is broken and such file cannot be searched. If this checkmark is selected, then Launchers with the broken file link will also be highlighted but with the red color - to indicate the problem. This function is on by default.
Next checkmark controls whether Active Window of external process (the one that will receive execution of automation launchers - COMMAND Launchers) is highlighted inside of the workspace by adding red sticker with the word ACTIVE at the titlebar of such window. This function is on by default. The color of the ACTIVE sticker is taken from the setting of Active Terminal Frame Color on Initial Terminal Font and Colors page of Options Dialog.
Next checkmark controls whether Active Terminal Window (the one that will receive execution of automation launchers - COMMAND/SCRIPT/I-SCRIPT/PLUGIN/I-PLUGIN Launchers) is highlighted inside of the workspace by adding red frame around such window. This function is on by default. The color of the frame is taken from the setting of Active Terminal Frame Color on Initial Terminal Font and Colors page of Options Dialog.
Next checkmark controls whether LauncherTree Window should also be highlighted by red frame to match frame and color with Active Terminal window to further emphasize their logical association. This function is off by default. When this function is on, it will disable glass frame of the LauncherTree window on Windows Vista+.
Next checkmark controls whether the most important button on the toolbar of the LauncherTree Window (New button that allows guided creation of the complex launchers) should flash with the green color to draw attention of the user. This function is on by default.
Next checkmark controls speed of the blinking in the terminal. It applies both to the text with Blinking attribute and to cursor in the active terminal). If this checkmark is selected, then blinking is twice faster (every 0.5 sec instead of every 1 sec). This function is on by default.
Next checkmark controls whether the cursor in active terminal should blink or not. If this checkmark is selected, then active terminal cursor is blinking. This function is on by default.
Next checkmark controls whether the cursor in the terminal should be full size or half size of the character cell. If this checkmark is selected, then terminal cursor is half-size. This function is off by default.
Last group of settings controls position of the red ACTIVE sticker on the titlebar of the active window of external process inside of the workspace. One can set the value of offset in pixels and from which edge of the window (right or left) this offset should be counted. Default offset is 100 pixels and it is counted from the right edge of the window.
Changes will be applied immediately.
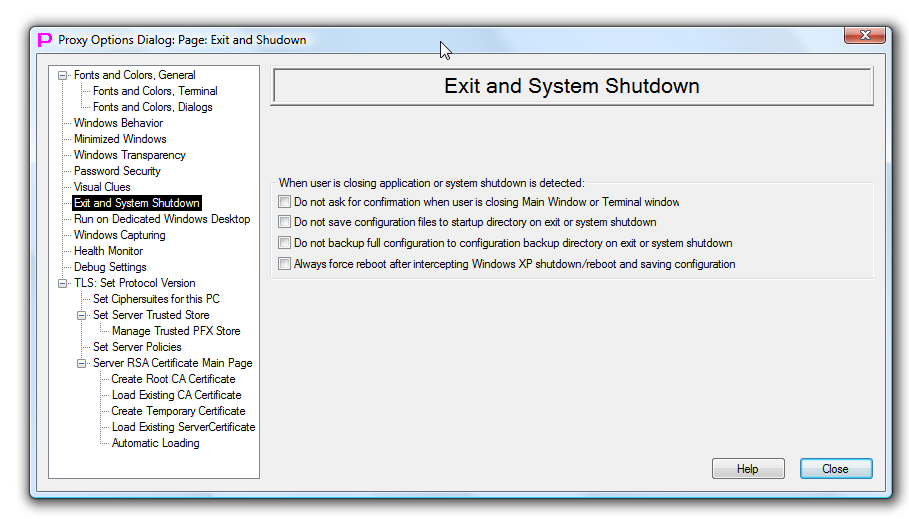
Exit and System Shutdown
This page controls behavior of the proxy32 application during exit and system shutdown.
First checkmark controls whether proxy32 will ask user for confirmation when user has requested to close window of built-in terminal or the main window. If this checkmark is selected, user will receive dialog asking to confirm closure of the window. This function is on by default.
Next checkmark controls whether proxy32 configuration (LauncherTree, Named substitution parameters and passwords, proxy32 settings etc) will be saved to startup directory on exit of proxy32 or on operating system shutdown/restart. If this checkmark is selected, configuration is saved automatically on exit or shutdown. This function is on by default. If this option is off user will have to manually save configuration after it was changed. To manually save configuration use Save button  on the toolbar of the LauncherTree.
Next checkmark controls whether proxy32 configuration (LauncherTree, Named substitution parameters and passwords, proxy32 settings etc) will be backed up to configuration backup directory on exit of proxy32 or on operating system shutdown/restart. If this checkmark is selected, configuration is backed up automatically on exit or shutdown. This function is on by default. Location of configuration backup directory is defined during the initial proxy32 installation and defaults to cfg directory inside of proxy32 startup directory. Proxy32 loads its configuration from the startup directory on the start. If startup configuration is corrupted for some reason, user can load one of the previous configurations that are stored in the configuration backup directory. Backup configuration also saves current copies of local files that are linked to the VIEWER/SCRIPT/I-SCRIPT launchers. To load previous configuration manually, use Import Full Config from Selected Directory command in the drop-down-arrow menu of the Load button  on the toolbar of the LauncherTree. Alternatively, only selected parts of the configuration (LauncherTree, Named substitution parameters and passwords) may be reloaded from the
 configuration backup directory using individual commands from the drop-down-arrow menu of the Load button. Note, that when loading older version of LauncherTree from the configuration backup directory all local files that are linked to the VIEWER/SCRIPT/I-SCRIPT launchers will be overwritten by their older versions that are taken from the configuration backup directory.
Next checkmark controls proxy32 reboot/shutdown detection mode for Windows XP. On Windows XP, proxy32 has to intercept system reboot/shutdown to save its configuration and then re-initiate reboot/shutdown again to complete system action that user has requested. Windows XP does not provide any official way for proxy32 to distinguish between reboot and system shutdown, so proxy32 uses last information that is recorded by Windows Explorer in the registry settings. This best effort detection is not reliable, so if user connected to Windows XP computer remotely, if is safer to avoid complete shutdown and treat both reboot and shutdown as reboot. If this checkmark is selected, on Windows XP after intercepting operating system reboot or shutdown and after saving configuration, proxy32 will always initiate system reboot. This function is on by default. Please, note, that when this option is enabled user has to first exit Proxy32 manually if shutdown and not reboot of Windows XP computer is required.
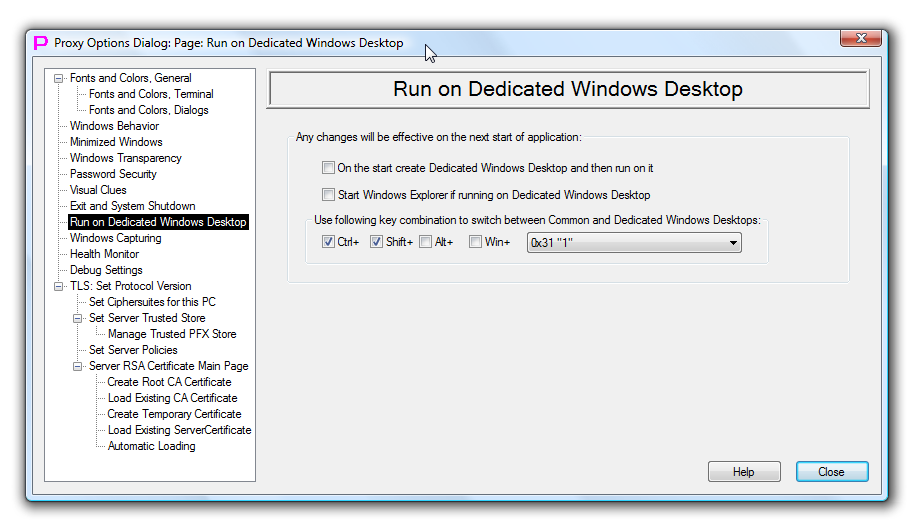
Run on Dedicated Windows Desktop
This page controls execution of Proxy32 on Dedicated Windows Desktop.
First checkmark controls if next time Proxy32 should be started on the Dedicated Windows Desktop. Normally, proxy32 starts on the Common Windows Desktop (where all the other Windows Applications are running). If this checkmark is selected (and configuration changes are saved to disk), on the next start proxy32 will create Dedicated Windows Desktop and run on it. This function is off by default.
Next checkmark controls whether Proxy32 should start another copy of Windows Explorer (on Dedicated Windows Desktop) when running on Dedicated Windows Desktop. Windows Explorer provides Windows Start button and Start menu, Windows Taskbar and Status Bar. If this checkmark is selected after creating Dedicated Windows Desktop proxy32 will start another copy of Windows Explorer on it to create Windows Start button and Start menu, Windows Taskbar and Status Bar for this Dedicated Windows Desktop. This function is off by default. Please, note, that on exit of Proxy32 Dedicated Windows Desktop cannot be deleted if it has some processes still running on it. If one wants Dedicated Windows Desktop to be deleted on exit from Proxy32, one has to manually kill copy of Windows Explorer, running on Dedicated Windows Desktop before exiting from Proxy32.
Last Setting controls keyboard shortcut that is used to switch between Common and Dedicated Windows Desktops. Default shortcut is Ctrl-Shift-1.
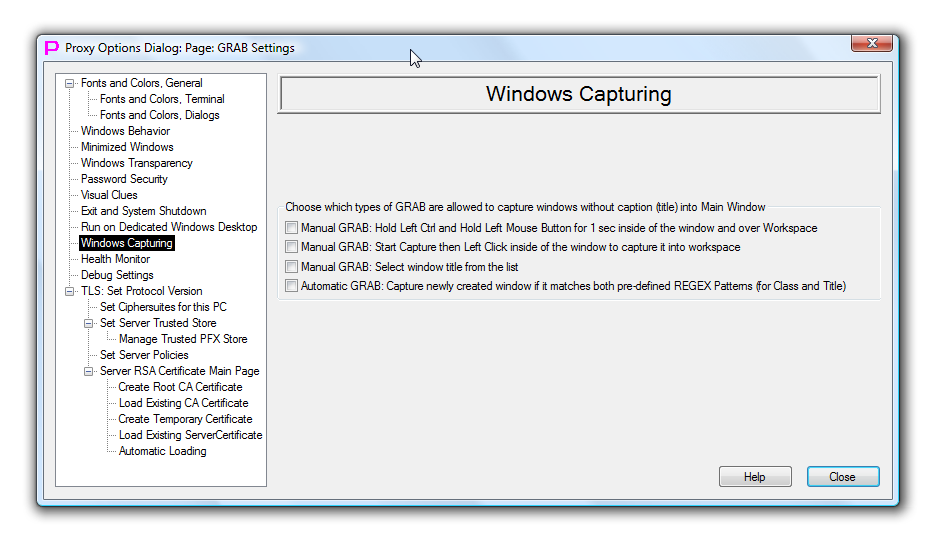
Windows capturing
This page controls how Windows of external processes that does not have caption/titlebar will be captured inside of the workspace.
There are 4 methods to capture existing window of external process into proxy32 workspace. All of them by default do not allow to capture window that does not have titlebar. This default behavior can be changed individually for each of the 4 capture methods. Therefore, this page contains 4 checkmarks.
First checkmark controls if windows without titlebar are allowed to be captured via Hold-LeftCtrl-and-Hold-Left-Button-for-1-second Manual GRAB. Normally, user have to simultaneously hold left Ctrl key and left mouse button for one second to capture window of external process into the workspace. During this holding mouse pointer should be positioned on the title of the window to be captured and at the same time it should be located over the internal space of the workspace window. When all those conditions are true, window of external process will be captured into workspace (if it is not in the workspace) or released (if it is already in the workspace). Requirement to hold mouse pointer on the window title does not allow to capture window that does not have a title. If this checkmark is selected, mouse pointer can be held on any part of the window that is being captured, thus allowing to capture windows that do not have title. This function is off by default.
Next checkmark controls if windows without titlebar are allowed to be captured via Start-Capture-then-click-on-the-Window-Title Manual GRAB. Normally, user have to Start the Windows capture process by selecting command from Workspace Popup menu, then left click on the title of the window of the external process to capture this window into workspace. Requirement to do left-click on the window title does not allow to capture window that does not have a title. If this checkmark is selected, left-click can be done on any part of the window that is being captured, thus allowing to capture windows that do not have title. This function is off by default.
Next checkmark controls if windows without titlebar are allowed to be captured via Select-From-the-list-of-Windows Manual GRAB. Normally, user have to Start the Windows capture process by selecting command from Workspace Popup menu, then select from the list the name of the window of the external process to capture this window into workspace. The list will show only the windows that have window title. That does not allow to capture window that does not have a title. If this checkmark is selected, even the windows that do not have a titlebar will be shown in the selection list, thus allowing to capture windows that do not have title. This function is off by default.
Next checkmark controls if windows without titlebar are allowed to be captured via Automatic GRAB. Normally, windows without titlebar are not captured by Automatic GRAB. If this checkmark is selected, even the windows that do not have a titlebar will be checked for match and captured on match, thus allowing to capture windows that do not have title. This function is off by default.
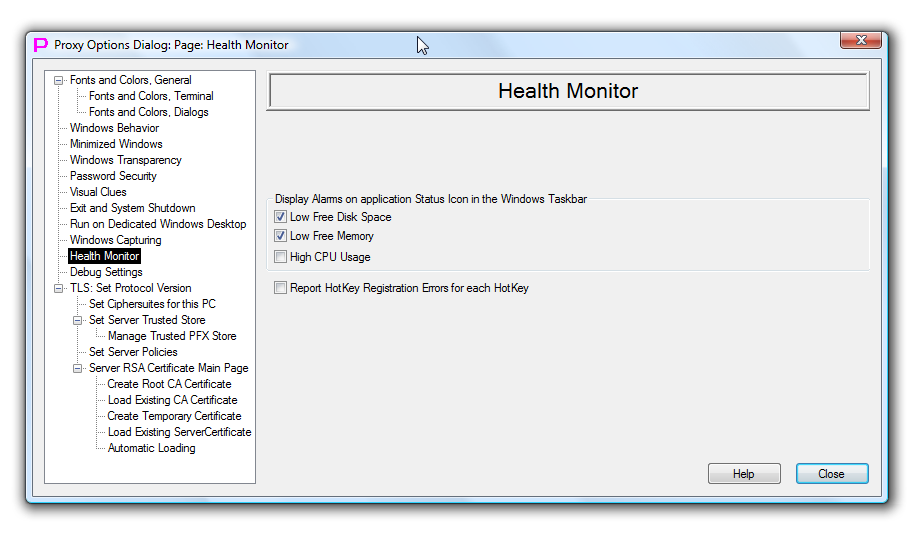
Health Monitor
This page controls how proxy32 reports health of the system.
First checkmark controls whether proxy32 generates alarm when system is low on disk space. If this checkmark is selected, proxy32 will generate alarm if free space on the disk where Proxy32 terminal log directory is located is less than 50 MB. Alarm will be shown as balloon tool-tip on the proxy32 status bar icon. This function is on by default. Note, that proxy32 will automatically disable log and scrollbuffer files for any existing window of built-in terminal, if this low disk space condition is detected.
Next checkmark controls whether proxy32 generates alarm when system is low on free memory. If this checkmark is selected, proxy32 will generate alarm if free system memory is less than 50 MB. Alarm will be shown as balloon tool-tip on the proxy32 status bar icon. This function is on by default.
Next checkmark controls whether proxy32 generates alarm when Proxy32 CPU usage is high. If this checkmark is selected, proxy32 will generate alarm if single-core-CPU usage by proxy32.exe process has exceeded 80%. Alarm will be shown as balloon tool-tip on the proxy32 status bar icon. This function is off by default. Note, that on detecting this condition proxy32 will reduce frequency of the terminal windows redrawing and the speed of data received by terminals until the CPU usage will return to the level below 80%. Also, proxy32 process is single-threaded and, therefore, will only use one CPU core on multicore CPU.
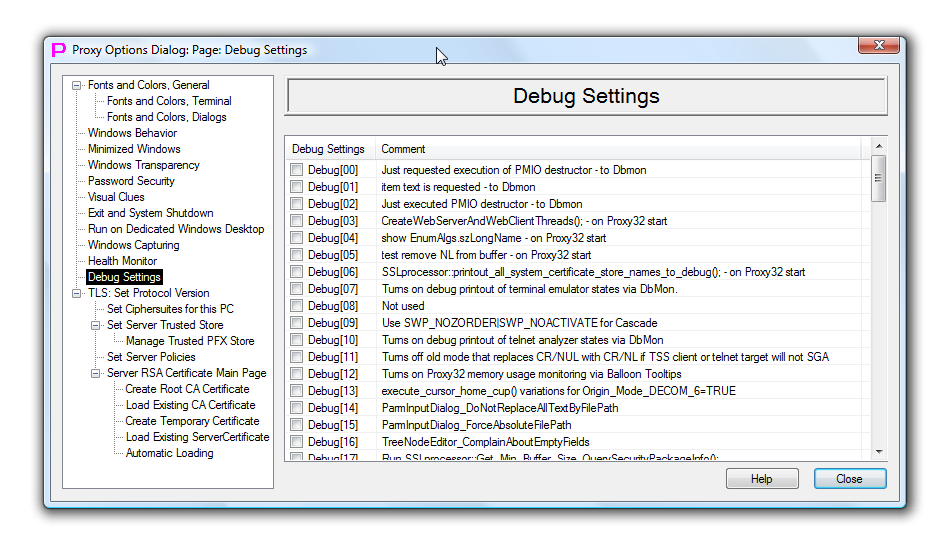
Debug Settings
This page is only for the use by developer.
It contains settings that enable experimental non-production parts of code for debug or testing purposes. For the regular user all the checkmarks on this page should be unselected!!!
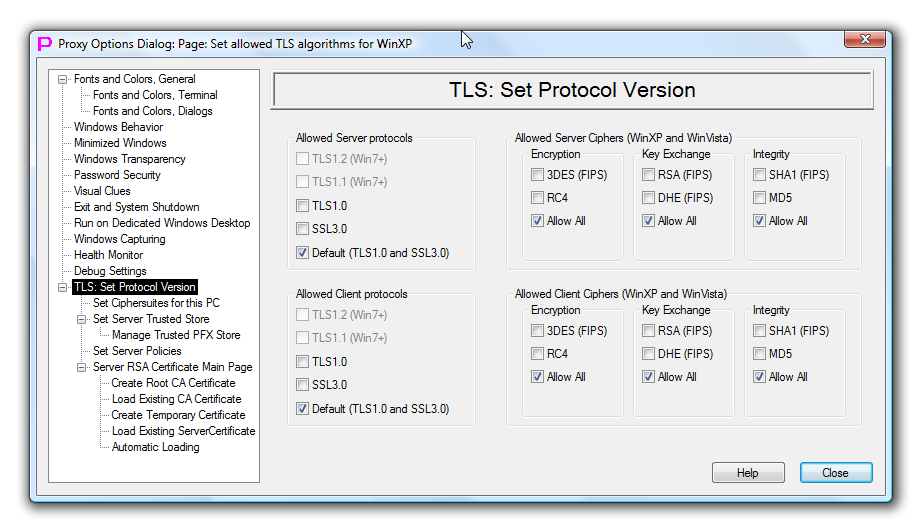
TLS Set Protocol Version
This page controls TLS protocol version settings for the TLS client and TLS server.
TLS client is part of the TELNET-TLS client module that is built into every terminal and used by terminal connected via TELNET-TERMINAL Launcher. TLS server is part of the TELNET-TLS server that is built into every terminal and used to connect remote users to existing terminal for terminal session sharing.
The upper part of the page controls server protocol version and algorithm selection.
The lower part of the page controls client protocol version and algorithm selection.
Windows XP and Windows Vista support only SSL version 3.0 and TLS version 1.0. Windows 7 and 8 added support for TLS version 1.1 and 1.2.
Windows XP and Windows Vista allow to supply list of allowed ciphers, key exchange algorithms and integrity protection algorithms per application (proxy32 in our case) and separately for client and server. Some of the algorithms in this list may become obsolete and do not provide adequate protection anymore. Use this setting to disable weaker algorithms when configuring interaction between old systems (Windows XP and Windows Vista). For fine-tuning of the algorithm usage for the newer Windows systems use Set CipherSuites page of the Options Dialog.
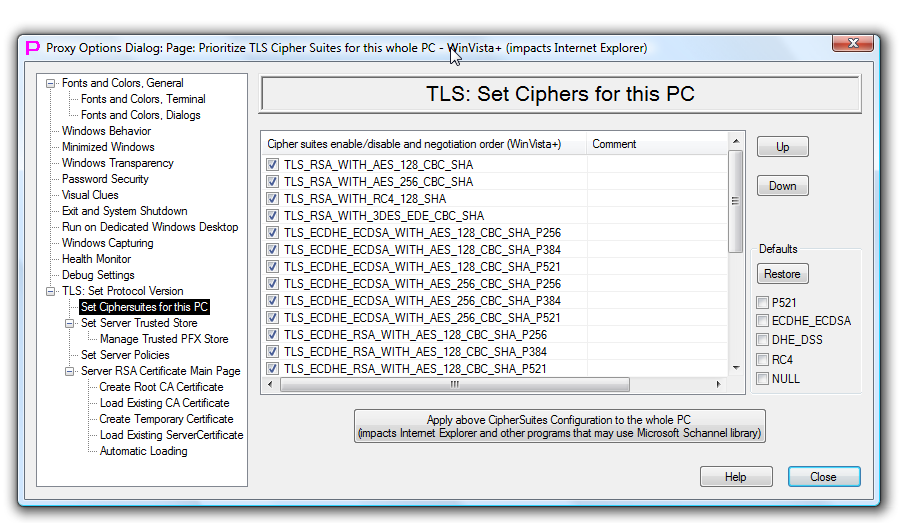
TLS Set CipherSuites for this PC
This page controls TLS CipherSuite selection for both TLS Server and TLS client for Windows Vista and newer Windows Systems.
TLS client is part of the TELNET-TLS client module that is built into every terminal and used by terminal connected via TELNET-TERMINAL Launcher. TLS server is part of the TELNET-TLS server that is built into every terminal and used to connect remote users to existing terminal for terminal session sharing.
Changes on this page are system-wide, they will impact all applications on this computer that use Windows SCHANNEL.DLL library (that is used by Internet Explorer for https protocol). Changes on this page will apply to both TLS client and TLS server. They will also impact the Internet Explorer browser. FireFox and Chrome browsers are not impacted by changes on this page as they do not use SCHANNEL.DLL library to implement TLS protocol.
The list on this page allows to configure which ciphersites are enabled and in which order enabled cipher suites will be presented by the TLS client to the TLS server. And how TLS server will prioritize ciphersuites when deciding which one to use. This should work as follows: - TLS client sends to TLS server list of the enabled on the client ciphersuites. - If some of TLS client's ciphersuites are supported by the TLS server, TLS server will make final choice of the ciphersuite to be used (according to server's priorities).
This page only works starting from Windows Vista (Windows Vista, Windows 7 and Windows 8). Originally, this page contains default list of the ciphersuites (Windows 7 and Windows 8 contain different list with newer ciphersuites, comparing to Windows Vista).
Name of each ciphersuite consists of the four algorithm names: - key exchange - authentication - block cipher - integrity protection
Example: TLS_RSA_WITH_AES_256_CBC_SHA - key exchange RSA - authentication RSA - block cipher AES_256_CBC - integrity protection SHA1
Another example: TLS_ECDHE_RSA_WITH_AES_256_CBC_SHA_P521 - key exchange ECDHE with P521 elliptic curve - authentication RSA - block cipher AES_256_CBC - integrity protection SHA1
If you are not sure about meaning of particular ciphersuite name, type exact ciphersuite name (as shown on configuration page) into Google search and add word MSDN (Microsoft Developer network) to locate Microsoft documentation page explaining this particular ciphersuite name. MSDN link addresses are known to change often, so there is no use for me to try to provide fixed link to Microsoft documentation page.
Strength of block cipher and strength of integrity protection is normally hard-coded into ciphersuite name. Strength of key exchange and authentication for some ciphersuites is not hard-coded into ciphersuite name and, therefore, can be adjusted separately. Proxy32 allows to set RSA key exchange and RSA authentication strength to 2048 or 4096 bits by setting certificate key length for generated RSA certificate.
To disable negotiation of the ciphersuite simply uncheck it, to increase its priority during negotiation move it up the list. If you want to enforce use of one particularly strong ciphersuite, leave only this ciphersuite in the list. Make sure that this ciphersuite is supported by the peer, otherwise connection will not be possible to establish. After you are happy with the list, press Apply button. By pressing Apply button content of the list on the page will be propagated to the system. To restore original list (Microsoft Default for this OS) of the ciphersuites in the page use Restore button together with checkmarks that define which set of ciphersuites to include into restored list. The list is restored only inside of the configuration page. To propagate restored list from the configuration page into the system do not forget to press Apply button.
Remember that changes on this page also impact Internet Explorer, so if you are on corporate PC and Internet Explorer is the only officially supported corporate browser, the list of the ciphersuites may have been already configured by your corporate IT folks and messing with this list may render some corporate web-pages inaccessible via Internet Explorer.
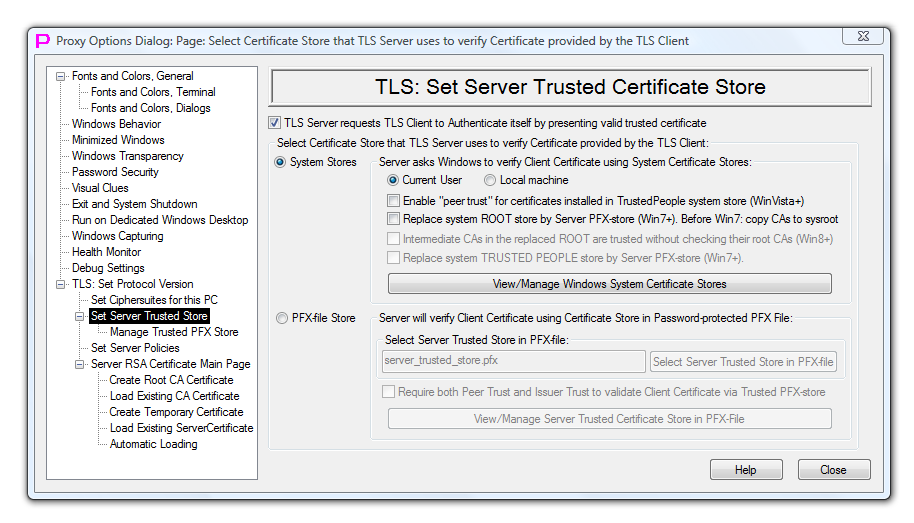
TLS Set Server Trusted Certificate Store
This page controls how TLS server checks validity of the certificates presented by TLS client.
More details about settings on this page can be found here.
TLS client is part of the TELNET-TLS client module that is built into every terminal and used by terminal connected via TELNET-TERMINAL Launcher. TLS server is part of the TELNET-TLS server that is built into every terminal and used to connect remote users to existing terminal for terminal session sharing.
In TLS protocol, TLS server always has to present certificate to TLS client, but TLS client has to present certificate to the TLS server only if TLS server requires it.
First checkmark controls, whether TLS server will allow to TLS client to connect without presenting valid certificate. If this checkmark is selected, TLS server will expect certificate from TLS client and if certificate is not presented or not valid, client will be denied connection. This function is off by default.
Two main radio buttons on the left are controlling where proxy32 will look for the certificates that will be used to validate client certificate. Those validating certificates are called Trusted Root CA (Certificate Authorities), Intermediate CA certificates and Peer certificates. There are two options: - Trusted CA certificates and Peer certificates are located in the Windows system stores. - Trusted CA certificates and Peer certificates are located in the password-protected PFX-file.
Advantages of using Windows system store: - it may already contain needed certificates as configured by Microsoft or by your corporate system administrator. - it may simplify use of certificates installed into smart-cards. Starting from Windows Vista, smart cards with certificates are mounted into system stores on insertion.
Disadvantages of using Windows system store: - collection of certificates is configured per computer/user and not per application, harder to control trust as many applications can manage system store. - collection of certificates is not easily portable to another computer (for example, when user runs single Proxy32 installation from USB flash drive on different computers).
There are five options to fine-tune use of Windows system store: - two radio buttons allow to choose between user-level system store and computer-level system store (Current user or Local machine) - check mark “Enable “”peer trust”” for certificates installed in TrustedPeople system store (WinVista+)” allows to enable peer trust when certificate is trusted if it is pre-installed into specific system store Trusted People (without usual signature check by ROOT CA certificate). If this checkmark is selected, peer trust is enabled. This function is off by default. This is working starting from Windows Vista. - check mark “Replace system ROOT store by Server PFX-Store (Win7+). Before Win7: Copy CAs to sysroot”. On Win7 and Win8 this option replaces Windows system ROOT store by user-supplied PFX-Store for the purpose of checking TLS Client certificate in Proxy32 TLS Server. On WinVista and WinXP system root store is not replaced but restricted. That means that trusted root certificates should also be installed into regular system root store, not only into user-supplied replacement of the system root store. On WinVista and WinXP user-supplied replacement of the system root store should not contain any non-root certificates, otherwise user will receive error message when certificate checking is performed. - check mark “Intermediate CAs in the replaced ROOT are trusted without checking their root CAs (Win8)”. On Win8 non-root CAs in the replaced root store can also be trusted if the check mark “Intermediate CAs in the replaced ROOT are trusted without checking their root CAs (Win8)” is selected. - check mark “Replace system TRUSTED PEOPLE store by Server PFX-Store (Win7+)”. On Win7 and Win8 this option replaces Windows system TRUSTED PEOPLE store by user-supplied PFX-Store for the purpose of checking TLS Client certificate in Proxy32 TLS Server.
There is also a button that opens Microsoft Management Console panel to manage system certificate store for Current user. To manage system certificate store for Local machine user should manually create special panel in Microsoft Management Console.
Advantages of using trusted certificate store in password-protected PFX-file: - isolated from other users and applications - portable, moves with proxy32 installation to another computer (for example, when user runs single Proxy32 installation from USB flash drive on different computers)
Trusted PFX certificate store of Proxy32 and associated with it Proxy32 internal Client Certificate validation functions allow to maintain trust configuration at the application level without need to modify user level and computer level trust configuration. To validate Client cert, either it should be present in PFX store (PEER TRUST) or its direct issuer (signer) should be present in the PFX store (ISSUER TRUST) or both should be present in PFX store (if checkmark Require both Peer Trust and Issuer Trust to validate Client Certificate via Trusted PFX-store is selected on the Page TLS Server Trusted Store of the Options Dialog). Client cert should be also with correct enhanced key usage (if it has such extension) and both client cert and issuer cert should not have expired. Bypass of certificate checks can be configured with the fine granularity via Set TLS Server Policies page in Options Dialog.
| step # | Description |
| 0. | If all cert checks are ignored, go to SUCCESS |
| 1. | Check time validity of the client Certificate |
| 2. | If time is invalid and no bypass of time check is enabled, then go to FAILURE |
| 3. | Check the Extended key usage extension of the Client Certificate |
| 4. | If Extended key usage is invalid (EKU Extension is present and does not contain Client AUTH in it) and no bypass of usage check is enabled, then go to FAILURE |
| 5. | Check if the Client Certificate is pre-installed in PFX store |
| 6. |
If pre-installed (PEER TRUST is valid) and no BOTH PEER TRUST and ISSUER TRUST are required, then go to SUCCESS
|
| 7. | Look for the next issuer (signer) of the client certificate in the PFX store |
| 8. | if no next issuer found, or Client Cert is self-signed, go to FAILURE |
| 9. | Check signature of the issuer on the Client Cert and time validity of the issuer Cert |
| 10. | if signature of the issuer is bad and no bypass is enabled, go to step 7 to look for the next issuer |
| 11. | if time validity of the issuer is bad and no bypass is enabled, go to step 7 to look for the next issuer |
| 12. |
ISSUER TRUST is valid. If no BOTH PEER TRUST and ISSUER TRUST are required, then go to SUCCESS
|
| 13. |
if BOTH PEER TRUST and ISSUER TRUST are required and the Client Certificate is pre-installed in PFX store (result of step 5), then go to SUCCESS
|
| 14. | FAILURE/EXIT |
| 15. | SUCCESS/EXIT |
Note: Bypass of various certificate checks can be configured with the fine granularity via Set TLS Server Policies page in Options Dialog.
Once PFX-file is selected as TLS server trusted system store, user can manage this store (view certificates in the store, add certificates to the store and remove certificates from the store). There is a button at the bottom of this dialog page that opens next dialog page that is dedicated to managing selected PFX-store.
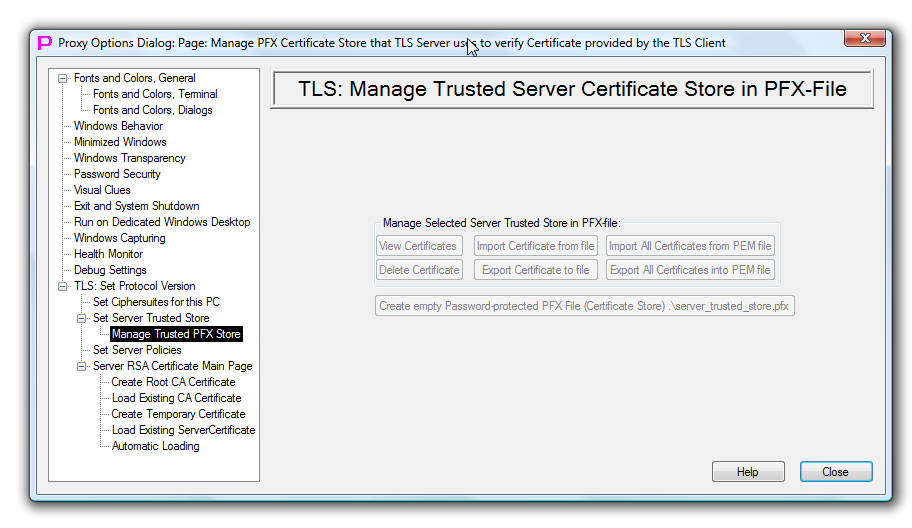
TLS Manage Server Trusted Certificate Store in PFX file
This page allows to create and manage TLS server trusted certificate store in password-protected PFX-file.
Lower button allows to create empty PFX-file with fixed name .\server_trusted_store.pfx in the proxy32 startup directory. Then user can manually rename this file as needed and then later set this empty PFX-file as TLS server trusted certificate store (this is done on the previous dialog page).
After PFX-file is set as TLS server trusted certificate store (on previous dialog page), upper 6 buttons on this dialog page allow to view, delete, export and import certificates into this PFX-file. The only way the certificate key can be imported/exported is when transfer is from one PFX-file into another PFX-file.
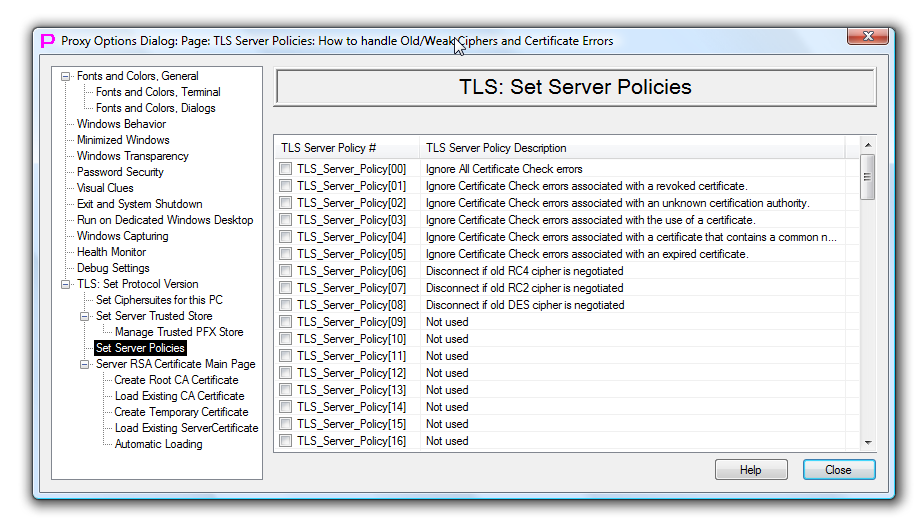
TLS Set Server Policies
This page controls with high granularity under which conditions TLS server should accept client connections and under which conditions connection from the client should be denied.
Currently, it allows to specify how TLS server should react to 6 types of certificate check errors and to 3 types of obsolete weak ciphers. In the future, more policies can be added by proxy32 developer as needed.
If checkmark next to the policy is not selected, then policy is disabled.
All policies in the list are disabled by default.
Changes on this page are effective immediately. As above policies only consulted with during TLS connection establishment phase, the changes will be effective when establishing next TLS connection.
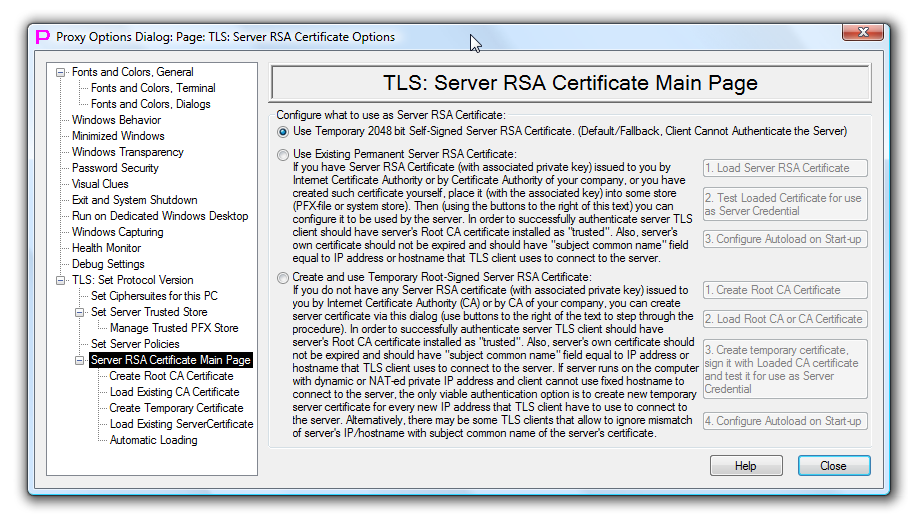
TLS Server RSA Certificate Main Page
This page controls which digital certificate will be used by TLS server to identify itself to the TLS client.
In TLS protocol, TLS server always has to present certificate to TLS client, but TLS client has to present certificate to the TLS server only if TLS server requires it.
TLS client is part of the TELNET-TLS client module that is built into every proxy32 terminal and used by proxy32 terminal connected via TELNET-TERMINAL Launcher. Each TELNET-TERMINAL launcher in TLS mode can point to different Client Certificate. Therefore, Telnet-TLS proxy32 terminals created from different TELNET-TERMINAL launchers can use different client certificates to identify themselves. In TLS protocol, client certificate is optional: TLS client has to present certificate to the TLS server only if TLS server requires it.
TLS server is built into every Proxy32 terminal and is used to connect remote users to existing terminal for terminal session sharing. Each window/instance of proxy32 terminal shares the same configuration of TLS server, including TLS server identity certificate.
There are three options (for TLS server identity) presented as 3 radio buttons on the left side of the page:
This option is selected by default and does not require any further server certificate configuration efforts from the user.
Every time proxy32 starts it creates new Temporary 2048 bit Self-Signed RSA certificate. This certificate is used as fallback option if no other Server certificate is configured, but user still wants to use TLS Server. Certificate key is stored in Windows CSP (Cryptographic Service Provider DLL) for the time proxy32 is running and deleted when proxy32 exits. If proxy32 crashes, the key may not be deleted and will be orphaned in Windows CSP until next start of Proxy32.
As certificate is self-signed, it cannot be used for authentication, only for key exchange to start ciphering. In order to connect to TLS server that uses self-signed certificate, TLS client should disable server certificate check before attempting to connect to the server. Non-authenticated connections can be highjacked with man-in-the-middle attack, so it is not recommended to use this option when high-security is needed.
There is some advantage in changing RSA keys every time proxy32 starts. If someone is recording all encrypted communications, all recorded communications cannot be decrypted later by stealing or breaking one pair of RSA keys, stealing/breakintg has to be done separately for every instance when pair of RSA keys is changing. This can make recording/stealing/breaking approach impractical.
Existing Permanent means that certificate is stored in Windows system store or in password-protected PFX-file and not in proxy32 memory. This is most standard option. Existing certificate can be one of the following types: RSA, DSA or ECDSA. ECDSA certificate is only supported starting from Windows Vista. Permanent RSA certificate can be manually generated and installed to store by the user with the help of proxy32 using the same proxy32 CA functions that are intended for creating of temporary signed RSA certificate. Note, that using particular type of the certificate will also limit list of the available ciphersuites to the ones that support particular type of authentication (RSA, DSA or ECDSA). RSA ciphersuites are time-proven and still have the best support across multiple platforms. Proxy32 allows to create RSA certificates with key length of 2048 or 4096 bit. Key of permanent certificate is always residing in Windows CSP in order for TLS to work, so key security is as good as CSP security. It is never deleted by proxy32 from CSP. Certificate in PFX-file is portable, it moves with proxy32 installation to another computer (for example, when user runs single Proxy32 installation from USB flash drive on different computers).
To use this option user will have to go to another dialog page and select particular certificate store and then select particular certificate from this store. To be used by the TLS server selected certificate should have matching private key associated with it. To provide adequate security, key should be long enough (minimum of 2048 bit for RSA at the time of writing)
Selected certificate can be tested for use as server credential and then configured to be loaded in proxy32 memory automatically every time proxy32 starts.
To the right side of the radio button there are 3 buttons that direct user to dialog pages used to load existing certificate, test it as server credential and configure it to be automatically loaded on proxy32 startup.
Existing Permanent certificate may come for free from corporate IT people or it has to be ordered from Commercial Certificate Authority. Alternatively, user can create server certificate using self-signed root certificate generated by proxy32. But in this case every client should have self-signed root certificate generated by proxy32 installed as trusted in order to be able to validate server's certificate.
When server sends its certificate to the client, client will validate server's certificate. First, client should have server's certificate Root CA and intermediate CA certificates installed as trusted to check the signature on the server's certificate. Then expiration date, revocation status and use policies are checked on the server's certificate. Finally, by convention, common name in the subject of the TLS server's certificate should match IP address or hostname of the TLS server. If TLS server is running on laptop with dynamically changing IP address and no network-visible hostname, then server certificate name-check may fail in TLS client. Some TLS clients can separately disable this server name-check, but most of them do not have such an option, only the option to disable all server certificate checks completely. To have common name on the server certificate matching the server's IP address, server's certificate can be re-created by user manually every time server's IP address is changing using technique described in the next certificate option (Create and use temporary root-signed Server RSA certificate).
As was described above, server certificate may be issued by corporate or commercial Certificate Authority, but in some cases it does not make sense to pay certificate authority for the server certificate: - very small group of users personally knowing each other will communicate with each other via TLS protocol, so they all can share one non-public root certificate generated by proxy32 built-in CA - TLS server IP address is dynamic and server has no network-visible hostname, so server certificate should be manually recreated every time Server's IP address is changing to make sure server's certificate name check will not fail in the TLS client.
Having CA function built-in into proxy32 helps in both cases. This option relies on built-in proxy32 CA function to generate Root CA RSA certificate and to generate temporary or permanent TLS server RSA certificate.
When this option is selected, following is happening (via multiple dialog pages): - by using proxy32 functionality user creates self-signed RSA 2048 or 4096 bit proxy32 root CA certificate and installs this certificate into Windows system trusted root store or into password-protected store in PFX-file in proxy32 startup directory. - user configures newly created self-signed proxy32 root CA certificate to be used in proxy32 built-in CA - user configures parameters for creation of server's temporary RSA root-signed certificate and then generates (using proxy32 built-in CA) such temporary certificate. - user configures for this temporary certificate to be created automatically on every start of proxy32 and to be used by TLS server - alternatively, instead of recreating temporary certificate automatically on every start of proxy32, user can re-create temporary certificate manually only when needed and then install it as permanent certificate to be loaded on every start of proxy32 and to be used by TLS server.
There is some advantage in changing RSA keys (server RSA certificate) every time proxy32 starts. If someone is recording all encrypted communications, all recorded communications cannot be decrypted later by stealing or breaking one pair of RSA keys, stealing/breakintg has to be done separately for every instance when pair of RSA keys is changing. This can make recording/stealing/breaking approach impractical.
To the right side of the radio button there are 4 buttons that direct user to dialog pages used for configuring and executing this option.
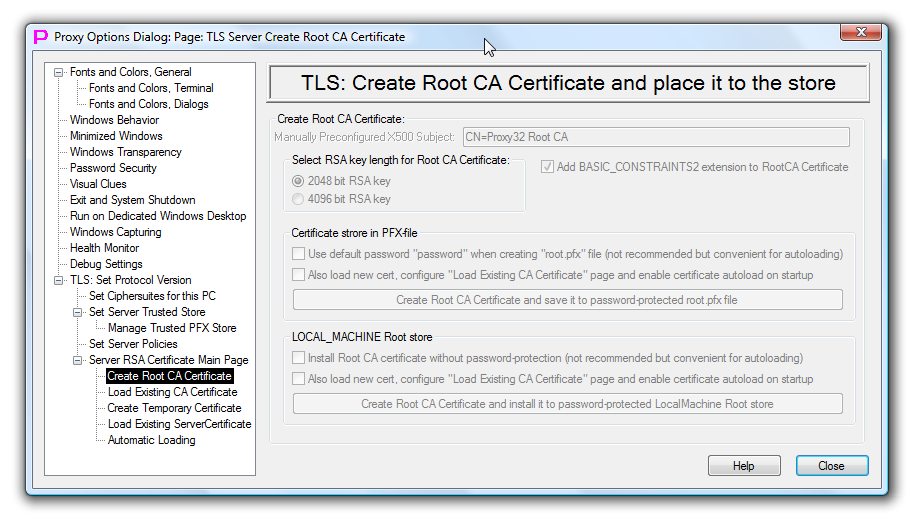
TLS Create Root CA Certificate and place it to the Store
This page allows to set parameters for self-signed proxy32 RSA root CA certificate, generate such certificate and install it to the certificate store for consequent use in Proxy32 built-in CA.
This is a dependent page, it activates only when third option is selected on TLS Server RSA Certificate Main Page. This page is part of proxy32 built-in CA function.
This page allows to: - set subject for self-signed RSA root CA certificate - set RSA key length (2048 or 4096 bit) for self-signed RSA root CA certificate - create certificate and save it as PFX-file or install it into system trusted root CA store - optionally, disable password-protection for newly created certificate - optionally, configure created self-signed RSA Root CA certificate for use in proxy32 built-in CA function.
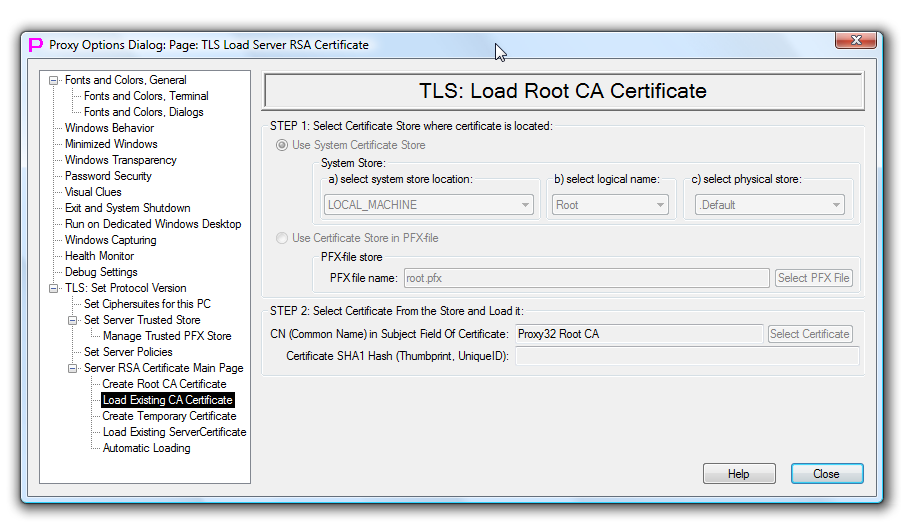
TLS Load Root CA Certificate
This page allows to configure existing RSA Root CA certificate for use in proxy32 built-in CA function.
This is a dependent page, it activates only when third option is selected on TLS Server RSA Certificate Main Page. This page is part of proxy32 built-in CA function.
To configure, on the STEP1 user has to select type of the certificate store first (system store or PFX store). Then for the system store user has to select store location (LOCAL_MACHINE or CURRENT_USER etc), then logical name (Root etc) and then physical name (.Default etc). For certificate store in the PFX file, user will have to select PFX-file name.
After certificate store is selected on the STEP1, user has to configure STEP2 by selecting particular certificate from the certificate store. Selected certificate should have matching private key associated with it.
To open PFX-store user will always be asked to supply password. When certificate is selected its common name and the thumbprint are saved in proxy32 configuration. Thumbprint needed to distinguish between two certificates in the same certificate store if they both have the same common name.
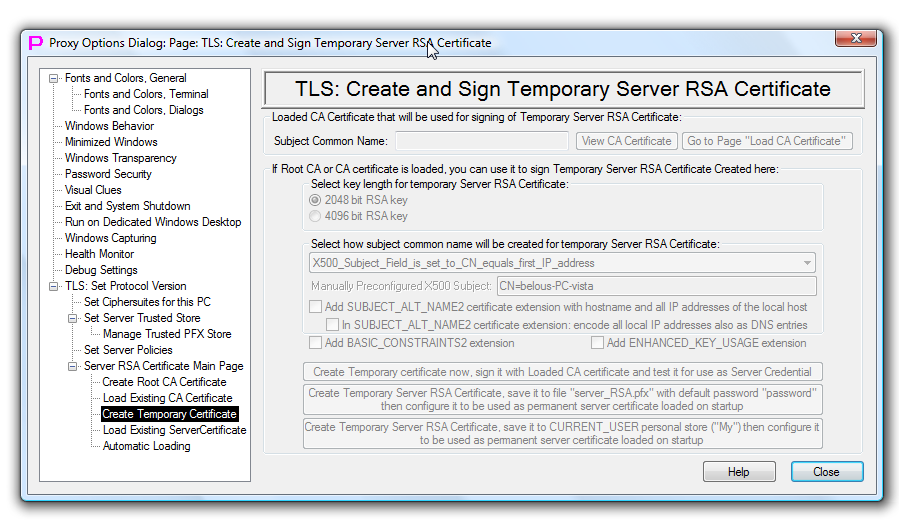
TLS Create and Sign Temporary Server RSA Certificate
This page allows to set parameters for root-signed proxy32 RSA Temporary server certificate, generate such certificate (and optionally, install it to the certificate store and configure for consequent use as permanent TLS server certificate).
This is a dependent page, it activates only when third option is selected on TLS Server RSA Certificate Main Page. This page is part of proxy32 built-in CA function.
The upper part of the page allows to view CA certificate that is loaded into proxy32 CA function and will be used for signing Temporary RSA server certificate. It shows subject common name of the loaded CA certificate and has two buttons: first button allows to view loaded CA certificate and another button directs user to dialog page where user can load another CA certificate.
The lower part of the page controls parameters for creation of the temporary RSA server certificate and allows to create such certificate. User can configure: - RSA key length of Temporary server certificate (2048 or 4096 bit) - add BASIC_CONSTRAINTS2 extension to Temporary server certificate. This extension basically prevents use of the server certificate for issuing another certificates. - add ENHANCED_KEY_USAGE extension to Temporary server certificate. This extension basically prevents use of the server certificate for any purposes but TLS client and TLS server authentication.
One of the most important parameters is Subject common name of Temporary server certificate. Subject common name of TLS server certificate should match IP address or hostname used by the TLS server to listen for TLS client connections. If there is only one IP address or hostname, it is included into server's certificate subject common name and server certificate namecheck in TLS client works fine.
In case TLS server is listening on multiple IP addresses, subject name can contain multiple common names (multiple CN= sections), but not all TLS clients are capable to work with such multi-common-name certificate subjects. Another option is to use SUBJECT_ALT_NAME2 extension to put in it all IP addresses and hostname, but, again, not all TLS clients can handle SUBJECT_ALT_NAME2 extension properly, especially if primary CN in subject field is not empty. For example, some TLS clients are working better if all computer IP addresses are encoded as DNS entries in the SUBJECT_ALT_NAME2 extension (and not as IP addresses). I was unable to find universal way (that would work with all TLS clients) to certify multiple TLS server IP addresses in one server certificate. The only compatible way that is working across all TLS clients is to have single IP address or single hostname and to put it into single CN= section in primary subject field of the certificate. Default setting on this page is to automatically put first IP address of the computer into the common name in the subject of the temporary server certificate. Such default guarantees that when temporary server certificate is created automatically on every start of proxy32, it will always have current computer IP address in the subject common name. This should eliminate server certificate name check problems in TLS client when TLS server runs on the computer with dynamically assigned IP address and no network-visible hostname (such as corporate laptop). Other subject options include manual configuration of subject or to automatically set subject common name equal to hostname, loopback IP, or any IP address (first, second, third, fourth) of the computer.
By default, no extensions are included into server certificate.
The last three buttons on the page are used to create Temporary server certificate with configured parameters. The difference between these three buttons is what to be done with certificate when it is created.
First button creates certificate and keeps it in proxy32 memory to use as a temporary server certificate until proxy32 will exit. On proxy32 exit the key of temporary certificate will be deleted from CSP.
The second button saves created certificate into PFX-file and configures it as permanent server certificate that will be automatically loaded on every start of proxy32 and used as server certificate.
The third button saves created certificate into system store (CURRENT_USER location, logical name My, physical name .Default) and configures it as permanent server certificate that will be automatically loaded on every start of proxy32 and used as server certificate.
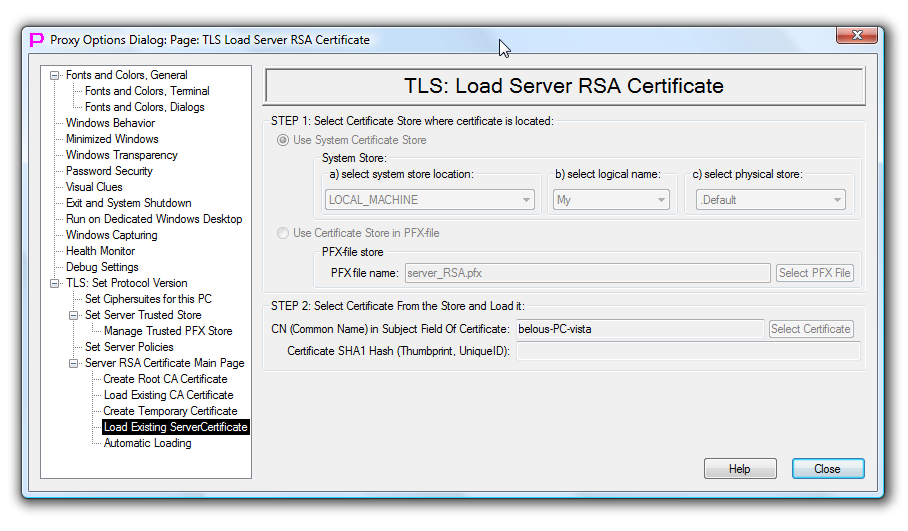
TLS Load Server RSA Certificate
This page allows to configure existing RSA, DSA or ECDSA certificate for use in proxy32 built-in TLS Server. ECDSA certificate is only supported starting from Windows Vista. Permanent RSA certificate can be manually generated and installed to store by the user with the help of proxy32 using the same proxy32 CA functions that are intended for creating of temporary signed RSA certificate. Note, that using particular type of the certificate will also limit list of the available ciphersuites to the ones that support particular type of authentication (RSA, DSA or ECDSA). RSA ciphersuites are time-proven and still have the best support across multiple platforms.
This is a dependent page, it activates only when second option is selected on TLS Server RSA Certificate Main Page.
TLS client is part of the TELNET-TLS client module that is built into every terminal and used by terminal connected via TELNET-TERMINAL Launcher. TLS server is part of the TELNET-TLS server that is built into every terminal and used to connect remote users to existing terminal for terminal session sharing.
In TLS protocol, TLS server always has to present certificate to TLS client, but TLS client has to present certificate to the TLS server only if TLS server requires it.
To configure TLS server certificate, on the STEP1 user has to select type of the certificate store first (system store or PFX store). Then for the system store user has to select store location (LOCAL_MACHINE or CURRENT_USER etc), then logical name (My etc) and then physical name (.Default etc). For certificate store in the PFX file, user will have to select PFX-file name.
After certificate store is selected on the STEP1, user has to configure STEP2 by selecting particular certificate from the certificate store. Selected certificate should have matching private key associated with it.
To open PFX-store user will always be asked to supply password. When certificate is selected its common name and the thumbprint are saved in proxy32 configuration. Thumbprint needed to distinguish between two certificates in the same certificate store if they both have the same common name.
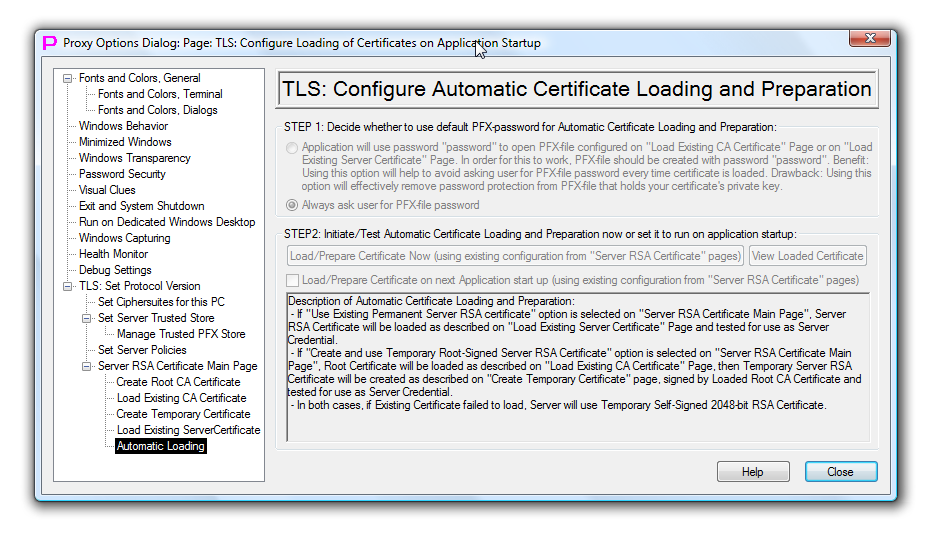
TLS Configure Automatic Certificate Loading and Preparation
This page allows to configure automatic certificate loading on every start of proxy32 to provide certificate to be used by TLS server according to setting selected on TLS Server RSA Certificate Main Page.
This is a dependent page, it activates only when second or third option is selected on TLS Server RSA Certificate Main Page.
When Proxy32 starts, temporary self-signed 2048-bit RSA certificate is always created to make sure first option on the page TLS Server RSA Certificate Main Page is always available. Using Temporary self-signed 2048-bit RSA certificate for the server is a fallback option, when no other server certificate is configured, or if other configured option has failed.
If second option is selected on TLS Server RSA Certificate Main Page page, then if automatic certificate loading is enabled, on every start proxy32 will load existing permanent server certificate using information provided on the TLS Load Server RSA Certificate page of Options Dialog. If server certificate is loaded successfully, it is used for TLS server, otherwise, temporary self-signed 2048-bit RSA certificate will be used by the server.
If third option is selected on TLS Server RSA Certificate Main Page page, then if automatic certificate loading is enabled, on every start proxy32 will load existing permanent CA certificate using information provided on the TLS Load Root CA Certificate page of Options Dialog. If CA certificate is loaded successfully, it is used for creating and signing of temporary CA-signed TLS server certificate, otherwise, temporary self-signed 2048-bit RSA certificate will be used by the server.
Current dialog page TLS Configure Automatic Certificate Loading and Preparation has one single checkmark that, if selected, will enable Automatic Certificate Loading on every start of proxy32 using information configured on the page TLS Load Server RSA Certificate or configured on the page TLS Load Root CA Certificate, depending on whether second or third option is selected on TLS Server RSA Certificate Main Page page.
Current dialog page TLS Configure Automatic Certificate Loading and Preparation also allows user test the certificate loading/creation process as it will be executed on proxy32 startup. This is done with the help of the button that is located right above the checkmark. Test will use settings from all other server certificate configuration pages and, basically, validates the overall server certificate config.
Separate button located to the right of the first button allows to see autoloaded certificate, it autoload test will succeed.
Current dialog page TLS Configure Automatic Certificate Loading and Preparation also allows user to choose how to deal with password when loading existing certificate from password-protected PFX-file. Every time proxy32 starts it may load (if configured) server or CA certificate from PFX-file, asking user for PFX-file password.
There are two radio buttons in the upper part of this dialog page.
If first radio button is selected, proxy32 will assume that PFX-file is protected with password password and will try to use such password automatically when opening PFX-file, without asking user to supply the PFX-file password. For this to work properly actual PFX-file has to be created with password password. Using this option is security risk as it reduces protection of certificate private key on the disk.
If second radio button is selected, proxy32 will always ask user for password when trying to open PFX-file.