
Fig. 1. Main window
1. General information
2. Description of the menubar of the main window
3. Popup menu of the main window
4. System menu of the main window
5. Mouse and keyboard shortcuts in the main window
5.1 Configurable Mouse shortcuts in the main window
5.2 Reserved Mouse shortcuts in the main window
Overview of the main window is presented on fig.1.
Fig. 1. Main window
Main window is the core of proxy32 application interface. It is standard window that has titlebar, menubar, application icon and minimize/maximize/close buttons on the titlebar, it is also present on the Windows taskbar panel.
Main window allows user to work with terminal windows and other windows (script editor and other applications) in 6 separate workspaces.
In the main window one can:
Main window has menubar with buttons that allow quick access to most frequently used functions and commands. Main window also has system menu and popup menu.

Fig. 2. Menubar of the main window
Instead of using buttons, one can assign their ACTIONS to HOTKEYS or to MouseClicks as described here.
Some buttons may have secondary actions when clicked while user holds modifier keys (Shift/Ctrl/Alt/Win). Most recent info about button will be shown in the button's tooltip or in the context help page associated with the button.
Names of the buttons in the menubar of the Main Window are shown below (from the left to the right according to the layout of menubar of the main window):
 Buttons to switch workspaces
 Button "Favorites"
 Button to switch between the windows in the current workspace
 Button to move windows between workspaces
 Button to open dialog to select window to be captured into current workspace
 Button to release active window of external process from workspace window back to desktop


 Buttons for automatically laying out windows inside of current workspace
 Button to close all non-minimized windows in current workspace
 Button to change title of the active window
 Button to select behavior of the windows
 Button "show/hide floating windows"


 Buttons to "show and position floating windows"
 Button "Popup menu of the main window"
 Button of context help "What is this?"
 Button to launch Help file
 Button to switch user from Dedicated Windows Desktop to Common Windows Desktop

 Button for turning on/off tooltips that are built into the program


 Button to select COMMAND beforetype delay


 Button to select COMMAND "Mouse Move Click" mode


 Button to select COMMAND interchar delay


 Button to select COMMAND line terminator

 Button to select COMMAND focus release mode


Brief description:
Six buttons allows to switch directly to desired workspace. Text of the buttons reflects names of the workspaces. Name of the current workspace can be changed.
Detailed description:
In the main window user can see 6 workspaces one at the time. Each workspace has its own button in the menubar of the main window. This button has the name of the workspace on it. When proxy32 is launched for the first time workspaces named Workspace0 to Workspace5, Workspace0 is active, its button is selected by frame, and title of the main window says Workspace0. Clicking the button of another workspace, user will open that another workspace inside of the main window. The button of newly selected workspace is highlighted by the frame and name of newly selected workspace will be shown in the title of the main window (fig. 3,4).

Fig.3. Switching between workspaces

Fig.4. Workspace1 is selected
User can assign names to workspaces. To change the name of the current workspace, RightClick on the title of the main window. It will start editing of the title "in place". Edited name will appear not only in the title of the main window but also on the button that represents current workspace (fig. 5).

Fig.5. Renaming Workspace1
Usually, user will assign name to the workspace to reflect task that is executed in that workspace. In that case, by switching between workspaces user is actually switching between the tasks that are running in those workspaces.
Brief description:
Button "Favorites" allows to create windows of terminals and Other applications inside of current workspace.
Detailed description:
In each workspace user can create:
To create windows of terminals and Other applications menubar of main window has button "Favorites" , that allows to select and run pre-configured action.
Button "Favorites" opens the menu that has 10 submenus (fig.6-7). During the installation proxy32 creates initial set of favorites in the first two submenus ("Quick Connect" and "Launch Application"), so that they can be used immediately after installation. Later, after learning automation in the proxy32, user will be able to create his/her own terminal, command, script and plugin launchers (in the LauncherTree window) and add them to "Favorites" submenus for quick access.
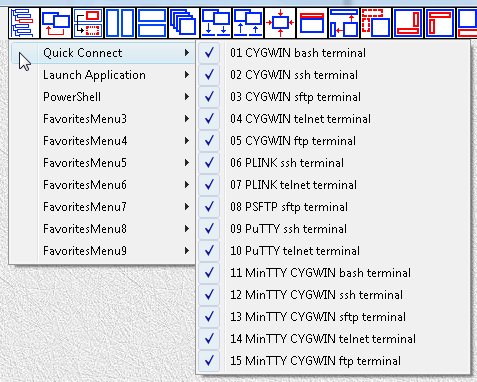
Fig.6. Favorites in submenu "Quick Connect"
Submenu "Quick Connect" contains favorites to create terminal window (built-in proxy32 terminal, PuTTY, MinTTY) and connect it to CYGWIN bash shell or to SSH, SFTP, TELNET or FTP server.
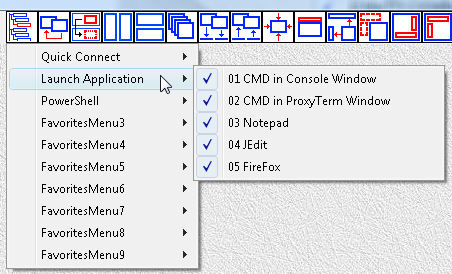
Fig.7. Favorites in submenu "Launch Application"
Submenu "Launch Application" contains favorites to create windows of Other applications, for example, Notepad or Firefox.
When using favorites in submenu "Quick Connect" Proxy32 pops up a dialog where user has to enter values for server connection parameters (IP address, port number, user name and password) and press OK. Fig. 8 shows parameter input dialog for connection to SSH server. Fig.9 shows as after pressing OK button in parameter input dialog terminal connects to SSH server.
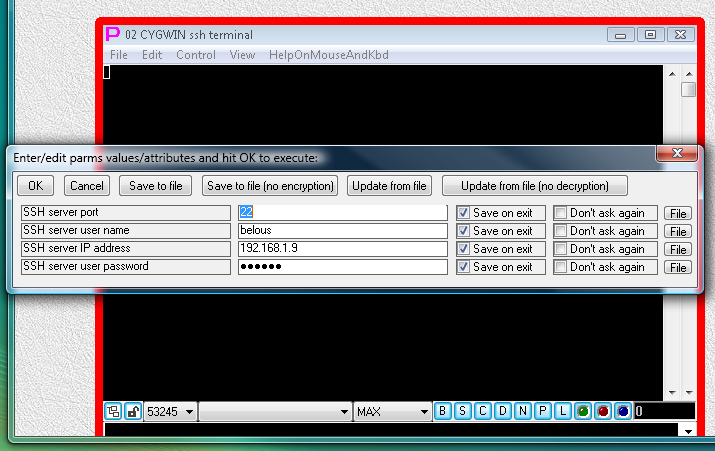
Fig.8. Sample of parameter input dialog to connect to SSH server
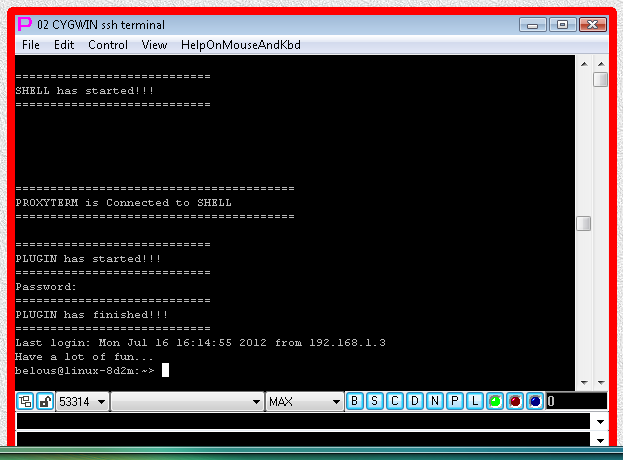
Fig.9. After pressing OK button in parameter input dialog terminal connects to SSH server
Entered parameter values stay in memory until Proxy32 exits. They will be shown in the parameter input dialog next time when this favorite is used and user can edit them before pressing OK button.
For entered parameter values to be shown in the dialog after next start of Proxy32, checkmark "Save on exit" should be selected in parameter input dialog against the parameters that user wants to save on exit.
Some favorites do not need parameters, so parameter input dialog will not popup when they are used.
Note:
Brief description:
Button to switch between the windows in the current workspace allows user to switch between terminal and other application windows inside of the current workspace.
Detailed description:
Pressing the button will show the list of all windows inside of current workspace (fig. 10).
This list can help user to find and reveal needed window, if windows in the workspace cover each other or located outside of visible area of the workspace after reducing size of the main window.
Selected window highlighted in the list by frame around icon (Windows Vista/7/8) or by checkmark (Windows XP). On Fig. 10 Firefox window is selected. By selecting window in the list user switches to this window.
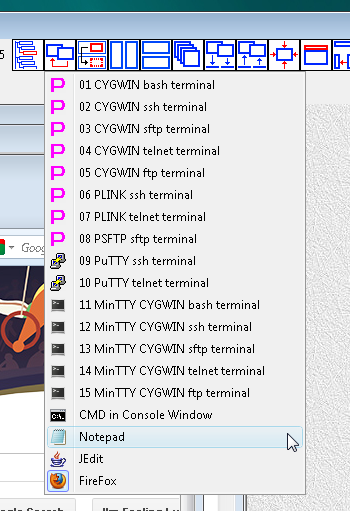
Fig.10. List of windows running in the current workspace
To switch between the windows running in the current workspace one just need to click inside of the window or on its titlebar. That will automaticly select window in the list. In some external processes clicking inside of the window is not always guarantees automatic selection in the list (because external process may try to control its own window in response to users click). Therefore, to guarantee the switch one should explicitely select such window in the list.
When user selects window title from the list or clicks inside of the window or on its titlebar:
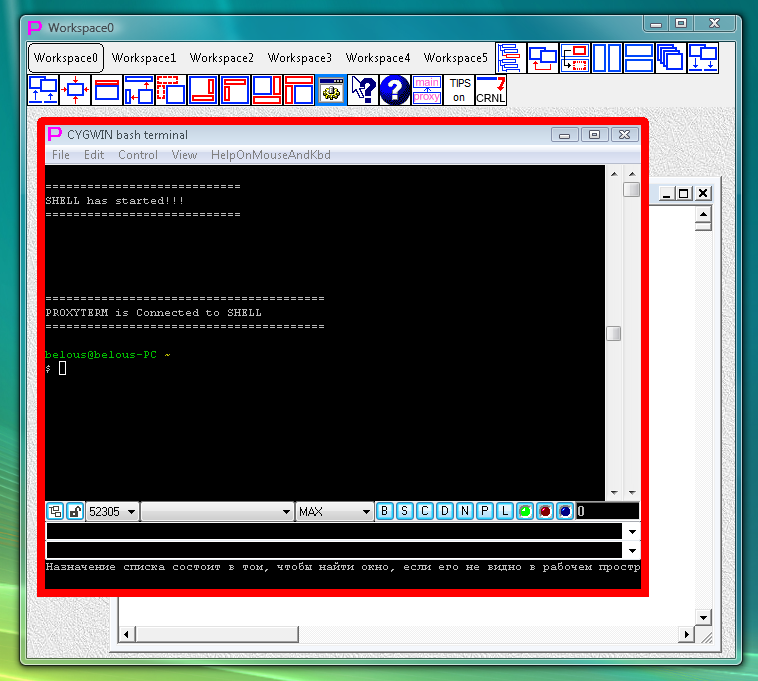
Fig.11. Active window of the built-in terminal is highlighted by red frame
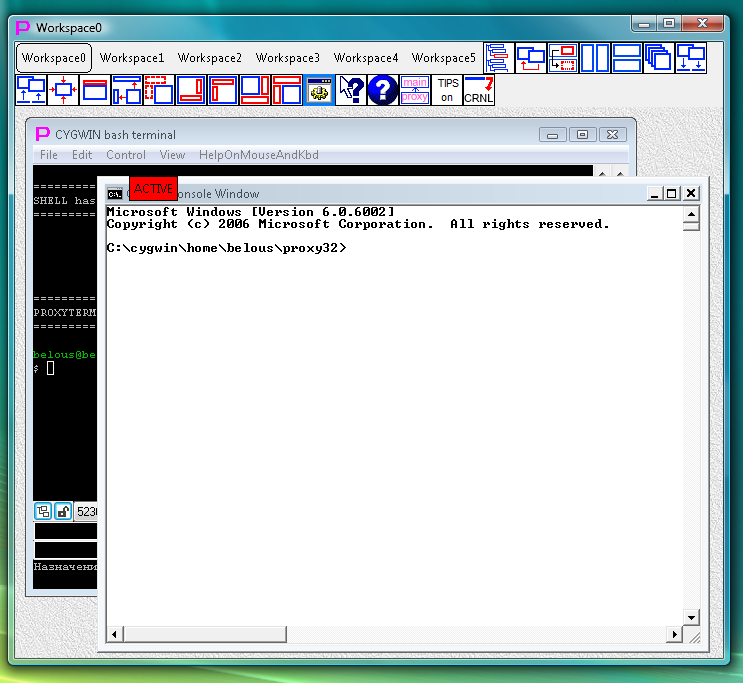
Fig.12. Active window of the external process (CMD console) is highlighted by red label with the word "ACTIVE" that is placed over the window's titlebar.
Note:
To get more details about active window and how to send commands into it, please, read here and here.
Brief description:
Button to move windows between workspaces allows to move terminal windows and windows of other applications from one workspace into another.
Detailed description:
Fig. 13-15 show by steps process of moving CMD console window from workspace Workspace0 into workspace Workspace5.
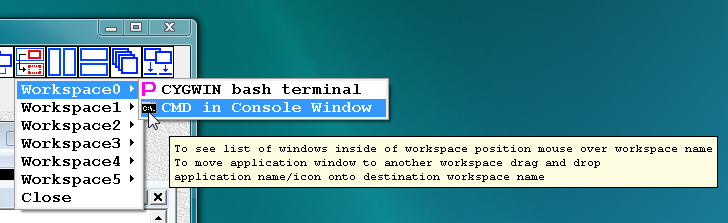
Fig.13. Moving windows from one workspace to another via drag-and-drop. List of windows in the workspace Workspace0 before user moved name/icon of CMD console window by mouse and dropped it onto the name of the workspace Workspace5.
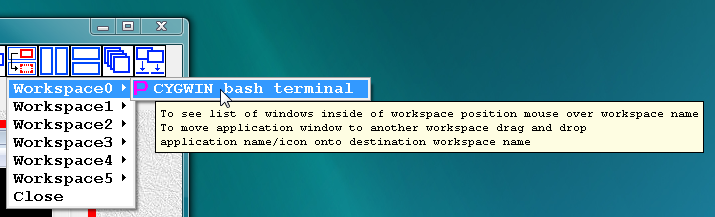
Fig.14. Moving windows from one workspace to another via drag-and-drop. List of windows in the workspace Workspace0 after user moved name/icon of CMD console window by mouse and dropped it onto the name of the workspace Workspace5.
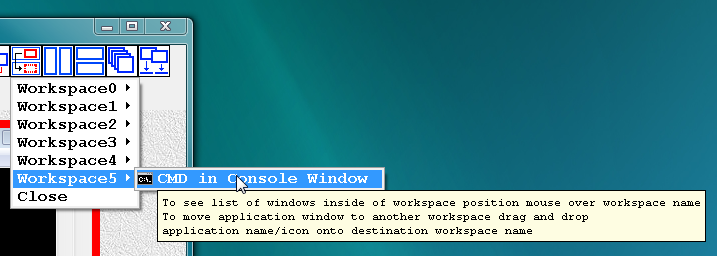
Fig.15. Moving windows from one workspace to another via drag-and-drop. List of windows in the workspace Workspace5 after user moved name/icon of CMD console window by mouse and dropped it onto the name of the workspace Workspace5.
This button will open dialog to select window to be captured into current workspace. For each existing "eligible" window that is not yet captured into proxy32 workspace it will show string "window_class : window_title". Highlight row in this dialog and click on "OK" button (or simply DoubleClick on the row. Example of dialog window is shown below.

LeftClick on the button:
Release Active Window (if it is External Application Window) from current Proxy32 Workspace back to Desktop. Released application will not be terminated on exit of Proxy32.
Left Click while Control key is pressed:
Release All External Application Windows (captured into all Workspaces via LAUNCH, VIEWER, manual GRAB or AUTOGRAB) from all 6 Proxy32 workspaces back to Desktop. Released applications will not be terminated on exit of Proxy32.
Brief description:
When one of the automatic layout buttons is pressed windows are laid out inside of the workspace according to selected algorithm (tile, cascade etc). After this windows are not being fixed in their positions, so user can move them again as desired.
Detailed description:
Buttons for automatically laying out windows inside of current workspace allow:
click on this button will tile all non-minimized windows in the current workspace into single-row from the left to the right every click on this button will add one extra row to existing tiled layout (until all windows are tiled into single-column from the top to the bottom and then next click will tile into single-row) cascade all non-minimized windows in the current workspace minimize all windows in the current workspace unminimize all windows in the current workspace make all non-minimized windows in the current workspace the same size and place them into the same position and then add random offset to position (normalize)Examples of automatic terminal windows layout are shown on fig. 2-5 in the Introduction.
By default, if floating windows are not visible, tile/cascade will arrange windows using all internal space in the workspace (fig.16), and if floating windows are visible, tile/cascade will arrange windows using only part of internal space in the workspace not covered by floating windows, so that there is no overlap with floating windows (fig.17). This default setting can be changed via menu of the button or via Proxy32 Option Dialog (reference).
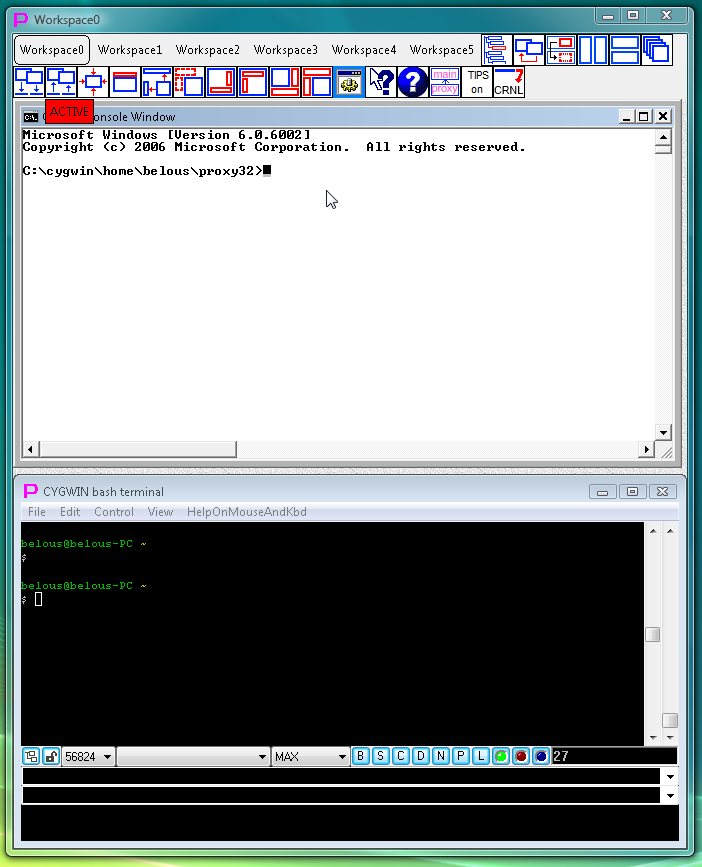
Fig.16. Layout of windows using all internal space in the workspace
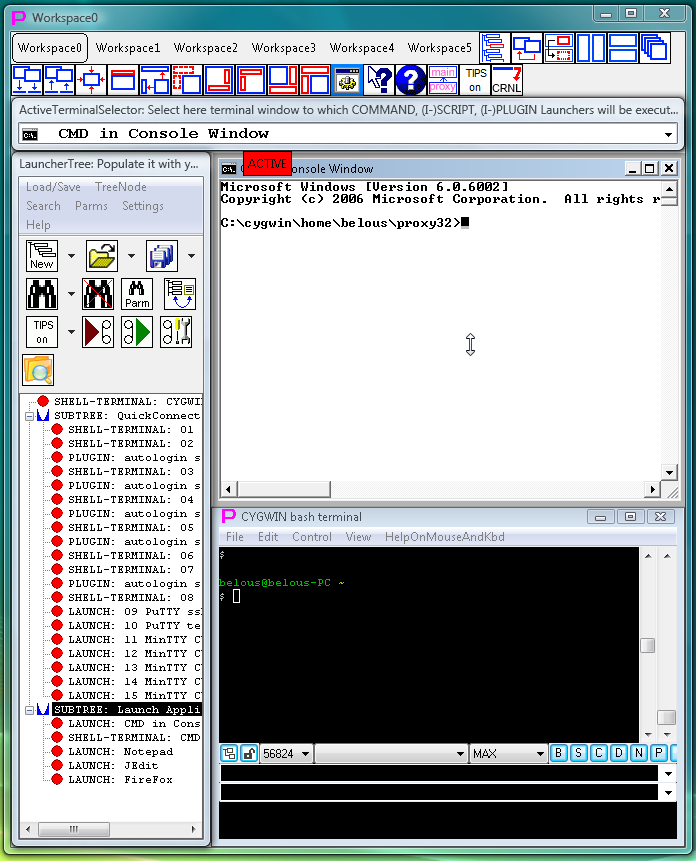
Fig.17. Layout of windows using only part of internal space in the workspace that is not covered by floating windows
By default, minimization with the button in the menubar of the main window (or with the minimization button in the title bar of the window) will cause minimized windows to be automatically placed in the row at the bottom of the workspace (as shown on fig.18). This default setting can be changed, for example, it is possible to have minimized windows automatically placed in the column at the side of the workspace (as shown on fig.19).
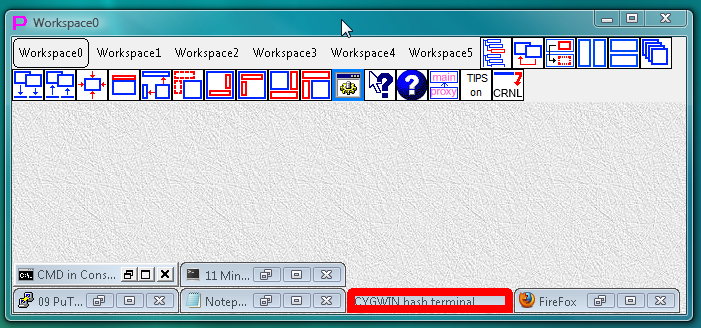
Fig.18. Automatic layout of minimized windows at the bottom from left to right (default)
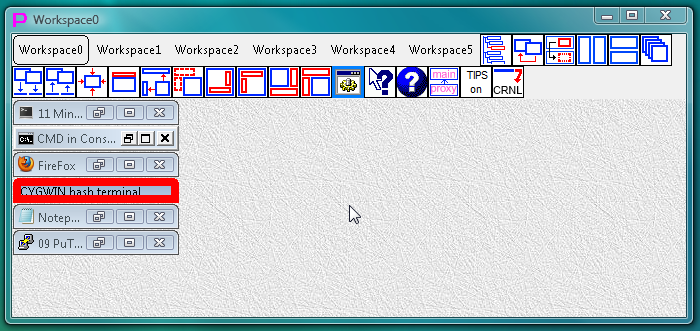
Fig.19. Automatic layout of minmized windows at the left from top to bottom
In the Proxy32 Options Dialog user can choose one of the 8 possible options for automatic layout of the minimized windows inside of the current workspace (as shown on fig. 20).
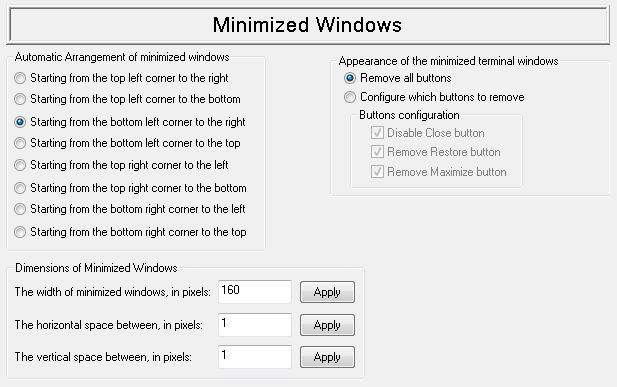
Fig.20. Settings for tuning minimized windows in Proxy32 Options Dialog
After particular window is minimized user can move it with the mouse. This new position of the minimized window will be remembered and will be used for all consequent minimizations until this window is closed. By default, if the size of the main window is changed minimized windows we'll be rearranged again automatically so that they will not end up outside of the visible part of the workspace when the main window is re-sized.
In the menu of the button or in the Proxy32 Options Dialog one can turn on and off the mode of automatic rearrangement of the minimized windows on resizing of the main window. In addition to this in the Proxy32 Options Dialog one can choose parameters of the automatic layout of the minimized windows and also the size of minimized windows.
Note: Positioning of the minimized windows while they are laid out automatically and the size of minimized windows are both system-wide settings and they will apply to all minimized windows running in the other Windows applications.
Button returns all minimized windows in the current workspace into the state in which they were before the minimization.
When button is pressed all nonminimized windows in the current workspace will be normalized, i.e. they will get the same size and position as newly created windows (fig.21). Normalization as well as minimization can help to put workspace in order when many non-minimized windows ended up having position and size that are not convenient for the user.
Normalization of windows with the help of the button amounts to laying out the windows in a such way that user has control over the size and positioning of the laid out windows. User can use existing terminal window as a template to specify where in the workspace any new window will be placed and which size it should have on creation. To use existing terminal window as a template user have to select menu "File/Save Terminal Settings" in this terminal window. This information will be stored in "Initial Terminal Settings".
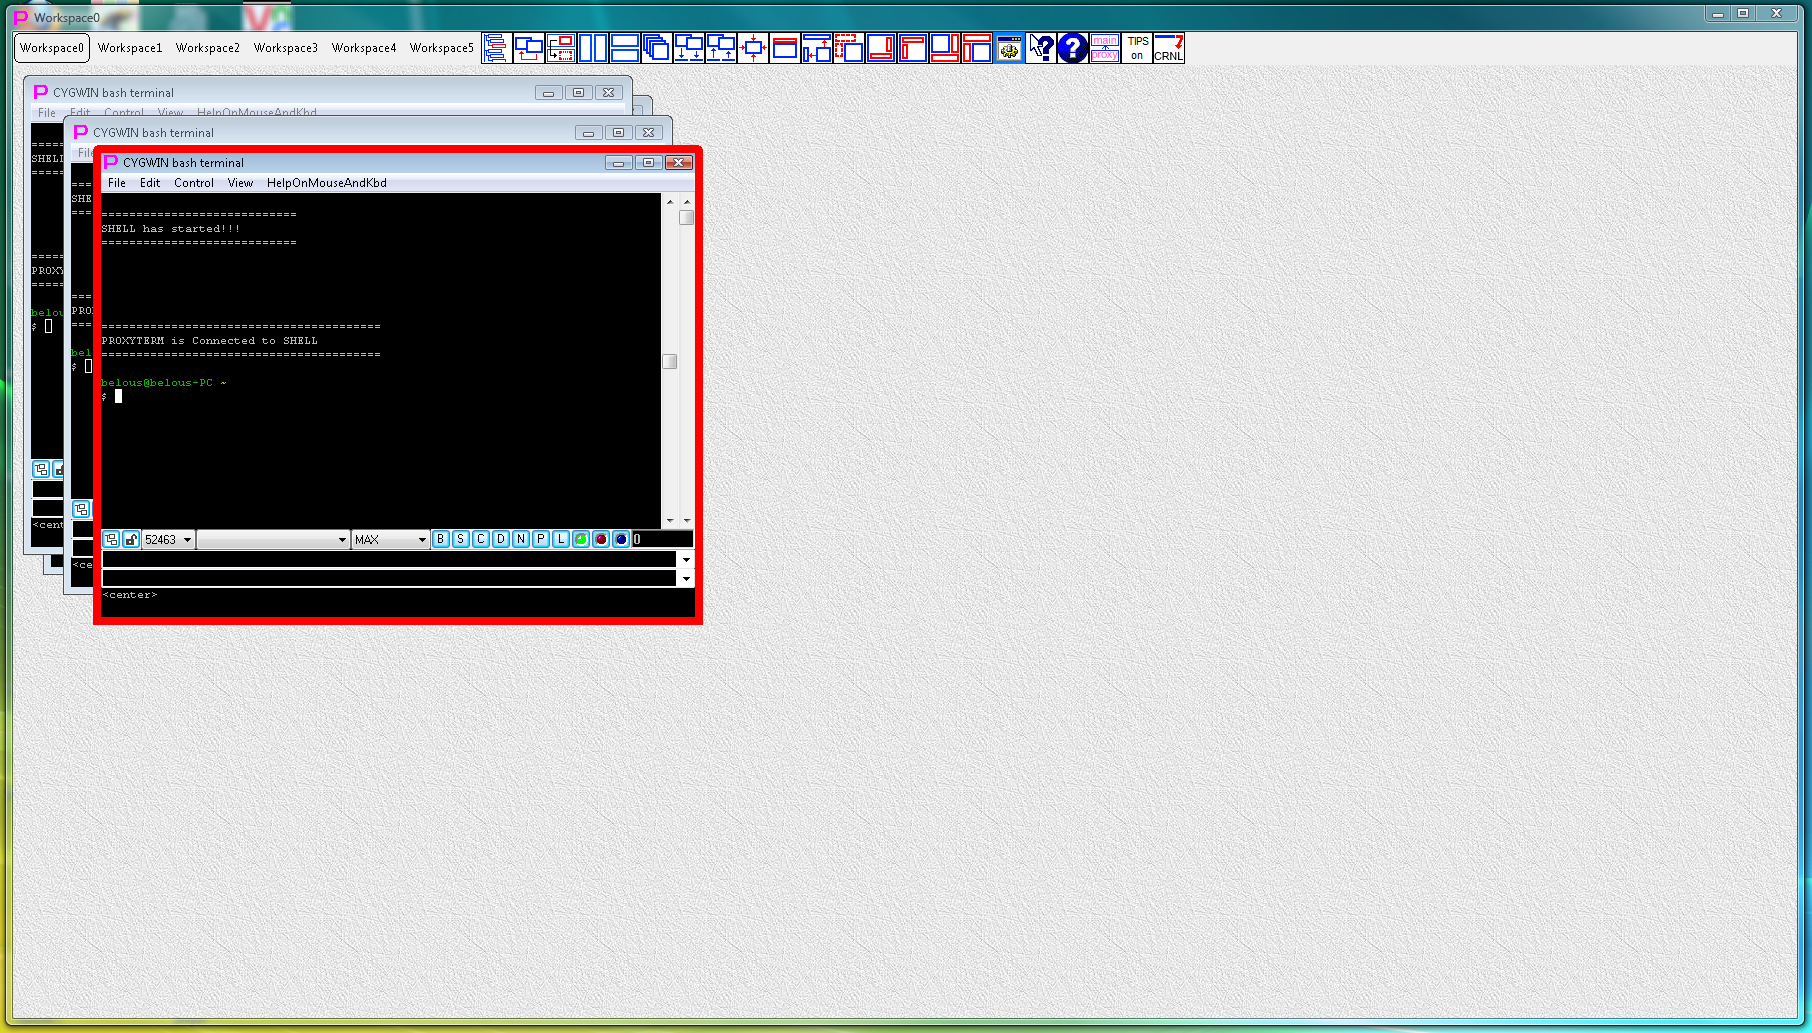
Fig.21 Example of the workspace with normalized windows. Default size and position are used.
Brief description:
Button to change title of the active window allows user to change title of active window.
Detailed description:
When new window is created via favorites menu or via LauncherTree floating window it gets title assigned to it (from tooltips field of the launcher that creates the window).
Button to change title of the active window allows user to change title of any active window. Pressing button pops up the dialog “New Window Title” that allows user to enter new title for the active window (Fig.22).
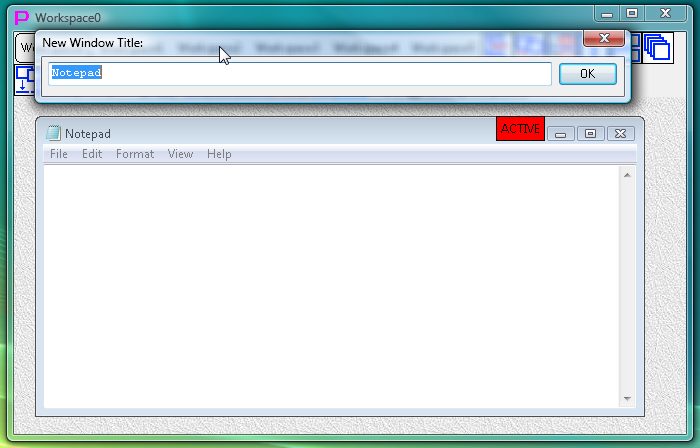
Fig.22. Dialog to enter new title of active window
In addition, for built-in Proxy32 terminal window the title can be edited "in place" when user makes right click on the titlebar of this window (Fig.23).
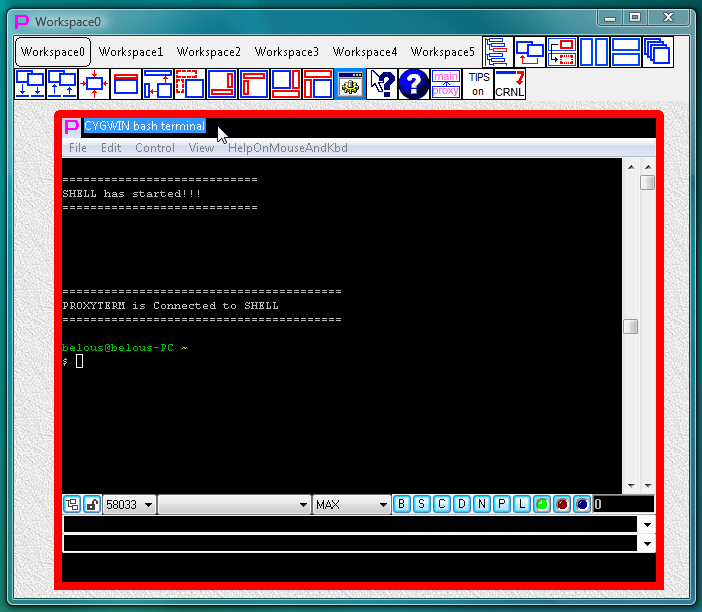
Fig.23. Editing title of the terminal window "in place"
New window title automatically appears in the list of windows in the current workspace. List pops up when button is pressed.
Some external processes, for example, PuTTY or MinTTY, may change the window title on command from remote computer. Proxy32 by default will restore the title that is given to the window in the Proxy32 environment. However, in the menu of the button one can allow to external processes to change the title of their own window.
Notes:
LeftClick on the button:
Close all non-minimized windows in current workspace. Button is particularly helpful to close group of input-sharing terminals connected to the cluster of remote hosts.
Brief description:
Menu of this button helps to tune user working environment. Pressing this button will show popup menu. In that popup menu one can select most convenient type of association between floating windows and the main window (fully dependent, partially dependent or completely independent positioning of floating windows), maximizing main window onto two monitors etc. Functions of this button are duplicated in the Options Dialog on the Page "Windows Behavior"
Detailed description:
It was already said in the Introduction that LauncherTree and Selector floating windows are the main components of the Proxy32 user interface (along with the main window)
When only one out of three windows visible to the user and the other two Proxy32 windows are covered by windows of the other programs, clicking the visible proxy32 window will bring to the front the other two proxy32 windows.
Main window and floating window LauncherTree can be made larger/smaller both by height and by width. Floating window Selector can be made larger/smaller only by width.
User can use the mouse to position any of the three proxy32 windows arbitrarily on the monitor (fig.24). When floating windows overlap with the main window they will be always positioned above it.
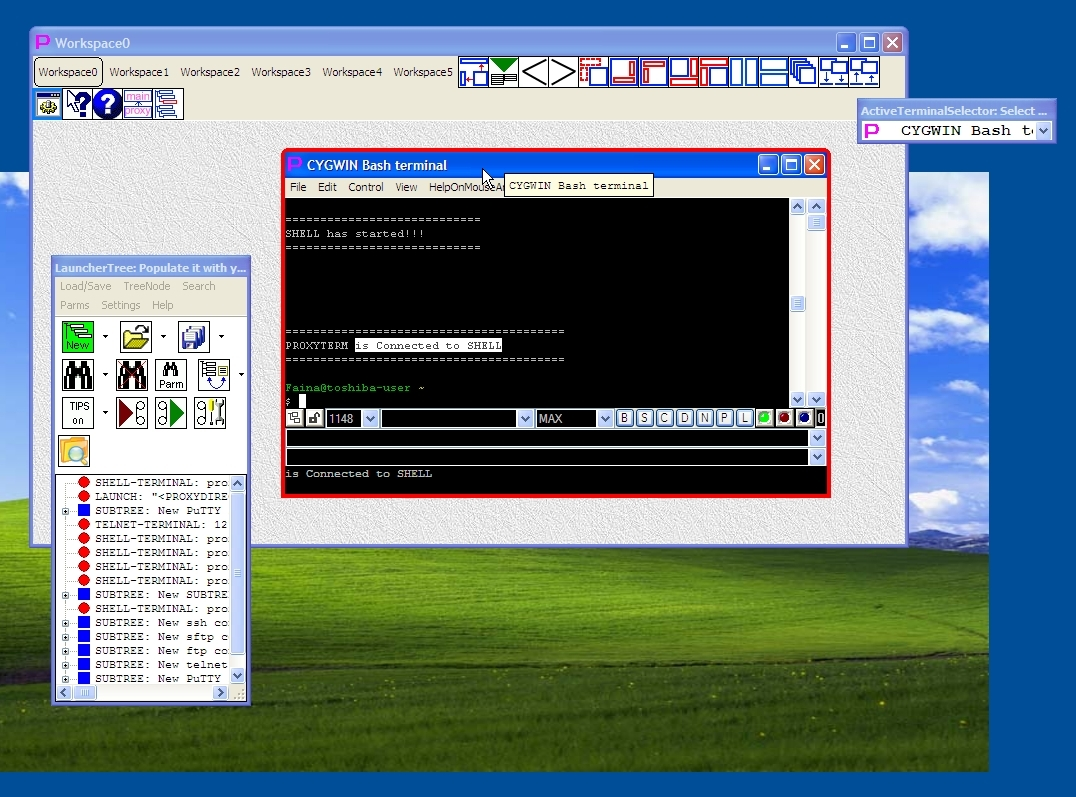
Fig.24. Arbitrary positioning of the floating windows
In the menubar of the main window there are buttons that control automatic positioning of the floating windows relative to the main window. They allow to automatically position floating windows into fixed positions inside or outside of the main window in the upper left or bottom right corner (fig.25). Fig. 25 shows windows positioning outside on the left after pressing button . All possible options of automatic window positioning are shown on fig.14-17 in the Introduction.
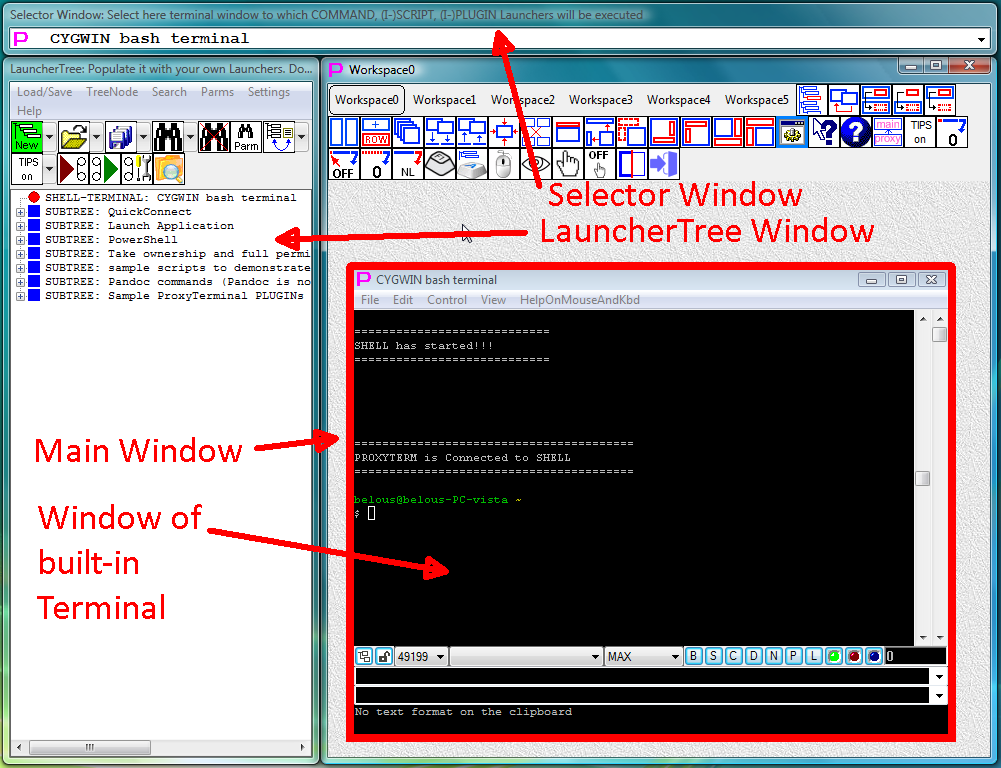
Fig.25. Floating windows on the left outside
Therefore, floating windows can be laid out on the monitor screen manually in arbitrary fashion, and also automatically into fixed positions relative to main window.
Button in the menubar of the main window allows to control how both floating windows (LauncherTree and Selector) will behave on moving and resizing main window (of course, moving and resizing of the main window is possible only when main window is not maximized). Pressing this button will show menu where user can select one of the three options of the behavior of the floating windows (fig.26):
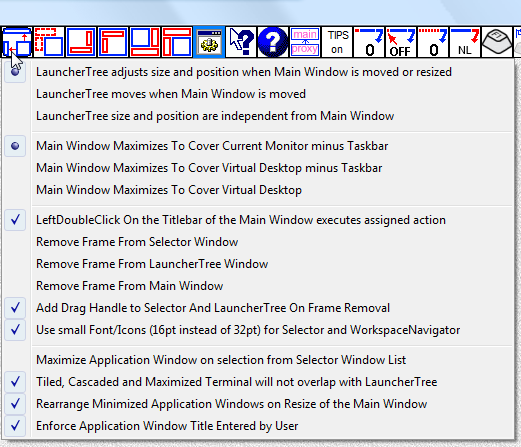
Fig.26. Menu of the button
In this menu user can select one of the three option of Floating windows behavior (fig.26):
"LauncherTree adjusts size and position when Main Window is moved or resized" is selected by default in Proxy32. When this option is selected, when main window is moved, floating windows will move together with main window, keeping their positions relative to each other (fig. 27). When main window is resized, floating windows adjust their sizes to match size of the main window (fig. 30). "LauncherTree moves when Main Window is moved" means that when main window is moved, floating windows are also moved with the main window keeping previous distance from top left corner of the main window (fig. 28); When main window is resized, floating windows will not adjust their sizes to match size of the main window (рис.31). "LauncherTree size and position are independent from Main Window" means that when main window is moved floating windows are not moving with the main window and not adjusting their sizes to match size of the main window (fig. 29, 31).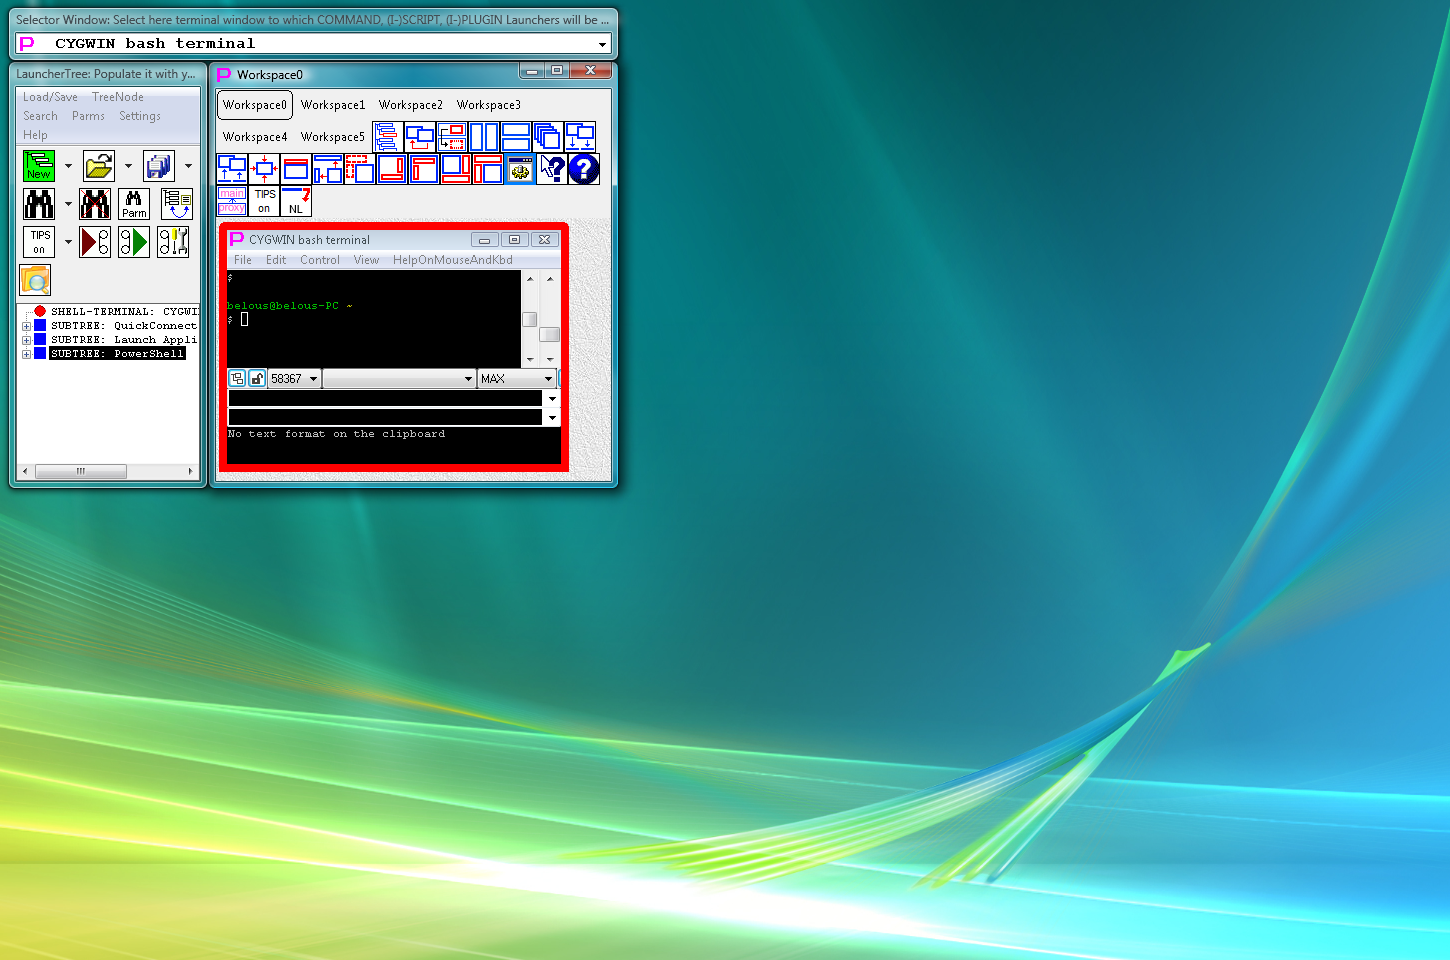
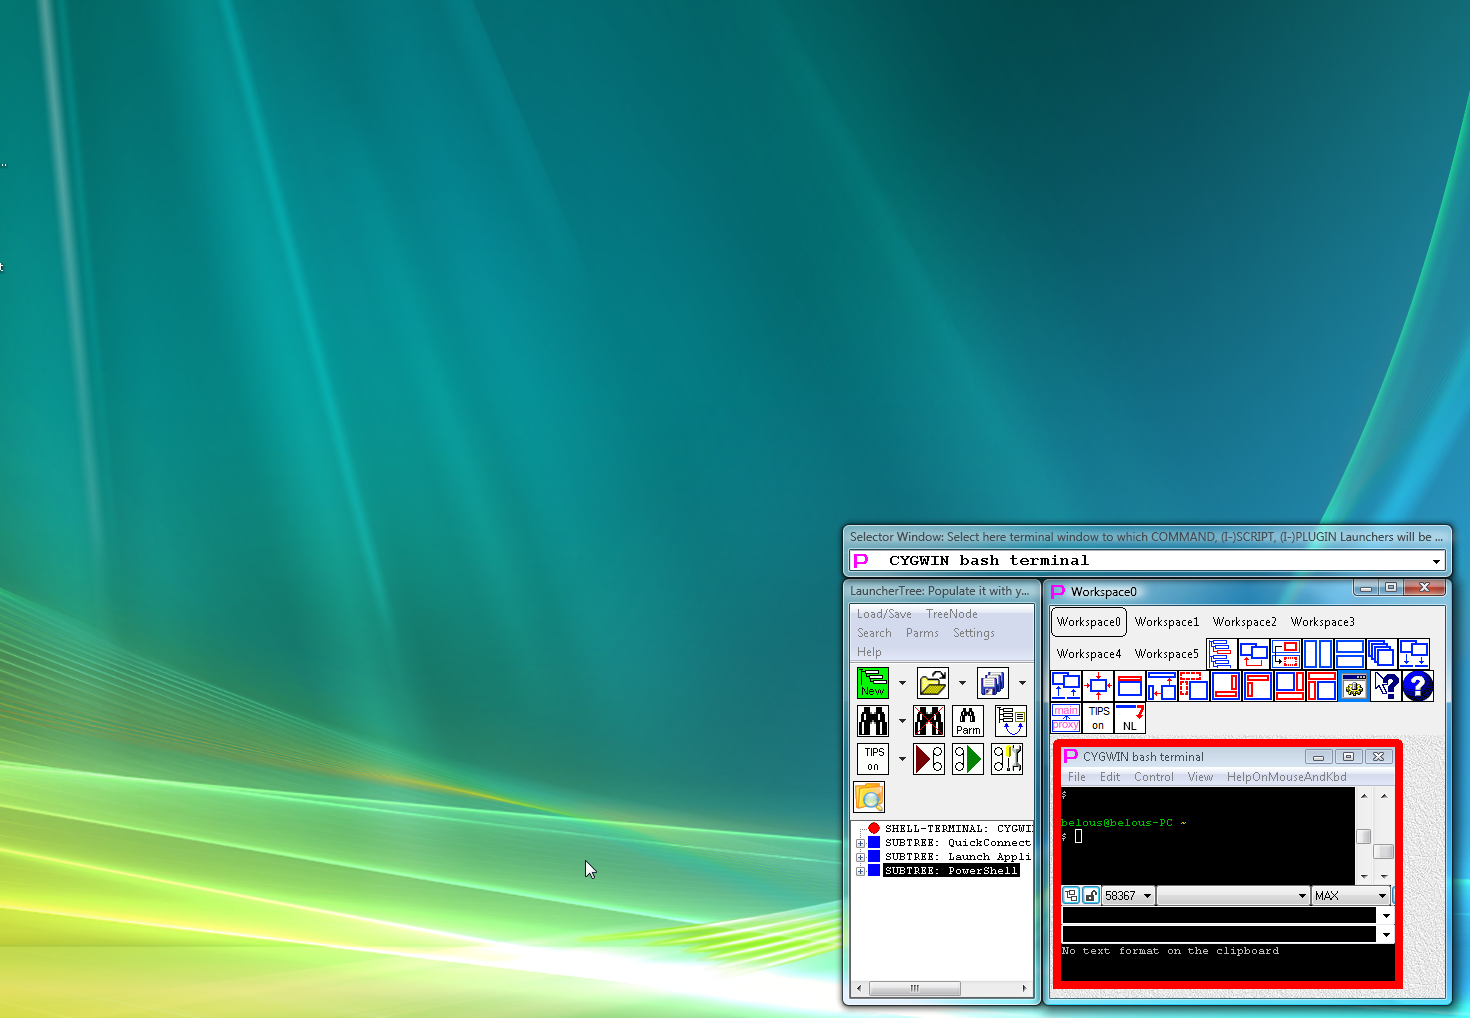
Fig.27. Option "LauncherTree adjusts size and position when Main Window moved or resized" is selected: before and after moving main window
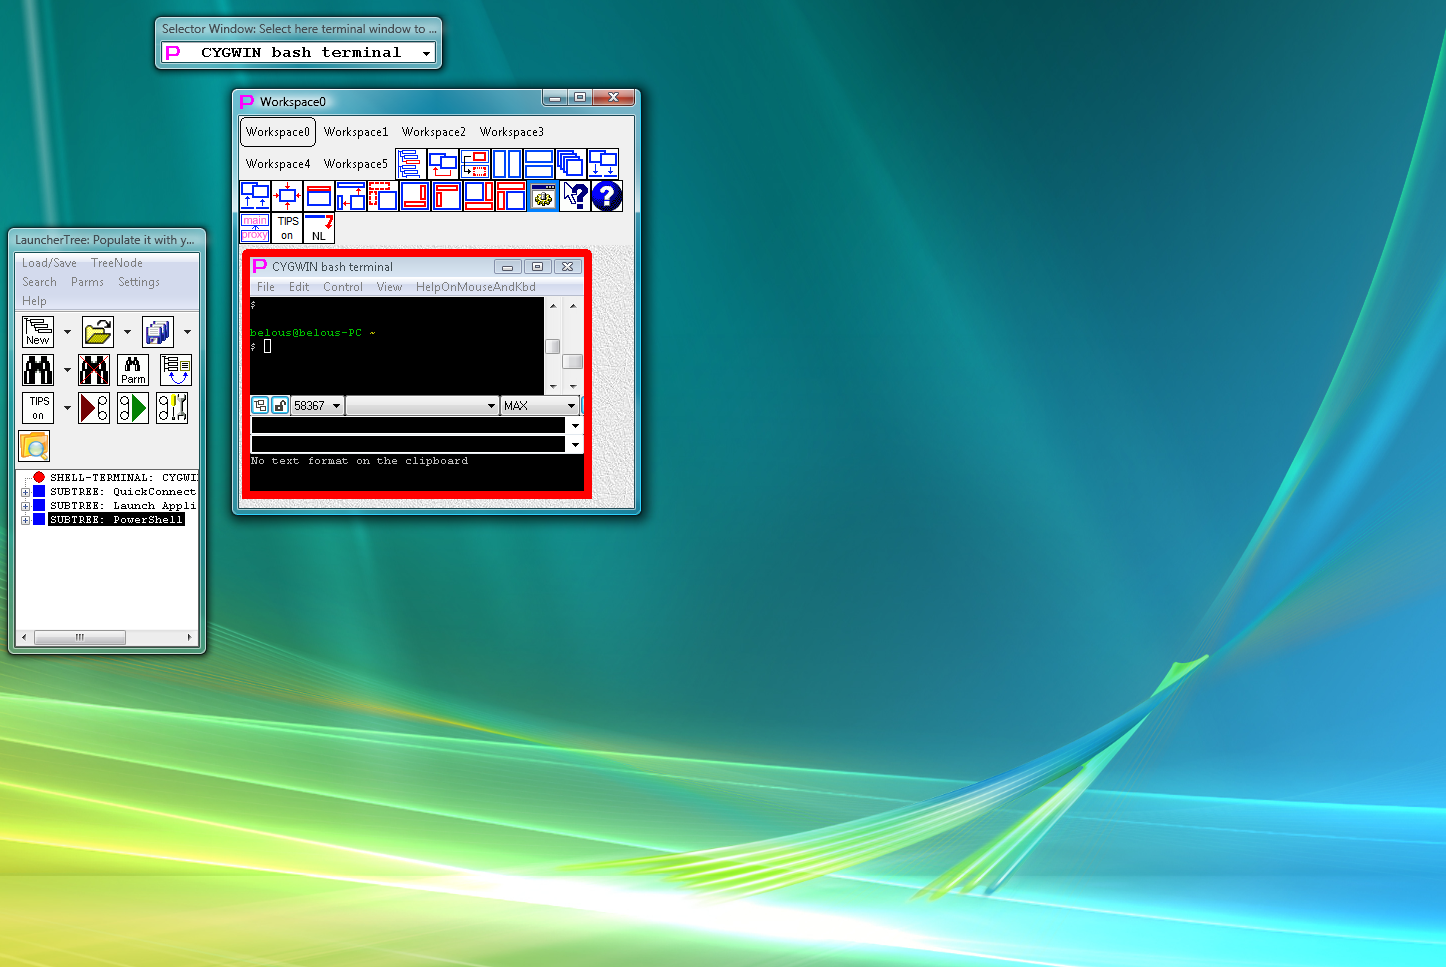
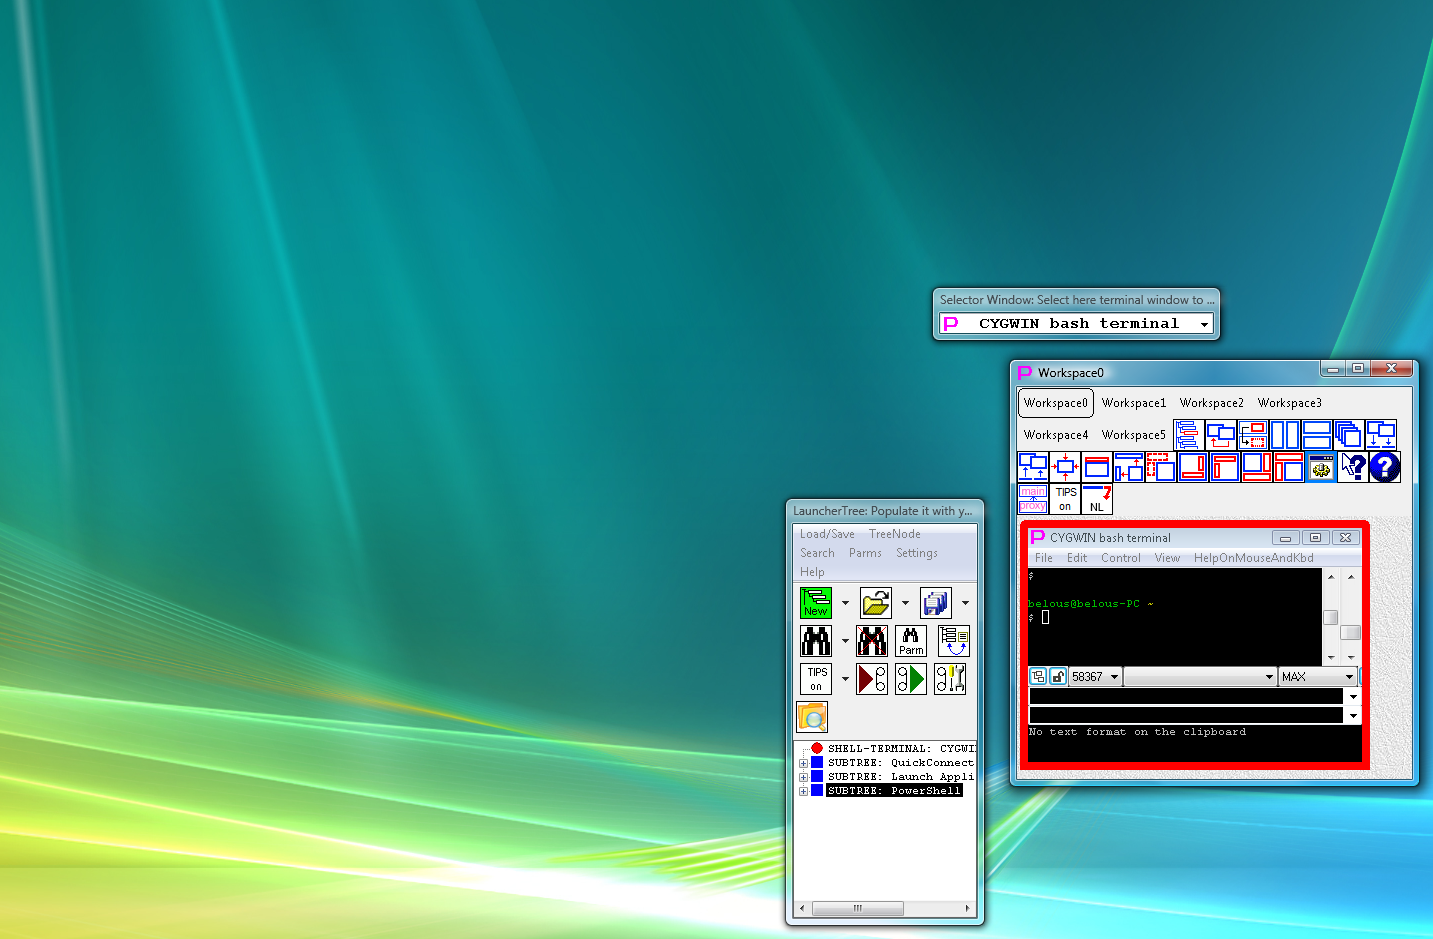
Fig.28. Option "LauncherTree moves when Main Window is moved" is selected: before and after moving main window
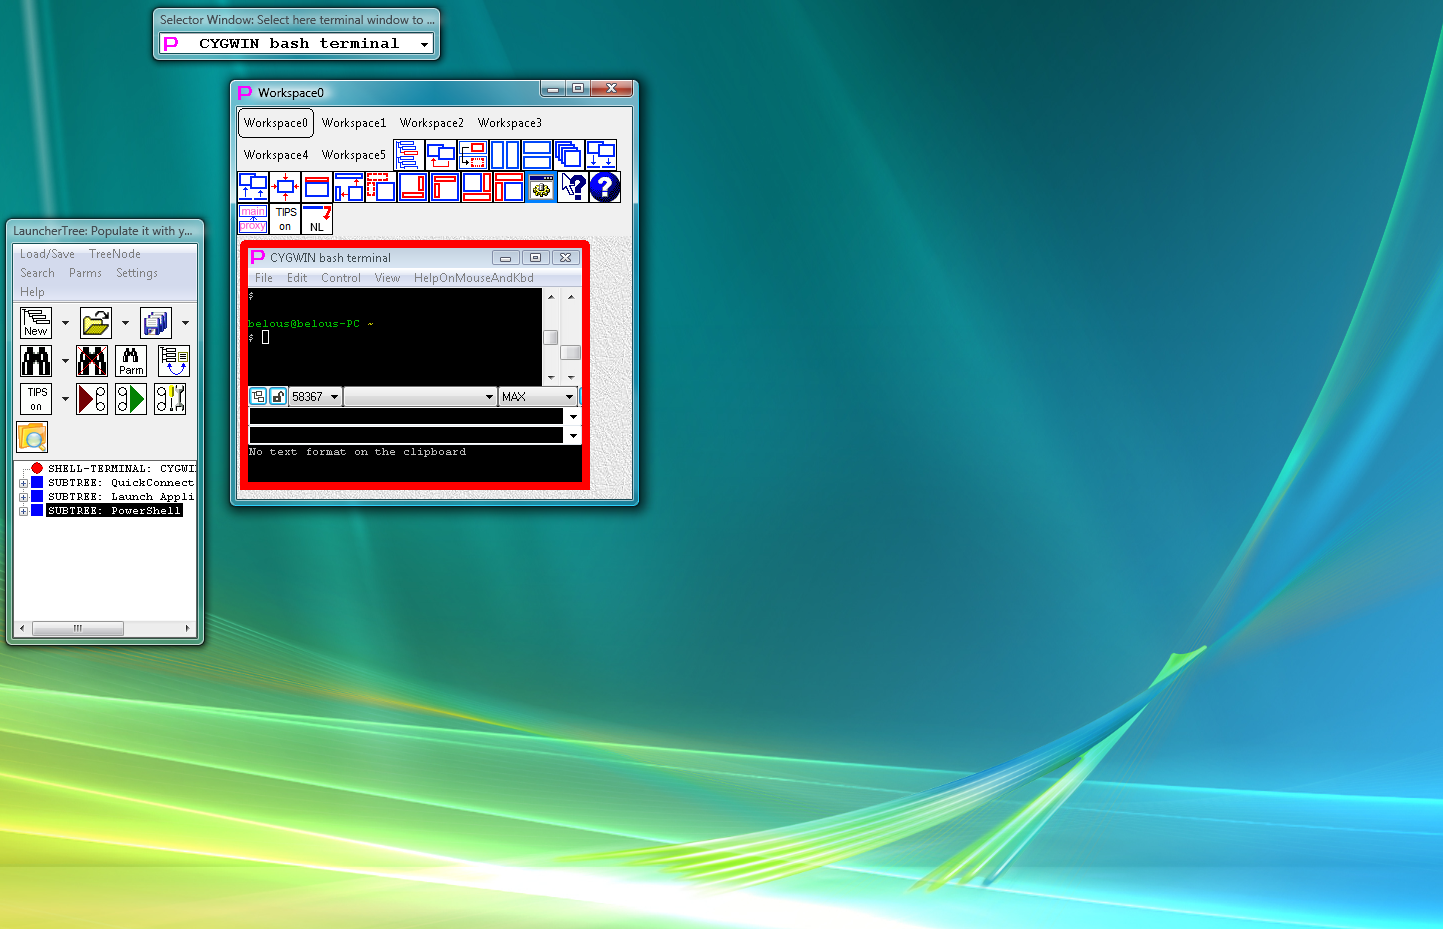

Fig.29. Option "LauncherTree size and position are independent from Main Window" is selected: before and after moving main window
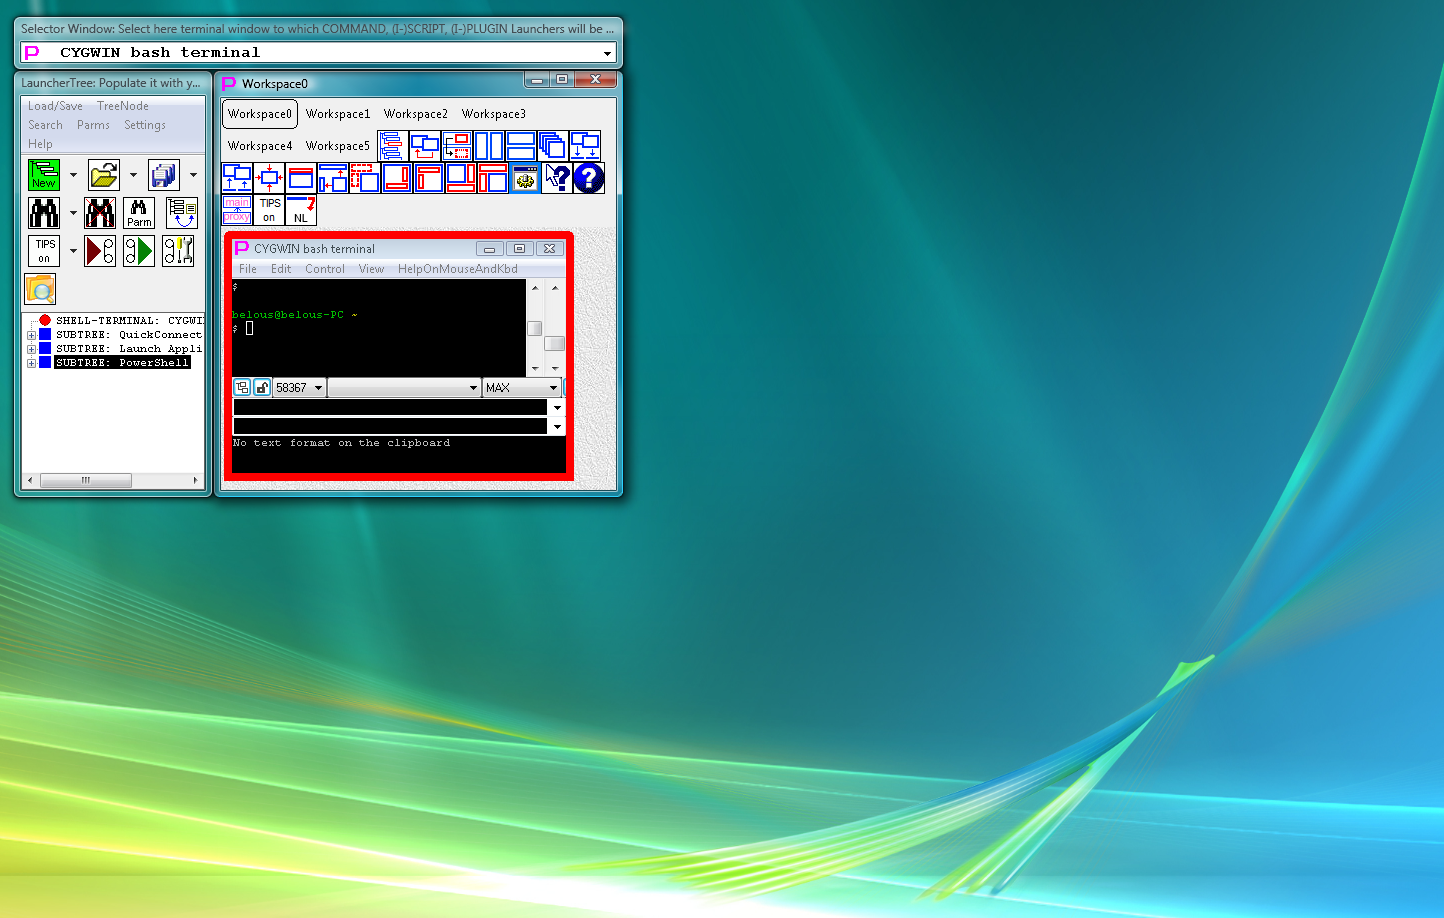
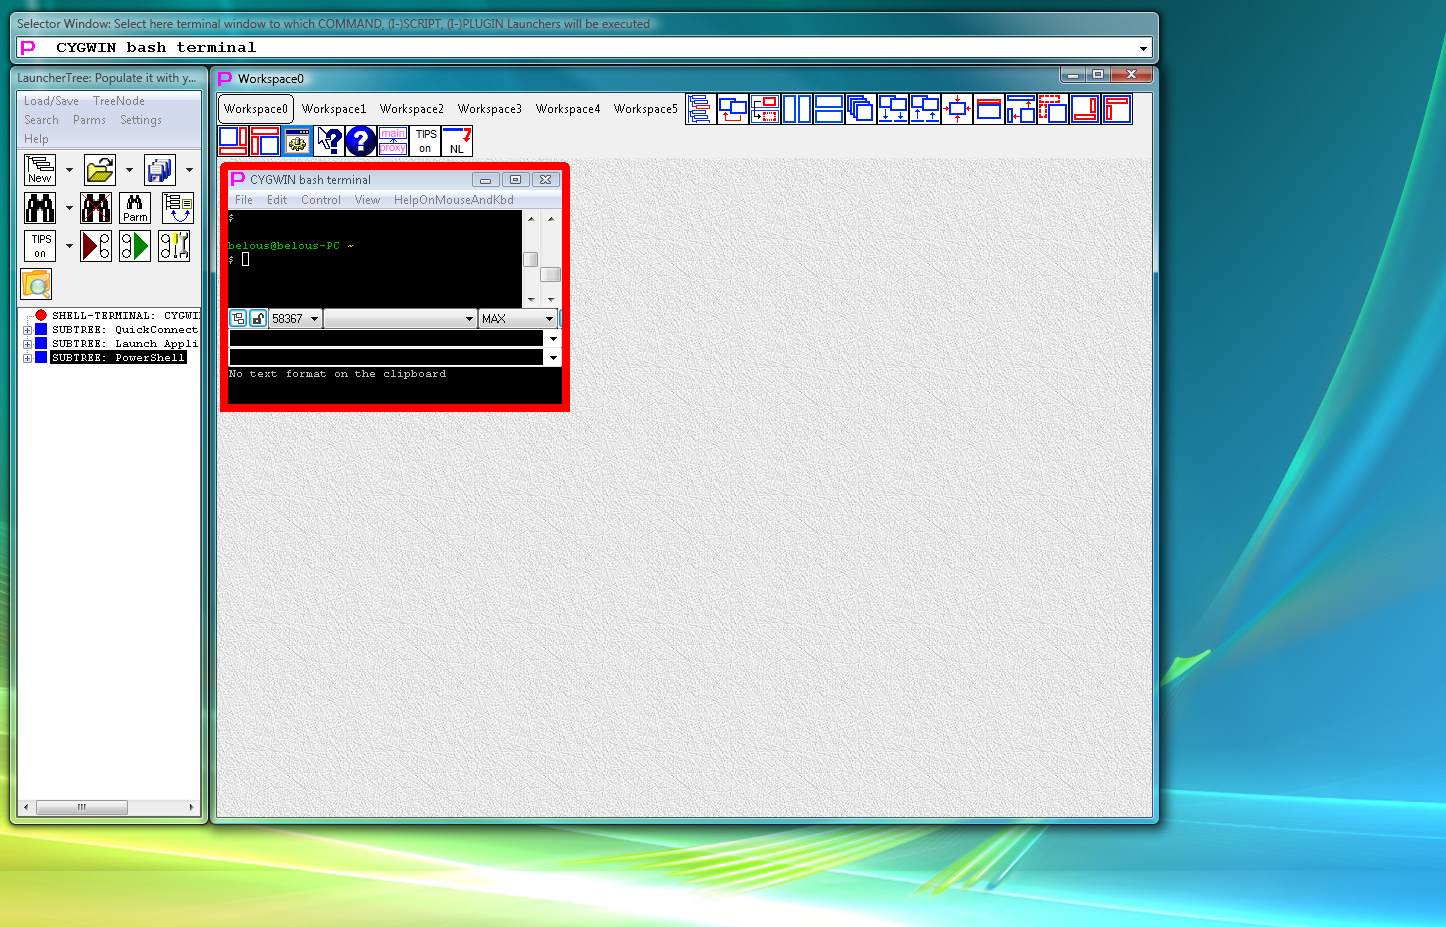
Fig.30. Option "LauncherTree adjusts size and position when Main Window moved or resized" is selected: before and after resizing main window
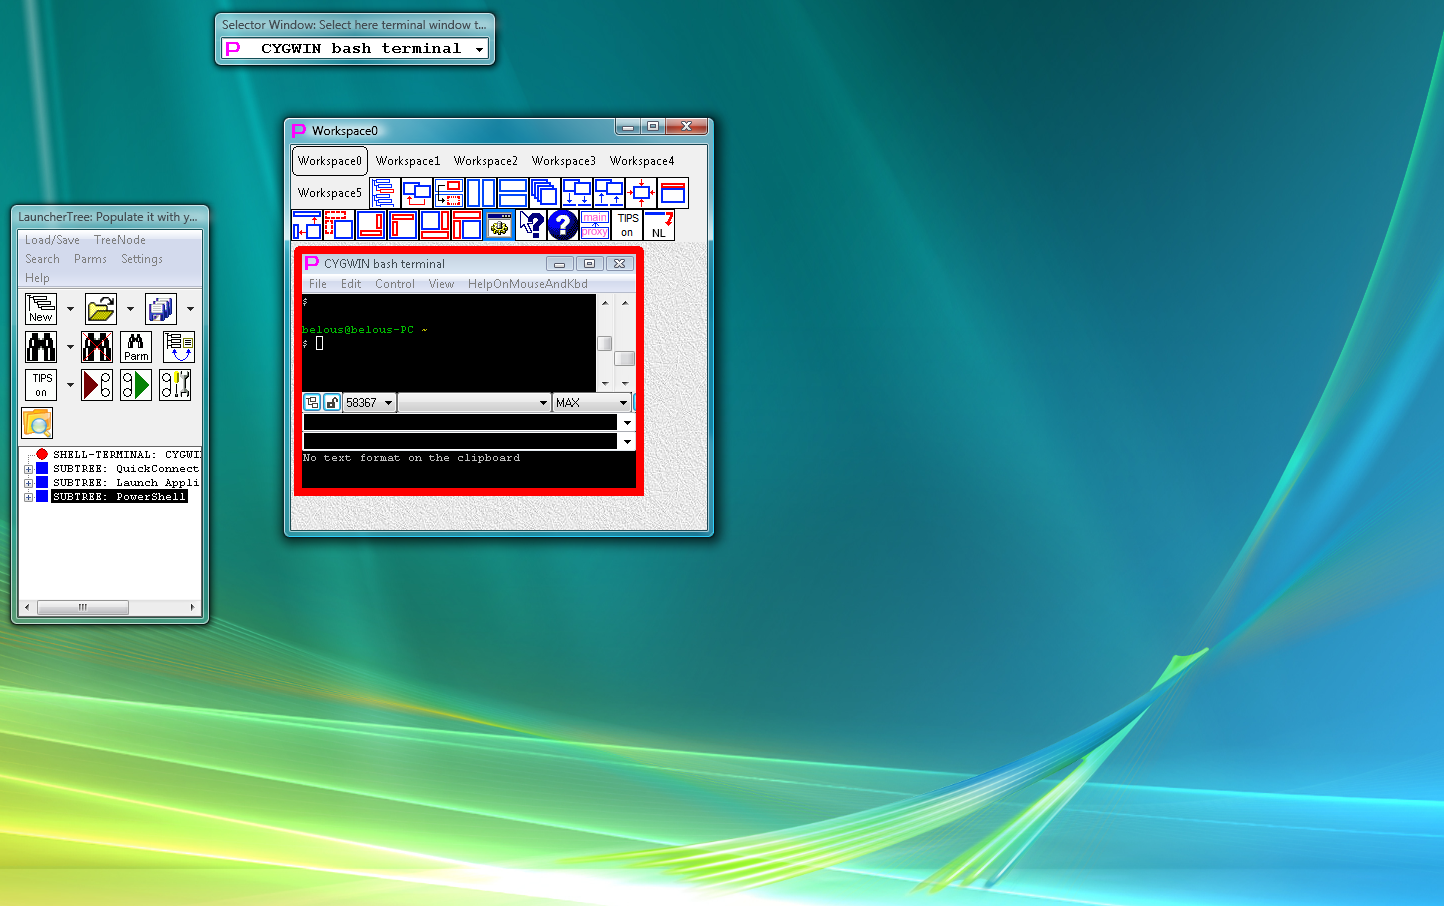
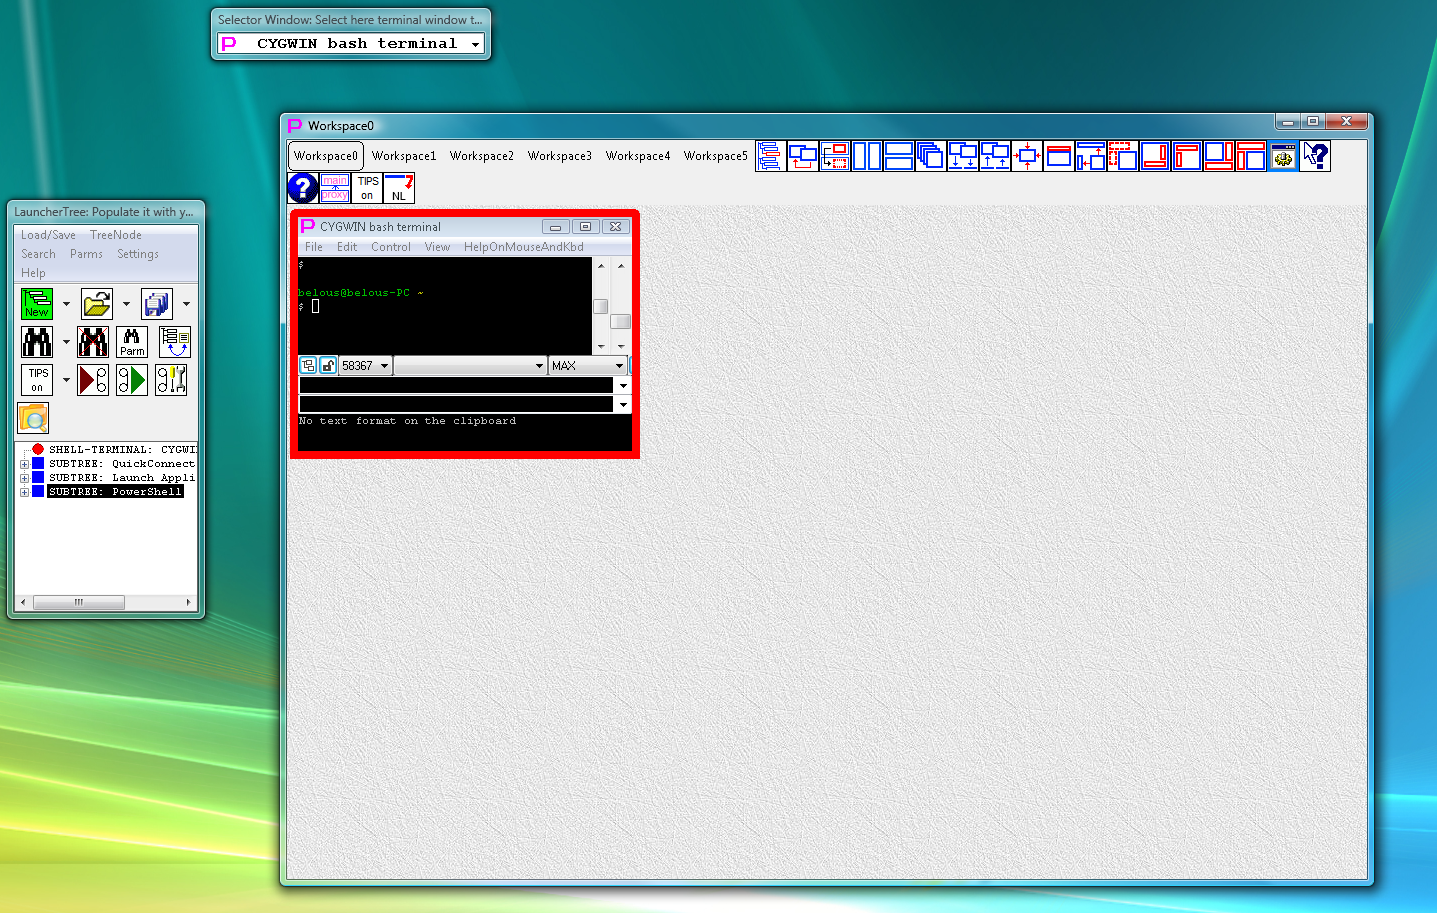
Fig.31. Option "LauncherTree moves when Main Window is moved" or "LauncherTree size and position are independent from Main Window" is selected: before and after resizing main window
In the menu of the button there are 6 additional options that user can select via checkmarks. These options allow to organize work in the main window according to users taste.
in menubar of the main window) to hide/show floating windows. This alternative method can be used when menubar of the main window is hidden and button is not available. (Menubar of the main window can be shown/hidden via both system menu and popup menu of the main window). (list of windows in current workspace) and (WorkspaceNavigator: move windows between workspaces via drag-n-drop). is pressed). If this checkmark is not set, selected windows does not maximize as a result of selection.
This button shows/hides floating windows LauncherTree and Selector. "Shown/Hidden" state of the floating windows is set by user and remembered after restart of Proxy32 application. To show floating windows press this button again or press one of the buttons "show and position floating windows".
Brief description:
These four buttons will show floating windows LauncherTree and Selector if they are hidden and place floating windows into preset fixed positions.
Detailed description:
It was already said above that floating windows can laid out on the monitor manually in arbitrary fashion and also automatically into fixed positions relative to main window. For this purpose menubar of the main window has 4 buttons . Those 4 buttons will "show" floating windows LauncherTree and Selector if they are hidden and place floating windows depending on user choice at the top left corner outside, or at the top left corner inside, or at the bottom right corner outside, or at the bottom right corner inside. In addition, floating windows will adjust their size to match dimensions of the main window. Fig. 32 shows positioning of floating windows at the top left corner inside of the main window. In the introduction fig. 14-17 show all possible option for automatic positioning of the floating windows.
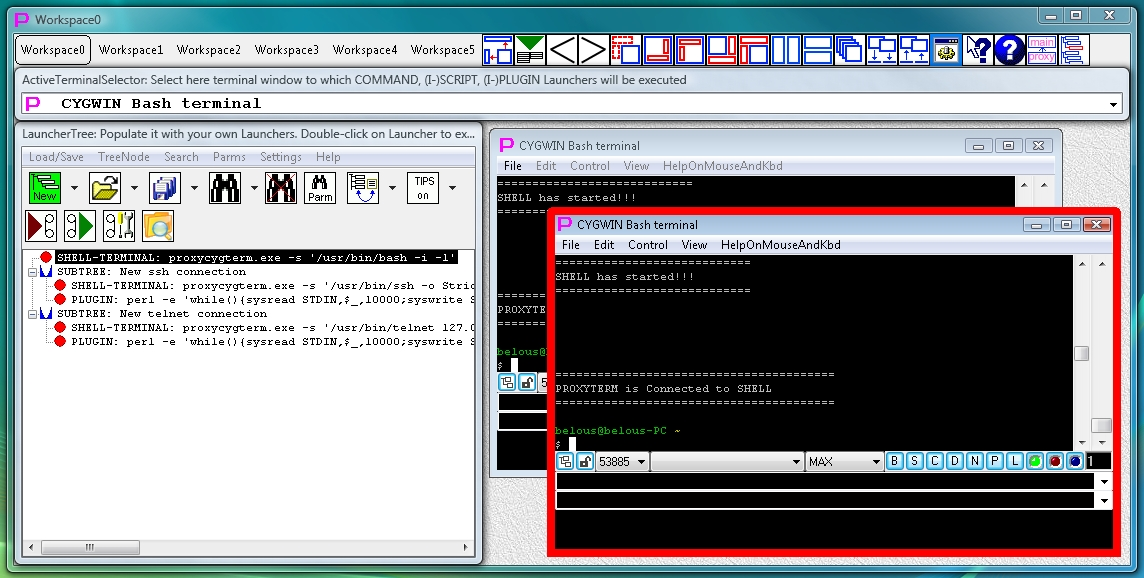
Fig.32. Floating windows are located in the top left corner inside after pressing the button
Possible positions of the floating windows are visually presented on the buttons. On those buttons main window is depicted as blue square and floating windows are depicted as red rectangles.
Positioning floating windows outside of the main window, as shown on the buttons is possible only if the main window is not maximized. Positioning floating windows inside of the main window, as shown on the buttons , is possible both when the main window is maximized and when it is not maximized.
If main window is not maximized and floating windows are positioned outside of main window, on maximization of the main window floating window will be automatically positioned inside of main window, as shown on the buttons .
If main window is maximized and floating windows are positioned inside of main window, on attempt to position floating windows outside by pressing one of the buttons main window will be put into non-maximized state and floating windows will be positioned outside.
Note:
Buttons will position floating windows regardless of settings of automatic floating window positioning in the menu of the button . But movement and resizing of the floating windows on movement and resizing of the main window will depend on the settings of automatic floating window positioning in the menu of the button .
Button opens popup menu of the main window (Fig.33).
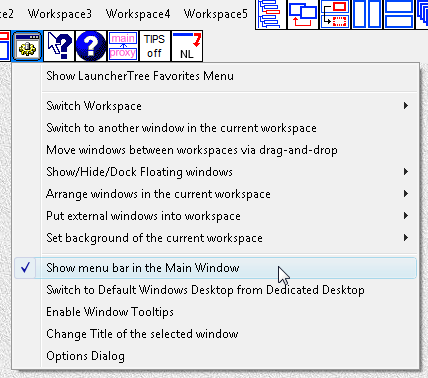
Fig.33. Popup menu of the main window
When menubar of the main window is hidden, button “Popup menu of the main window” is unavailable. There are following alternative ways to call this menu:
This popup menu contains many commands and options that duplicate buttons of the menubar of the main window. Some functions however are only available via this menu. Those commands and options are described in the section 3. Popup menu of the main window.
When this button is pressed, Proxy32 switches into context help mode for the next mouse click. Cusrsor takes shape of an arrow with the question mark. In this mode when pressing button or selecting menu item instead of executing action of the button or menu item proxy32 calls help page that describes that button or menu item. After this context help mode is turned off and cursor reverts to its standard shape.
Pressing this button will open help file. Help file has table of contents and index to help user locate needed subject.
Brief description:
Pressing this button will switch user from Dedicated Windows Desktop to the Common Windows Desktop. Switching works only when Proxy32 is running on Dedicated Windows Desktop.
Detailed description:
Proxy32 can create Separate Windows Desktop and start Proxy32 GUI on it. In this case programs started on Common Windows Desktop will be unable to interact with Proxy32 GUI (manipulate Proxy32 windows and send mouse and keyboard events into them). Running Proxy32 on the Separate Windows Desktop can be used for executing mission-critical tasks when user wants to avoid any interference from the other Windows applications.
Start of Proxy32 on the Separate Windows Desktop is disabled by default but it can be enabled via Proxy32 Options Dialog.
When Proxy32 GUI is started on the Separate Windows Desktop, it allows user to switch back and forth between Separate and Common Windows Desktops:
in the menubar of the main window. in the status area of the windows taskbar on Common Windows Desktop.
This button allows quickly turn on and off built-in Proxy32 tooltips. After installation of Proxy32 those tooltips are enabled by default. When user becomes familiar with all controls of the Proxy32 GUI, user can turn them off.
COMMAND launcher is designed as simplest form of automation to inject pre-defined (and possible parmetrized text) into keyboard buffer while window of external process has keyboard focus.
COMMAND launcher is also capable to send pre-defined text to the remote host of Proxy32 built-in terminal, but discussion below does not apply to execution of COMMAND launcher to the window of Proxy32 built-in terminal.
COMMAND launcher is executed by DoubleClick-ing on user created COMMAND-launcher node. Such node should be created by user in advance on Proxy32 LauncherTree that is displayed in Proxy32 LauncherTree floating window. COMMAND-launcher node contains text that will be injected to keyboard buffer on its execution.
When COMMAND launcher is executed to the window of external process, there are 5 parameters of execution that can be adjusted on all 5 steps of COMMAND launcher execution. First parameter is BEFORE_TYPE_DELAY:
COMMAND launcher is designed as simplest form of automation to inject pre-defined (and possible parmetrized text) into keyboard buffer while window of external process has keyboard focus.
COMMAND launcher is also capable to send pre-defined text to the remote host of Proxy32 built-in terminal, but discussion below does not apply to execution of COMMAND launcher to the window of Proxy32 built-in terminal.
COMMAND launcher is executed by DoubleClick-ing on user created COMMAND-launcher node. Such node should be created by user in advance on Proxy32 LauncherTree that is displayed in Proxy32 LauncherTree floating window. COMMAND-launcher node contains text that will be injected to keyboard buffer on its execution.
When COMMAND launcher is executed to the window of external process, there are 5 parameters of execution that can be adjusted on all 5 steps of COMMAND launcher execution. Second parameter is MOUSEMOVECLICK:
F4 in my favored configuration. Thare is no other way to set MOUSEMOVECLICK_MOUSEPOSITION coordinates. I am positioning mouse pointer over certain application window inside of Virtual desktop window (which is "ACTIVE" at that time) and pressing F4 to set MOUSEMOVECLICK_MOUSEPOSITION coordinates to the position of mouse pointer inside of "ACTIVE" window. MOUSEMOVECLICK_MOUSEPOSITION coordinates are stored in memory for as long as Proxy32 is running. They are not stored on exit of Proxy32. After they are set, MOUSEMOVECLICK_MOUSEPOSITION coordinates can also be substituted into AHK script that is contained inside of E-SCRIPT launcher. It is done by using substutution parameters <PROXYMOUSEXWITHINACTIVESTICKERWINDOW> and <PROXYMOUSEYWITHINACTIVESTICKERWINDOW>. Doing so allows AHK script to allows AHK script to adjust point of origin when simulating mouse clicks inside of application window that is located inside of the "Virtual Desktop" window.NOTE: To pre-set position for MOVE or CLICK assign ACTION SET_COMMAND_LAUNCHER_MOUSEMOVECLICK_MOUSEPOSITION to some HOTKEY key combination and use this key/action to capture current cursor position relative to left top corner of currently active window. After position is captured, MOUSEMOVECLICK step of COMMAND execution will use captured coordinates to execute MOVE or CLICK.
| ACTION NAME | ACTION DESCRIPTION |
| SET_COMMAND_LAUNCHER_MOUSEMOVECLICK_MOUSEPOSITION |
Applies to execution of COMMAND launcher to the window of external process and to execution of E-SCRIPT launcher that uses substutution parameters Sets MOUSEMOVECLICK_MOUSEPOSITION coordinates to the position of mouse pointer inside of "ACTIVE" window and stores those coordinates in memory till exit of Proxy32 or till new coordinates will be set. Set coordinates are used by MOUSEMOVECLICK step of COMMAND launcher execution and also can be passed to E-SCRIPT AHK program via substutution parameters |
COMMAND launcher is designed as simplest form of automation to inject pre-defined (and possible parmetrized text) into keyboard buffer while window of external process has keyboard focus.
COMMAND launcher is also capable to send pre-defined text to the remote host of Proxy32 built-in terminal, but discussion below does not apply to execution of COMMAND launcher to the window of Proxy32 built-in terminal.
COMMAND launcher is executed by DoubleClick-ing on user created COMMAND-launcher node. Such node should be created by user in advance on Proxy32 LauncherTree that is displayed in Proxy32 LauncherTree floating window. COMMAND-launcher node contains text that will be injected to keyboard buffer on its execution.
When COMMAND launcher is executed to the window of external process, there are 5 parameters of execution that can be adjusted on all 5 steps of COMMAND launcher execution. Third parameter is INTERCHARDELAY:
COMMAND launcher is designed as simplest form of automation to inject pre-defined (and possible parmetrized text) into keyboard buffer while window of external process has keyboard focus.
COMMAND launcher is also capable to send pre-defined text to the remote host of Proxy32 built-in terminal, but discussion below does not apply to execution of COMMAND launcher to the window of Proxy32 built-in terminal.
COMMAND launcher is executed by DoubleClick-ing on user created COMMAND-launcher node. Such node should be created by user in advance on Proxy32 LauncherTree that is displayed in Proxy32 LauncherTree floating window. COMMAND-launcher node contains text that will be injected to keyboard buffer on its execution.
When COMMAND launcher is executed to the window of external process, there are 5 parameters of execution that can be adjusted on all 5 steps of COMMAND launcher execution. Fourth parameter is LINETERMINATOR:
Enter key. There are 4 possible values for LINETERMINATOR: NONE, CR, NL and CRNL. For example, working with Windows Console would require CRNL and woring with LINUX terminal would require NL. When the text is injected into some text fields in the web-page shown in the browser, user may opt to use NONE as line LINETERMINATOR.
COMMAND launcher is designed as simplest form of automation to inject pre-defined (and possible parmetrized text) into keyboard buffer while window of external process has keyboard focus.
COMMAND launcher is also capable to send pre-defined text to the remote host of Proxy32 built-in terminal, but discussion below does not apply to execution of COMMAND launcher to the window of Proxy32 built-in terminal.
COMMAND launcher is executed by DoubleClick-ing on user created COMMAND-launcher node. Such node should be created by user in advance on Proxy32 LauncherTree that is displayed in Proxy32 LauncherTree floating window. COMMAND-launcher node contains text that will be injected to keyboard buffer on its execution.
When COMMAND launcher is executed to the window of external process, there are 5 parameters of execution that can be adjusted on all 5 steps of COMMAND launcher execution. Fifth parameter is FOCUSRELEASE:
Ctrl-Alt automatically at the end of every COMMAND that uses MOUSEMOVECLICK=CLICK.Fig. 33 shows popup menu of the main window. It opens when button is pressed.
When menubar of the main window is hidden, button “Popup menu of the main window” is not available. There are following alternative ways to call this menu:
To open Popup menu of main window:
To open System menu of main window:
This popup menu contains many commands and options that duplicate buttons of the menubar of the main window. Some functions however are only available via this menu:
of the menubar of the main window, contains additional options: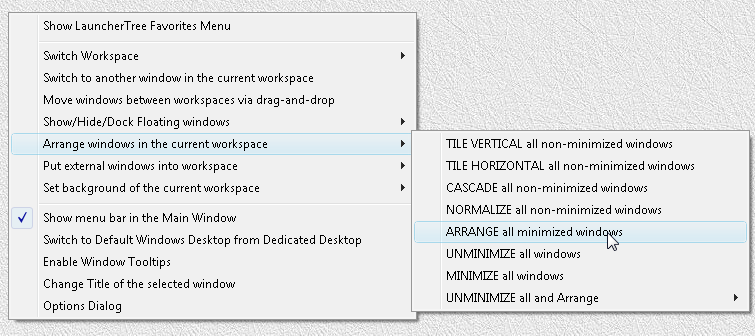
Fig.34. Popup menu of the main window, command "ARRANGE all minimized windows"
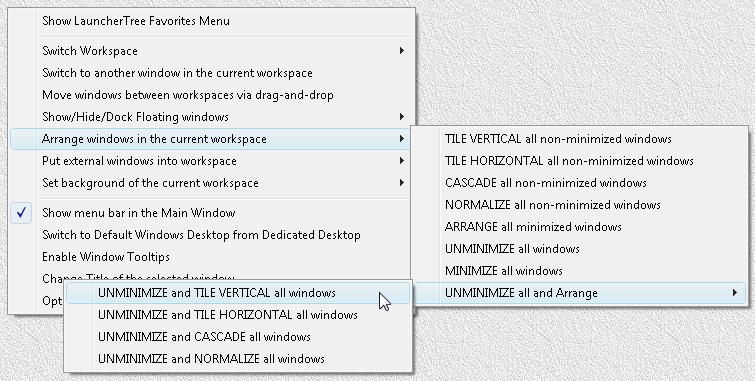
Fig.35. Popup menu of the main window, Submenu "UNMINIMIZE all and Arrange"
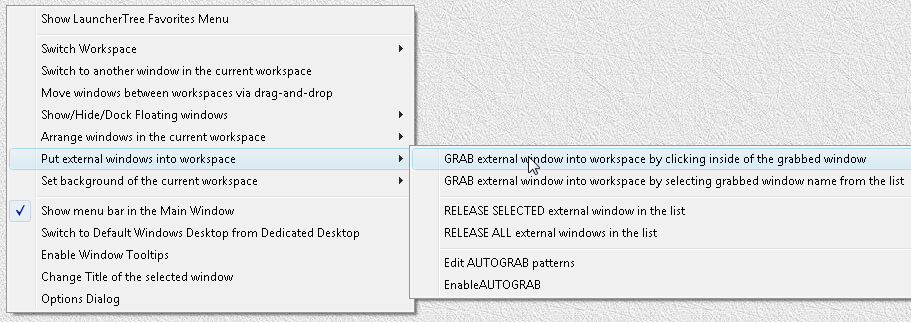
Fig.36. Popup menu of the main window, Submenu "Put external windows into workspace"
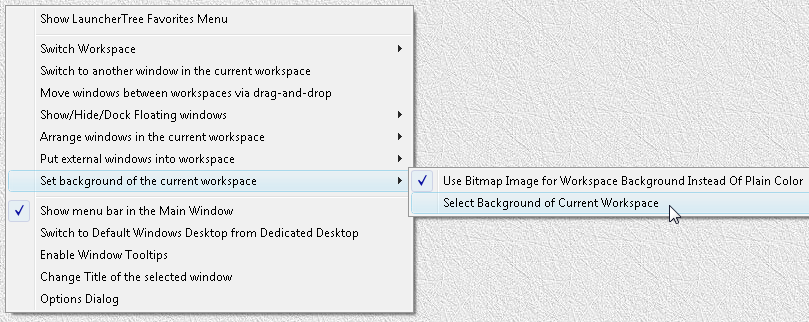
Fig.37. Popup menu of the main window, Submenu "Set background of the current workspace"
Command "Show menu bar in the Main Window" allows to show/hide menubar of the main window (fig.33).
Command "Options Dialog" calls dialog that contains setting for the whole proxy32 application (fig.38). Fig.39 shows Options Dialog window. "Option Dialog" is described in more details here.
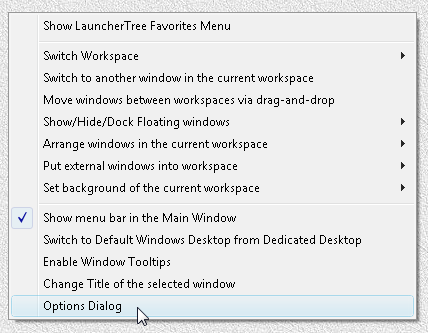
Fig.38. Popup menu of the main window, Command "Options Dialog"
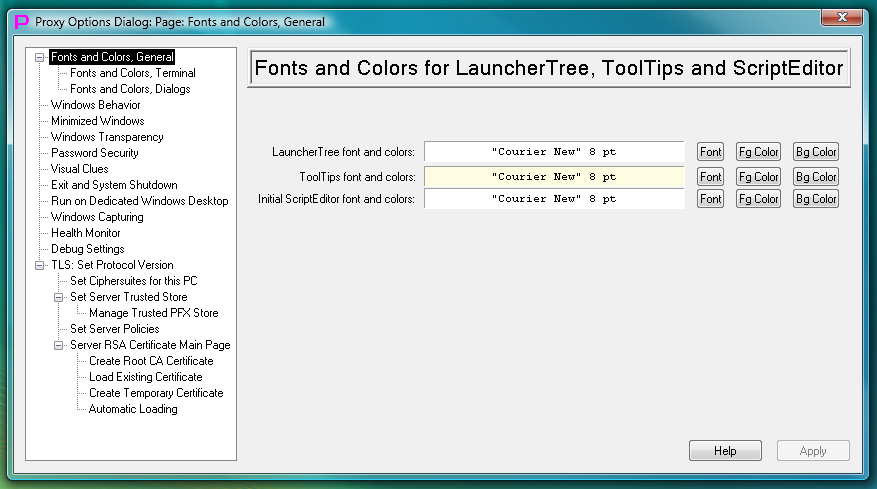
Fig.39. Options Dialog window
Proxy32 System menu of the main window is practically identical to Popup menu of the main window that shows on pressing button “Popup menu of the main window” in the menubar of the main window and that was described above in detail. As can be seen from fig.40, comparing to “Popup menu of the main window” system menu contains additional options to close, maximize and minimize main window. Those options are standard for window's system menu for majority of MS Windows applications.
Ways to open System menu of main window:
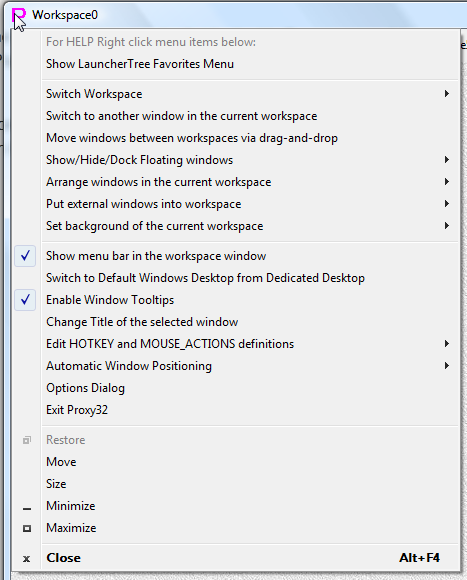
Fig.40. System menu of the main window
While most operations in the main window can be performed via large buttons of the menubar of the main window, sometimes one may prefer to hide menubar of the main window to make more space in the workspace. In such case one can access functions of all buttons via the Popup/System menu of the main window. Functions of some most frequently used buttons are assigned (as Actions) to individual mouse shortcuts for direct access (without need to go through Popup/System menu of the main window). Mouse shortcuts will work not only on the background of the main window but also on the title of the main window (RightClick is reserved for workspace title change and double-click can be configured to preserve its MS-Windows "default" action of "toggle between zoom and restore window") and even on the title of the floating windows. This helps when background of the main window is covered with terminal windows.
Default mapping of mouse shortcuts to Actions can be changed via "Mouse Actions" Dialog. Dialog can be opened by pressing button in the menubar of the main window. Dialog can also be opened via Popup/System menu of the main window:
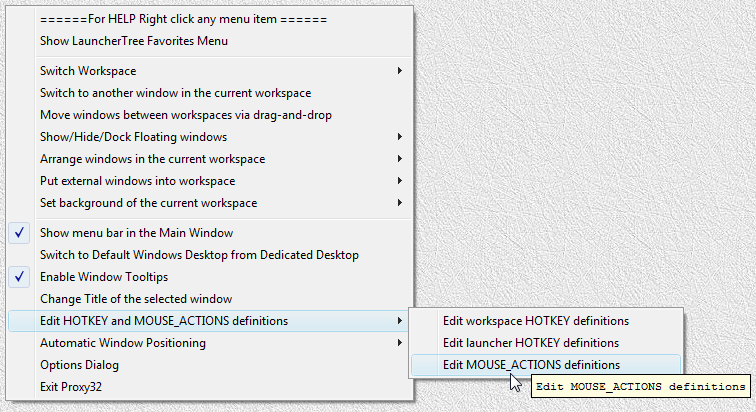
Fig.41. How to call "Mouse Actions" Dialog from popup menu of the main window
When opened for the first time this dialog will show default mapping of mouse shortcuts to Actions:
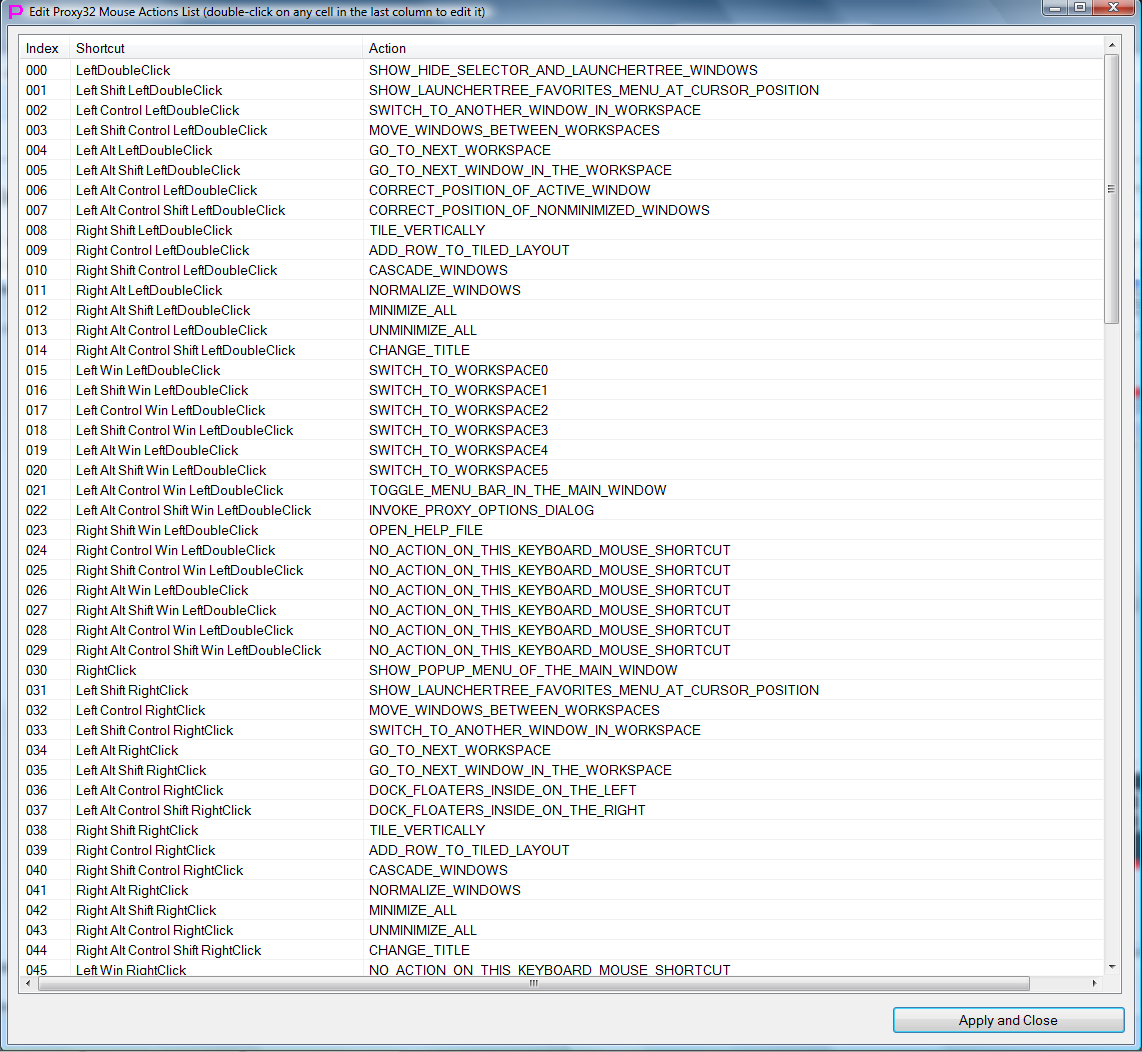
Fig.42. Default mapping of mouse shortcuts to Actions
Default mapping of mouse shortcuts to Actions can be changed via "Mouse Actions" Dialog. Changes are stored in Settings.xml file in proxy32 startup directory.
To call Popup/System menu of the main window (equivalent to button and covers almost all main window functionality):
Button "show/hide floating windows"
Button to move windows between workspaces
Open System menu of main window:
If configured in Proxy32 option dialog to preserve its MS-Windows "default" action of "toggle between zoom and restore window":
Rename Workspace:
Rename window of the built-in terminal:
Capture/Release window of external process inside of workspace window (Manual GRAB):
1. General information
2. Description of the menubar of the main window
3. Popup menu of the main window
4. System menu of the main window
5. Mouse and keyboard shortcuts in the main window
5.1 Configurable Mouse shortcuts in the main window
5.2 Reserved Mouse shortcuts in the main window