Fig. 1. Window of the Proxy32 built-in terminal
1.1 What is terminal emulator?
1.2 Terminal screen scrollback buffer
1.3 Search in the terminal scrollback buffer
1.4 Copy and paste via clipboard
1.5 Sharing terminal session between multiple users
2. Description of the Proxy32 built-in terminal
2.1. Capabilities of the built-in terminal
2.1.1. General information
2.1.2. Controls in the built-in terminal window
2.1.3. Scrolling in the built-in terminal
2.1.4. Bookmarking and text search in the scroll back buffer of the built-in terminal
2.1.5. Copy and Paste operations in the built-in terminal
2.1.6. Sharing Terminal Session with Remote users
2.1.7. Flow control in the terminal
2.2. Creating, connecting, disconnecting and re-connecting windows of the built-in terminal
2.2.1. Brief introductory information
2.2.2. Ways to create and connect window of the built-in terminal
2.2.3. Using launchers to create and connect windows of the built-in terminal
2.2.4. Disconnect, re-connect and terminal state indication (button CONNECT/DISCONNECT)
2.2.5. Using substitution parameters in the launchers for creation and connection of the built-in terminal windows
2.2.6. AUTOLOGIN and passwords
2.3. Creating launchers for Proxy32 built-in terminal
2.3.1. Creating SHELL-TERMINAL launchers with the "New" button
2.3.2. Creating SHELL-TERMINAL launchers with Proxy32 TreeNode Editor
2.3.3. Editing (modifying) SHELL-TERMINAL launchers
2.3.4. Creating and editing TELNET-TERMINAL and COM-PORT-TERMINAL launchers
2.4. Automating work in the built-in terminal
2.5. Terminal Menu Reference
2.5.1 Menu "File"
2.5.2 Menu "Edit"
2.5.3 Menu "Control"
2.5.3.1 Command "Control/Show LauncherTree Favorites Menu"
2.5.3.2 Submenu "Control/Connect via TELNET, COM-PORT or SHELL"
2.5.3.3 Submenu "Control/Sharing Terminal Session with other users"
2.5.3.4 Command "Control/Send TELNET/COM-PORT Break (Break key)"
2.5.3.5 Submenu "Control/Log File and Scroll Buffer"
2.5.3.6 Submenu "Control/LINE TERMINATORS"
2.5.3.7 Submenu "Control/TERMINAL WINDOW RESIZE AND NAWS"
2.5.3.8 Submenu "Control/TERMINAL SPARE BOOLEAN SETTINGS"
2.5.3.9 Submenu "Control/TERMINAL EMULATOR SETTINGS"
2.5.3.10 Submenu "Control/WORKAROUNDS"
2.5.4 Menu "View"
2.5.5 Menu "HelpOnMouseAndKbd"
Functionality of the terminal includes keyboard, screen and connection module that connects keyboard and screen to local or remote computer in order to send text commands from keyboard and to receive in response text of command execution results and show this text on the screen.
Standalone terminals implemented in hardware are practically replaced by the personal computers that are running software applications called terminal emulators. In such applications, terminal screen is represented by program window and terminal keyboard is represented by keyboard of personal computer. Term personal computer in this context includes tablets and smart mobile phones.
In the terminal emulator software connection module allows to connect terminal either directly to the program for the text mode control of the local computer (local shell) or via protocols COM-PORT, TELNET, SSH, TELNET-TLS to the program for the text mode control of the remote computer (remote shell).
Terminal emulator application has to mimic the behavior of the standalone terminal implemented in hardware. Terminal emulator application should be able to recognize and execute all screen control commands (control sequences of bytes) that were supported by particular standalone hardware terminal that is being emulated. Most popular set of emulated commands belongs to standalone hardware terminal VT100 made by DEC. Very popular terminal emulator XTERM has expanded VT100 set of commands by its own commands, so the majority of modern terminal emulators claim to emulate XTERM command set. In reality, most of the the popular terminal emulators support not all but just a subset of XTERM commands. When terminal emulator software replaces actual standalone hardware terminal in existing multi-terminal system, quality of terminal emulation may be of importance. When terminal emulator is connected to modern servers and telecommunication equipment, very small subset of XTERM commands is actually needed and quality of the emulation is rarely a critical issue.
Modern terminal emulators have large text screen scroll-back buffer where user can see all previous commands that were sent and all responses received to those commands. Size of the screen scroll-back buffer is expressed by number of lines that it can store.
Some terminal emulators have limited size of the screen scroll-back buffer (for example, some emulators have screen scroll-back buffer that can hold maximum of 128000 lines).
When user works with modern equipment via terminal, this equipment can send millions of lines of diagnostic information to the terminal screen. If terminal emulator has limited size of the screen scroll-back buffer, user may face situation when needed diagnostic information did not fit into screen scroll-back buffer and lost. While working with terminal emulator that has limited size of the screen scroll-back buffer, user has to turn on logging of terminal session to file. When needed diagnostic information did not fit into screen scroll-back buffer and lost, user will have to open file with the log of terminal session and start looking for needed diagnostic information in this file.
Due to growing complexity of the modern equipment, volume of diagnostic information that is sent to terminal screen is constantly increasing, so the size of the screen scroll-back buffer is one of the most important terminal features.
If scrollback buffer has millions of lines in it there is a problem to find needed information in this buffer. If user knows how needed information looks like then he/she can give a text sample for the text search in the buffer as long as terminal emulator has a text search function. In most cases user doesn't know exact sample of the text, he/she only knows a few pieces of such text. That is why contemporary terminal emulators allow user to give a sample for the text search not only as literal text string but also as specially coded text search pattern (with the help of the special language that allows to specify complex text search patterns). This language for coding text search patterns is called "regular expressions". When text search doesn't work for whatever reason user still has an option to scrollback in the terminal scrollback buffer manually to visually locate needed part of the diagnostic information.
When scrollback buffer holds millions of lines of diagnostic information, convenience of using scrolling in the scrollback buffer represents very important parameter of the terminal emulator.
Very often user has to enter long and repeating commands in which only small portion of the text is changing between consecutive commands. Or user has to enter commands that are contained in the text document. In such situations user can copy and paste the text of command via clipboard instead of typing commands manually into terminal every time.
Also, very often diagnostic information that is already present on the terminal screen has to be copied selectively to the text document for future reference. In order to do so user also have to use copy and paste of the text via clipboard. In most of the terminal emulators text selected in the scrollback buffer is automatically copied to the clipboard and when the text is being pasted it is actually sent to the remote computer as if it has been typed manually from the keyboard of the terminal. While working in the terminal often user spends most of the time executing copy and paste of the text through the clipboard. In some terminal emulators text from the scrollback buffer is not copied to the clipboard if the size of this text exceeds some undocumented limit so that user have to experiment to find out what is the maximum size of the text he/she can copy to the clipboard in one shot. The same way in some terminal emulators it is possible to insert text from the clipboard only if the size of the text in the clipboard does not exceed some undocumented limit so that user has to experiment to find out what is the maximum size of the text that he/she can paste from the clipboard in one shot. If user has to copy large amount of the text from the terminal into the text document or from the text document into the terminal then such undocumented limitation on the size of the buffer for copy and paste in the terminal will significantly complicate and slow down the work and will cause large number of errors. One of the most frequent errors while working with clipboard is pasting of the wrong text from clipboard into the terminal because user thought that clipboard contains one text but in fact clipboard was containing another text. This is happening because user doesn't have a way to see content of the clipboard before he/she pastes text of the command from the clipboard into terminal.
In some terminal emulators each operation of copy or paste via clipboard requires several steps (multiple pressing of the mouse or multiple selections from drop-down menus), and that may significantly slow down and complicate the work and also cause a lot of errors.
Convenience of the work with the clipboard (in particular, absence of limitation on the size of the buffer for copy and paste of the text, simplicity of the procedure of copy and paste of the text and also ability of the user to see content of the clipboard before performing the paste operation etc.) is one of the most important functions of the terminal emulator.
When working with the contemporary equipment user is very often required to involve a lot of people, each of them being an expert on separate component of the equipment. To do so in contemporary terminal emulators there is a function that allows to share one single terminal session between many users. When using such a function terminal of the main user is connected directly to the remote equipment, and terminals of the assisting experts are connected to the terminal of the main user. In such a setup all users can send text commands from their terminal into the remote equipment (in turn) and all users can see in their terminals all command execution results.
Having function of sharing of single terminal session between many users is one of the most important characteristics of the contemporary terminal emulators.
Built-in Proxy32 terminal was designed to satisfy all discussed above requirements to modern terminal emulator.
Window of the built-in terminal connected to the CYGWIN bash shell is created in the workspace "Workspace0" every time Proxy32 starts.
CYGWIN Bash is universal shell that is providing access to control of the local computer (via commands: cd, pwd, ls, rmdir, cat, less, vi, rm, grep, mc etc), and also allows to invoke any CYGWIN communication shell (ssh, sftp, ftp, telnet) and to control remote computers via such connections.
In CYGWIN Bash terminal listed commands can be entered manually, but built-in proxy32 terminal allows to automatically create and connect terminal window and to automate execution of the commands into such terminal window via COMMAND/SCRIPT/PLUGIN (refer to sections 2.2. Creating, connecting, disconnecting and re-connecting windows of the built-in terminal and 2.4. Automating work in the built-in terminal ). Creation of COMMAND/SCRIPT does not require programmers skills. Creation of PLUGIN requires programmers skills. PLUGIN is a local process that is invoked from terminal and controls interaction of the terminal with remote equipment via its STDIN/STDOUT/STDERR streams. PLUGIN code can be written in any programming language as long as programmer is able to code read/write operations for STDIN/STDOUT/STDERR byte streams of the PLUGIN process.
Another important feature of the built-in terminal is the ability to share terminal session with remote users. To achieve it, every window of the built-in terminal has built-in TELNET-TLS server.
If local user is working in the terminal with the local Bash shell and then invokes CYGWIN communication shell (ssh or telnet) from the local Bash prompt to connect to remote equipment, then such terminal session should not be shared with remote users. After session of communication shell is ended communication shell process is exiting and shared terminal is falling back to local Bash prompt. That allows remote users can gain access to the Bash prompt of the shared terminal and gain full access to the computer on which shared terminal is running. If the intent is to share with remote users only communication session with the remote equipment, then shared session should not have access to the local Bash shell on the computer on which shared terminal is running. Therefore, Proxy32 allows to connect built-in terminal not only to local CYGWIN Bash shell, but also directly to CYGWIN communication shells (ssh, telnet, ftp, sftp). In case of direct connection to communication shell, if connection to the remote equipment is lost then communication shell process is exiting and shared terminal is left not connected anywhere (instead of falling back to local Bash prompt, as it would be the case if communication shell was invoked from the local Bash prompt).
Proxy32 allows to connect new window of the built-in terminal and re-connect existing window of the built-in terminal to different sources: local shell (for example: CYGWIN Bash/screen/mc/ssh/sftp/telnet/ftp or Windows CMD/PowerShell or Plink/PSFTP), TELNET or TELNET-TLS server or COM-PORT.
Built-in terminal allows to use TELNET-TLS protocol for both terminal session sharing and for connection to the remote equipment. TLS (Transport Layer Security) provides encryption of data, integrity protection and authentication of both ends of protected connection via Digital certificates.
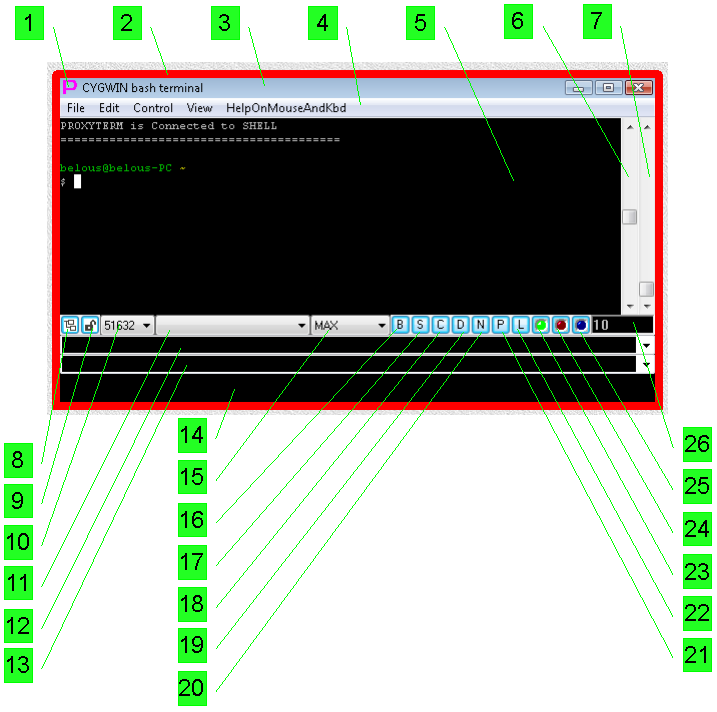
Built-in terminal along with the menu has panel of controls to create comfortable environment for working in the terminal and to simplify execution of the complex tasks.
Built-in terminal has:
Terminal controls are covered in sections 2.1.2 - 2.1.7.
Fig.1 shows window of the Proxy32 built-in terminal. Such window is automatically created in the workspace "Workspace0" on every start of the Proxy32 and user can immediately start working in this window.
Fig. 1. Window of the Proxy32 built-in terminal
While SCRIPT/PLUGIN is running clipboard viewer (reference 14 on fig. 1) in the terminal window is replaced by "Kill" button (reference 27 on fig. 2) and SCRIPT/PLUGIN progress indicator (reference 28 on fig. 2). While SCRIPT/I-SCRIPT is running progress indicator shows percentage of SCRIPT/I-SCRIPT lines that are already executed relative to the total number of lines in the SCRIPT/I-SCRIPT file that is being executed. When PLUGIN is running progress indicator shows percentage of filling up of the PLUGIN input buffer. PLUGIN input buffer holds data received by terminal and that are still to be processed by PLUGIN.
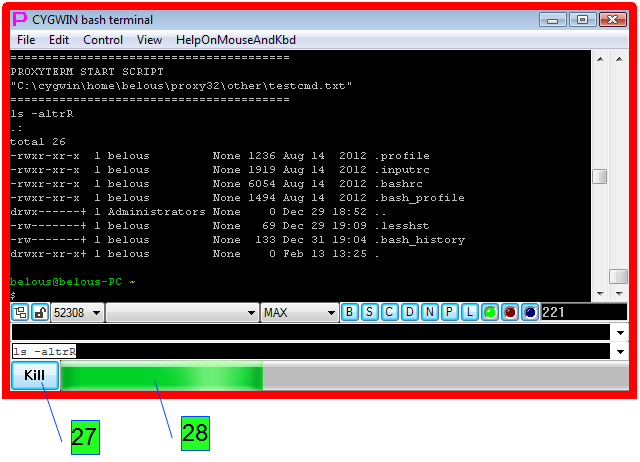
Fig. 2. Window of the Proxy32 built-in terminal when SCRIPT/PLUGIN is running
Remote equipment can use terminal in two modes:
Contemporary equipment mostly uses serial mode of terminal and that will be described below.
While terminal is used in serial mode new information appears in the bottom line of the terminal, if another line is needed it will be added in the bottom and all other lines will be moved upwards causing top visible line to disappear behind upper border of the terminal working area.
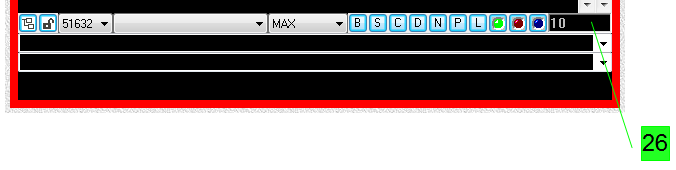
The information that was scrolled upwards and becomes invisible is not lost, but being saved in the so-called terminal scroll-back buffer. User can always look at the information in this buffer using scrolling mechanism in the terminal window. Terminal buffer can be imagined as infinite tape on which newly arrived lines are printed and each line is assigned sequential number starting from 0. During normal work in terminal in the terminal work-area user can see last line of the buffer and a few lines before it, that will fit into work-area. In the proxy32 built-in terminal number of the first line that is visible in terminal screen is shown in the small text window that is located in the right bottom corner of the terminal window (reference 26 on Fig.1).
Scrolling in the terminal can be imagined as moving terminal screen forward and backward along the tape that represents terminal buffer, so that different groups of lines get visible via work-area of the terminal. For example, if currently number of first visible line is 100 and terminal screen height is 25 lines, then in the work-area user can see lines 100-124. If terminal is scrolled back to the beginning of the scrollback buffer, user will see first 25 lines of the buffer - lines 0-24.
There are three ways to scroll the buffer: use scrollbars, mouse wheel or keyboard commands.
Built-in Proxy32 terminal has two scrollbars: coarse (reference 7 on Fig.1) and fine (reference 6 on Fig.1).
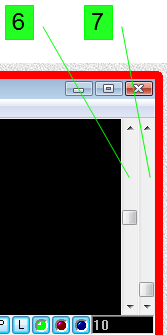
Having two scrollbars helps when terminal scrollback buffer contains tens of millions of lines. To find needed information user will first use course scrollbar to get quickly into needed part of the scrollback buffer with the precision of tens or hundreds thousand of lines. Then user can use fine scrollbar to locate needed line.
Coarse scrollbar allows navigation across the whole terminal scrollback buffer. Fine scrollbar allows navigation in the scrollback buffer areas ranging in size from tens to tens of thousands of lines. Therefore, user can increase scrolling speed of the fine scrollbar on the fly.
Left-SHIFT is pressed scrolling speed of the fine scrollbar is multiplied by factor 8,Left-CTRL is pressed scrolling speed of the fine scrollbar is multiplied by factor 32,Left-ALT is pressed scrolling speed of the fine scrollbar is multiplied by factor 128.Scrolling speed modifier keys are working independently from each other, for example, when Left-SHIFT and Left-CTRL are pressed simultaneously scrolling speed of the fine scrollbar is multiplied by factor 8x32=256.
Mouse Wheel does exactly the same scrolling as the fine scrollbar does. That includes use of the Left-SHIFT, Left-CTRL and Left-ALT modifier keys to increase scrolling speed.
Pressing Shift-PageUP or Shift-PageDOWN will scroll one terminal screen UP (backwards in terms of buffer line numbers) or DOWN (forward in terms of buffer line numbers) accordingly, and those two key combinations are never sent to the remote equipment.
By default, arrival of the new information to the terminal screen will automatically scroll terminal buffer in such a way that last line of the buffer with the new information on it will be visible at the bottom of the terminal screen. User can turn off such "auto-scroll on the new data" by pressing red button (reference 24 on fig.1).

When scrollback buffer already contains a lot of information and terminal user wants to start new set of tests or start new diagnostic procedure in order to find later the beginning of the printout of the new diagnostic procedures user may create the bookmark before the beginning of the new printout.
In order to do so before starting the tests user have to highlight with the left button of the mouse the last line in the terminal and press the button labeled "B" (Bookmarks - reference 16 on Fig.1) on the button panel of the terminal window.
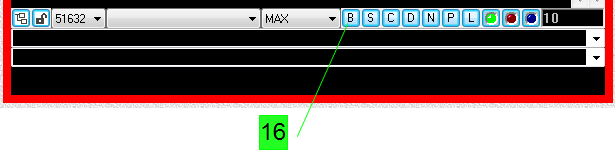
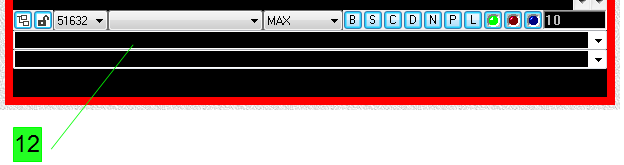
It will pop up the dialog for adding bookmark. In this dialog user can enter name of the bookmark and press OK button to add the bookmark to the drop-down list (reference 12 on the Fig 1) that is located directly under button panel in the terminal.
This drop-down list keeps bookmarks created manually and also bookmarks created automatically as a result of text search in the terminal buffer. After creating bookmarks user can start running diagnostic procedure. When diagnostic procedure is finished user can select the bookmark from the list, as a result terminal will automatically scroll the buffer so that the last line before the beginning of the printout (the line that was bookmarked) will be located in the middle of the terminal screen and it will be highlighted. Using manually created bookmarks helps to easily separate one sequence of tests from another in the terminal buffer.
When every test generates large amount of the text information and user only interested in one or two lines in every test result, user can use the function of the text search in the terminal buffer. This function works as follows.
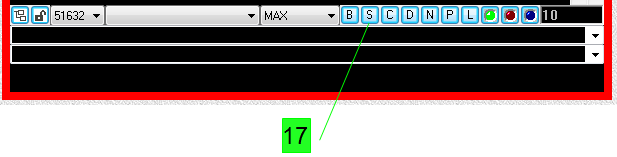
First user have to specify the range of the lines to perform the search. If user highlights on the terminal screen the area that contains one or more full lines then search will be performed only inside of those lines that are present inside selection. If selection does not contain one or more full lines then search will be performed through all the lines that are present in the terminal buffer. To start search user should press button "S" (Search - reference 17 on Fig.1).
Search dialog will appear in which user can specify text search pattern that has to be contained in those lines that user wants to find. Text search pattern can be given both literally or with the help of special language that allows to create text search patterns (regular expressions). For example, if the user looks for the line PN offset = 64 PN chips (where 64 can be replaced by any number in another test result printout), then for literal search he/she can use the text search pattern PN offset = and for the regular expressions search he/she can use text search pattern PN offset = \d+ PN chips, that will provide more precise search because it tries to match the whole line. \d - means that there should be one decimal digit in this place in the matching text. \d+ - means that there should be one or more decimal digits in this place in the matching text. After user specified text search pattern and pressed OK button in the search dialog search procedure will start going through all lines in the terminal buffer or through all highlighted lines in the terminal buffer and it will automatically create bookmarks for those lines that match given search pattern. Bookmarks will be placed into the drop-down list (reference 12 on Fig.1), that is located immediately under the button panel of the terminal.
The name of the bookmark will be the text of the found line and in this name the part that is matching the search pattern will be highlighted. If there are too many of the search results only the first 5000 results will be placed into the drop-down list. If user opened the drop-down list he/she can see all search results simultaneously and that will look similar to the results of the grep UNIX command. When the user selects one of the search results in the drop-down list terminal will scroll its buffer so that bookmarked (matched) line will be shown in the middle of the terminal screen and the part that is matching the search pattern will be highlighted.
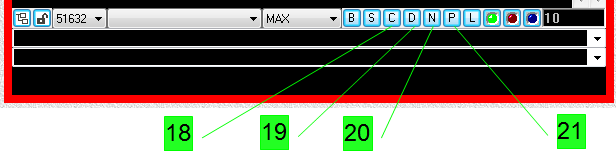
Results of the new search will be added to the drop-down list after the results of the previous search. To remove all search results (and bookmarks) from the drop-down list user have to press button C (Clear - reference 18 on Fig.1). To remove particular search result from the drop-down list user has to select it in the drop-down list and then press button D (Delete - reference 19 on Fig.1). To go to the next or previous search results in the drop-down list user have to press button N (Next - reference 20 on Fig.1) or button P (Previous - reference 21 on Fig.1) respectively.
Another drop-down list (reference 13 on fig.1) contains bookmarks for the lines on which user typed commands into terminal.
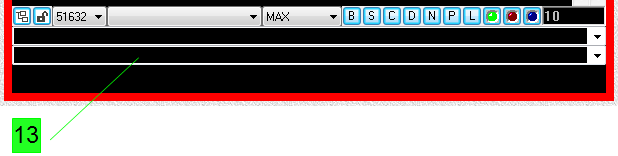
Those bookmarks are created automatically as user presses Enter key to initiate command execution.
After user has executed set of tests, looked at the results of those tests and found the results that he/she is interested in he/she may want to save results of some tests in the separate text document for the future reference.
If user wants to save the whole terminal session log then it's easier to use terminal session log file that is by default saved on the disk and that can be opened in the text editor Notepad when user pressed the button L (Log - reference 22 on Fig.1).
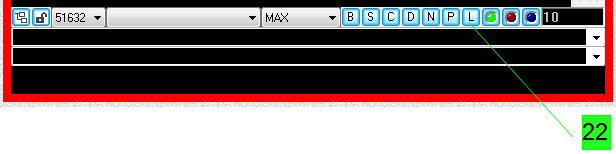
User can specify any other text editor as default viewer for the terminal session log files. In addition user can browse through terminal session log files of old terminal windows including those that were running in the past and that are currently closed. All terminal session log files kept by default in the log directory inside of Proxy32 startup directory. LogView dialog (that is invoked with the button  on the toolbar of the LauncherTree window) allows user to perform text search through all terminal session log files and also filter out those files by name or remove those files. In the same dialog user can assign text editor that will be used as a default viewer of the terminal session log files.
Terminal session log file is created by default automatically when terminal window is created. It contains title of the terminal window and the timestamp of the creation in its name. Changing the title of the terminal window either manually by user or automatically on the command from the remote computer will cause the terminal session log file to close and it will create new terminal session log file that will contain new title of the terminal window and the new creation timestamp in its name.
If user wants to receive a large amount of text information from the remote equipment without placing this text information into the terminal scroll back buffer then user can press blue button (reference 25 on Fig.1) in order to do so. When blue button is pressed received information will be saved into terminal session log file but not into terminal scroll back buffer.

If user wants to save selectively only the part of the diagnostic information that was collected in the terminal scroll back buffer then user have to selectively copy needed information from the terminal scrollback buffer to the clipboard and then paste this information from the clipboard into the text editor.
Built-in Proxy32 terminal will automatically copy text to the clipboard when this text is selected in the terminal scrollback buffer. Text is selected by the mouse. Beginning of the selected area is marked by the left click, the end of the selected area is marked by the right click. To select small area of the text one can press left button of the mouse in the beginning of the selected area then drag the mouse pointer to the end of the selected area and then release the left button. After that one can use right click to extend selection area or to make it smaller because the right click will mark the new end of the selected area. Double click on the text in the terminal scrollback buffer will first highlight text that is limited by punctuation or by spaces inside of the line. On the second double click it will select piece of the text that is limited by spaces inside of the line. On the third double click the whole line of the text will be selected. Highlighted text will be automatically copied to the clipboard and it also can be seen in the window of the clipboard viewer (reference 14 on Fig.1), that is located at the bottom of the terminal window. When needed text is selected in the terminal scroll back buffer user can insert this text from the clipboard into the text editor.
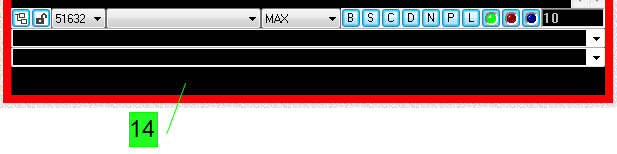
If user has selected text in the terminal scrollback buffer and this text is too large the system may not have enough memory to place this text on the system clipboard and copy operation will fail. To prevent this situation from happening Proxy32 will take size of the selected text in bytes and compare it with predefined threshold that is set by default to 100,000,000. If the size of the selected text exceeds predefined threshold Proxy32 will copy selected text not to the system clipboard but to the text file name of which will contain word selection and the date and time of its creation. File is placed to the same directory where all the files of terminal session logs are located. Name and path to that file will be shown in the window of the clipboard viewer (reference 14 on figure 1), so that user will be able to find it easily. If the size of the selected text does not exceed predefined threshold Proxy32 will copy selected text to the system clipboard.
On the older computers with old operational systems and with the small size of the memory or on the computers where user runs too many programs simultaneously system may not have 100,000,000 of bytes of memory to place the text to the system clipboard. Therefore, this threshold can be corrected by the user via menu "Settings/Initial Terminal Settings/Limit Max Size of Clipboard Selection/Edit ClipboardSelectionMaxSizeBytes" in the LauncherTree window. If the threshold is set right below the maximum size of the system clipboard, copy operation will never fail regardless of the size of the selected text.
User can disable use of this threshold via menu "Settings/Initial Terminal Settings/Limit Max Size of Clipboard Selection/Use ClipboardSelectionMaxSizeBytes" in the LauncherTree window. If this threshold is not in use Proxy32 will always try to copy selected text to the clipboard without checking the size of the copied text. By default this threshold is enabled.
When user pastes text from the clipboard this text is sent to the remote equipment to which terminal is connected. If terminal is not connected pasted text is ignored. User can see clipboard content before the paste operation in the window of the clipboard viewer (reference 14 on figure 1).
Maximum size of the text that can be pasted in one operation is limited by one megabyte. Paste operation can be performed with the help of the mouse, keyboard or via terminal menu.
When using mouse paste operation is performed by middle-click in the terminal working area. User can choose an option when paste with the middle mouse button will be executed only if the left CTRL key is pressed. When using keyboard paste operation is performed with the key combination Shift-Insert, this key combination will never be sent to the remote equipment. Menu Edit/Paste in the terminal window also performs text paste operation.
Drop-down list (reference 13 on figure 1) automatically accumulates bookmarks for the typed commands as user types those commands in the terminal.
When user selects any of those bookmarks, terminal will scroll in such a way that the line that contains selected command will be placed in the middle of the screen and the text of the command itself will be selected. On selection text of the command will be copied to the clipboard and after that user will be able to see text of the command in the clipboard viewer. To issue this command again user have to press middle button of the mouse to insert text of the command from the clipboard into the terminal and then press Enter key to initiate command execution on the server. Therefore, drop-down list (reference 13 on the figure 1) allows not only to find the beginning of the printout of the results of any of the previous commands but also to quickly repeat any of the previous commands.
Because the drop-down list (reference 13 on the figure 1) contains all history of executed in the terminal commands, user can open this list to see all history of executed commands. User might also want to save the content of this list to the clipboard or to clear the content of this list. This can be done via terminal menu "Edit/Commands History/Copy Commands History to clipboard" and "Edit/Commands History/Clear Command History".
To allow many remote users work together in one shared terminal session terminal of the main user is connected directly to the remote equipment and terminals of the remote user's connected to the terminal of the main user (refer to Fig.3). In such configuration all users can send text commands from their terminals to the remote equipment (in turn) and all users can see command execution results in their terminals.
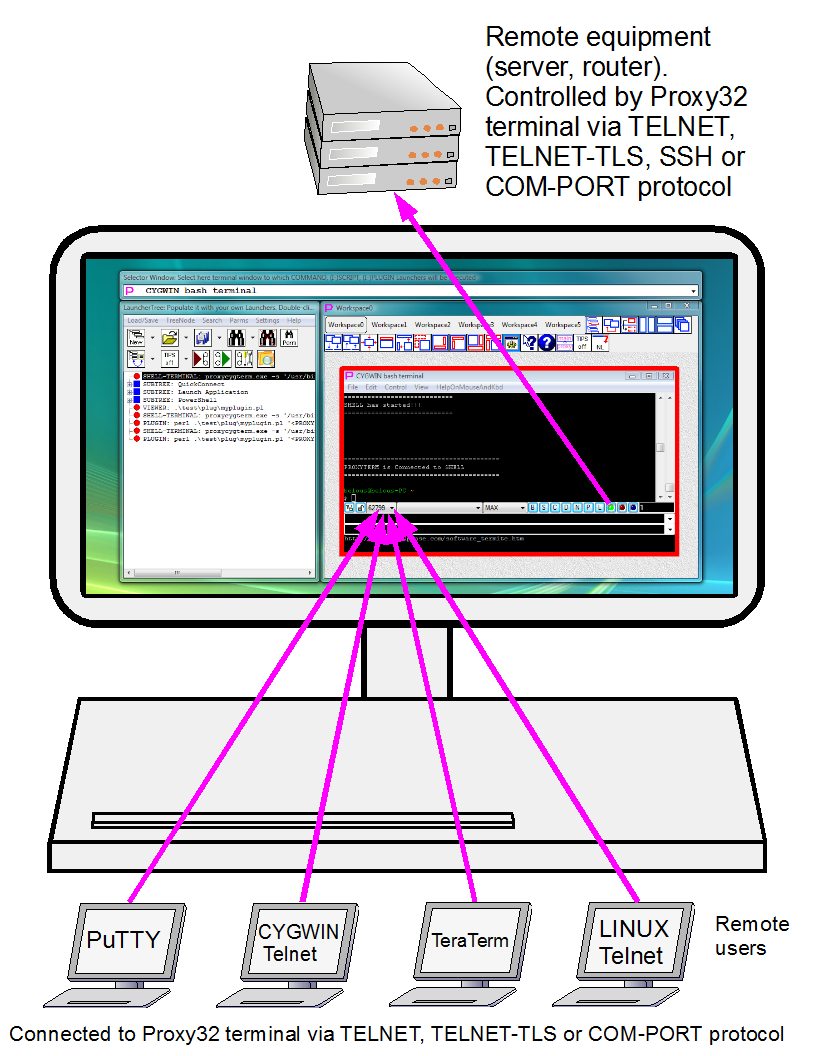
Fig. 3. Sharing Terminal Session with Remote users
To achieve this every new window of the built-in terminal has its own built-in telnet server. Remote users can connect to this telnet server in order to share terminal session that is running in this terminal window. Telnet server in each terminal window is using its own unique TCP port number in order to receive connection requests coming from telnet terminals of the remote users. Therefore, by choosing connection port number remote user can choose to which terminal window of the main user he/she will be connected.
By default, in Proxy32 when the new terminal window is created TCP port number for the built-in telnet server is selected from the list of available ports that is kept in the system. If several windows of the built-in terminal created one by one then TCP port numbers for those windows may happen to be sequential. When window of the built-in terminal is closed, TCP port number that is used by this window is freed and later can be assigned to one of the newly created windows. By default, user doesn't have control over the port numbers assigned to the newly created terminal windows. When telnet server is located behind the firewall user can choose an option when every newly created window will try to use the same fixed initial port number, for example, 1300. If this port number is available, it will be used and if it is already assigned then window will try to use next port number, 1301. This process will continue by increasing port number by one every time until available port will be found and used. Next created terminal window will use the same algorithm for the port number selection. As a result, all newly created terminal windows will have port numbers in the range 1300 and above assuming that this port range is available in the system. User can turn on and off this port selection algorithm. Also, user can choose initial port number that is set by default to 1300. Those settings (Use Initial TSS port Number and Edit Initial TSS port Number) are located in the menu "Settings/Initial Terminal Settings/Terminal Session Sharing" in the LauncherTree window. Default value of the initial port number is selected for Windows XP. If Proxy32 is running on the other Windows operational systems initial port number may have to be corrected, so that its value will get into the range of the free ports that are available for use in this particular Windows operational system. To find out what initial port value to use on particular OS and PC, one can create terminal window with Use Initial TSS port Number setting disabled and see what port number is allocated by the system for the terminal. Port number allocated by the system can be used as good approximation for the value of the Initial TSS port Number. If Proxy32 is running behind the firewall port range that is used by the built-in terminal windows (in our example this is the port range starting from 1300 and above) has to be open in the firewall to let remote users connect to the shared terminal windows.
After terminal window is created, main user has to communicate port number of this window and also its own IP address to the remote user if main user wants remote user to connect to this window.
Port number that is being used by particular terminal window is shown in the drop-down list (reference 10 on the figure 1), that is located in the left bottom part of the terminal window.
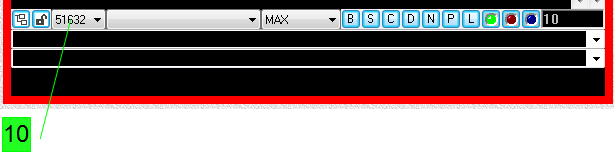
This list contains port number for the telnet server of this window, all IP addresses of this computer, on which telnet server will accept connections, and also information about the protocol in use (telnet or telnet-TLS). When user selects an element in this list content of this element is copied to the clipboard to make it easier communication of the port number and IP address through the email/chat to the remote user.
User has an option to switch from using protocol telnet to using the protocol telnet-TLS (Transport Layer Security), when telnet traffic is protected from eavesdropping with the help of the TLS protocol. TLS protocol provides two-way authentication between client and the server with the help of the digital certificates. It also encrypts all the traffic that passes between client and the server in both directions. This is the same TLS protocol that is used by Internet Explorer and by the other web-browsers to protect user's transactions when he/she purchases goods over the Internet.
When using external software (for example, CYGWIN program Stunnel) to protect telnet traffic that is created by the remote users connected to the terminal window, it may be necessary that built-in telnet server in the terminal window of the main user will accept only connections that are originated on the same computer on which terminal is running. In order to do so Proxy32 has an option that makes built-in telnet server listen for new connections only on the loopback IP address 127.0.0.1. Option to turn on or off protocol TLS and option that allows to receive new connections only on the loopback IP address are located in the menu "Settings/Initial Terminal Settings/Terminal Session Sharing" in the LauncherTree window.
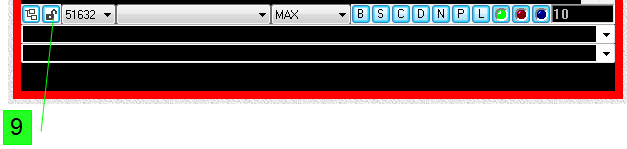
Turning protocol TLS on and off can be done individually in every terminal window with the help of the button (reference 9 on the figure 1). Changing TLS on/off setting will have impact only on the new connections that are established after that setting was changed.
To configure TLS protocol one has to create or select and install digital certificates for authentication, also one can choose authentication and the encryption modes. For more details please see TLS Configuration Guide: Step-by-step.
When remote users are connected to the terminal of the main user, main user has an option to switch any remote user into read-only mode (so that remote user cannot type and only can see on the screen the results of execution of the commands issued by other users) and back, and also disconnect any remote user (or all remote users) from the built-in telnet server. To perform these operations main user have to choose remote user in the drop-down list (reference 11 on the figure 1), and then select the operation in the menu "Contol/Sharing Terminal Session via TELNET or COM-PORT connections/BUILT-IN TELNET/TLS SERVER" in terminal window.
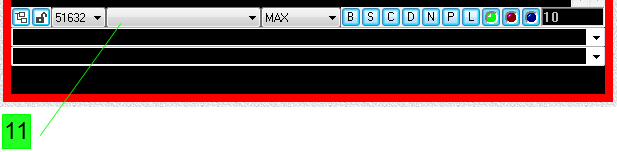
The same drop-down list allows main user to see which one of the remote users is typing commands into shared session at this moment. As soon as remote user starts typing commands, his/her IP address will be automatically selected in this list.
There is also an option to connect remote user to the terminal of the main user (to the shared session) via COM-PORT. If main user selects COM-PORT launcher on the LauncherTree and then does ctrl-right-click on the green button CONNECT/DISCONNECT (reference 23 on the figure 1), then terminal will open COM-PORT that is configurd in the selected COM-PORT launcher and will wait for the remote user's commands from this COM-PORT, and also terminal will start sending commands execution results to the remote user through this COM-PORT.
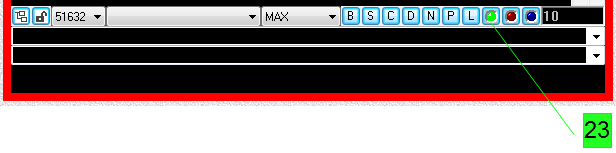
To disconnect terminal from this COM-PORT user have to do ctrl-right-click on the green button CONNECT/DISCONNECT (reference 23 on the figure 1). Only one remote user can be connected to the terminal through COM-PORT. Number of the remote users that can be connected to the terminal through telnet server is not limited. Connecting remote user through COM-PORT may be needed when computer of the remote user and computer of the main user are connected to the different networks and they cannot communicate through IP protocol. COM-PORT connection between two computers can be made either with the physical cable or with the help of the Bluetooth connection.
Built-in Proxy32 terminal is receiving incoming data from the source and sending it to several recipients. In case when some or even one of the recipients is unable to receive incoming data in real time as they arrive, terminal has built-in mechanism of flow control to tell the data source to reduce the speed of incoming data to match the speed of the slowest data recipient.
Terminal can receive incoming data from the following sources: from remote TELNET server (if terminal is in TELNET mode) or from STDOUT/STDERR of local SHELL (if terminal is in SHELL mode) or from local COMPORT (if terminal is in COM-PORT mode). Multiple recipients are the remote users that are sharing this terminal session with the main user by connecting via TELNET, TELNET-TLS or COM-PORT to the terminal of the main user. Another example of the recipient is PLUGIN, which is external program that PLUGs-IN into terminal to receive incoming data from the source via existing terminal connection, to analyze this data and to present results of the analysis to the user on the screen of the terminal (and also, possibly, to send requests for more data to terminal data source.)
Main recipient of incoming data is terminal itself. Incoming data has to be processed by the terminal itself and shown on its own screen. This should be possible to do in the real time as long as there is enough of CPU resource left for Proxy32 execution on the local computer. If Proxy32 CPU usage exceeds 80%, flow control will automatically reduce the speed of all terminal data sources to the minimum to reduce CPU usage by all running built-in terminals. This slowdown is temporary until Proxy32 CPU usage will go below 80%.
If PLUGIN (child process) is running in the terminal, incoming data is passed to the STDIN of the PLUGIN process instead of being passed to the screen of the terminal. If PLUGIN is unable to process incoming data in the real time, Terminal will detect this situation and automatically kill the PLUGIN process assuming it is written poorly if it is unable to handle stream of incoming data as it arrives.
If remote users are connected to the Terminal Session Sharing (TSS) TELNET server and/or to the TSS COM-PORT, then Terminal has to tell to the data source to adjust the speed of incoming data to match the speed of the slowest client that is connected to the TSS TELNET server or TSS COM-PORT. Therefore, if one TSS client has very slow TCP or COM-PORT connection or it is running very slow terminal emulator software, it will slow everybody down until it is disconnected from TSS module.
Terminal has separate drop-down list (ref. 15 on fig.1) that allows to monitor changes of the maximum speed of incoming data source that are initiated by the flow control.
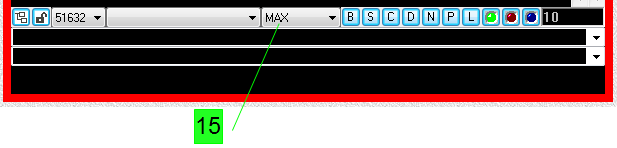
The same drop-down list also allows user to manually set (reduce) maximum speed of incoming data from the source when automatic flow control is not slowing down the source and maximum speed of incoming data from the source is shown as MAX.
Lets introduce basic concepts to help user navigate better in the material that will follow.
Window of the built-in terminal with the CYGWIN Bash shell prompt is created automatically on every start of Proxy32.
In Proxy32 one can create unlimited number of the windows of the built-in terminal and windows of external processes in every workspace.
Windows of the built-in terminal are created via execution of the terminal launchers. Those launchers are created on the Launcher Tree in the floating window LauncherTree (fig. 4).
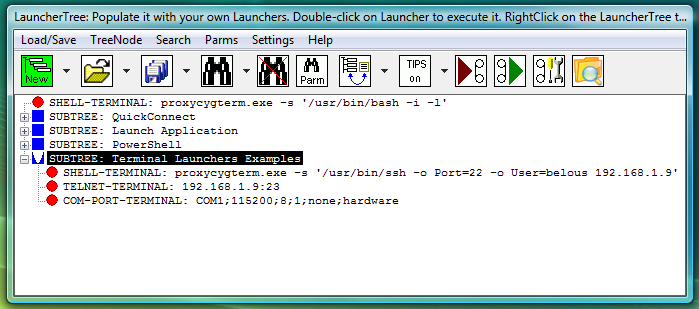
Fig.4. Example of the Launcher Tree.
On the Tree launchers are represented by TreeNodes and use red circles as Node Icons  . They can be placed into subtrees (represented by SUBTREE TreeNode), that are similar to folders in browsers Favorites menu. On the Tree SUBTREE TreeNode has blue square icon. SUBTREE has two states that are indicated by the icon image: open
  and closed
  . Tree can contain not only terminal launchers but also launchers to create windows of the external processes (for example: PuTTY, NotePad, FireFox etc) and launchers for automating work in the existing windows.
Launcher can be executed by double clicking on it in the LauncherTree window.
All local shells can be divided into universal shells and communication shells:
Via local communication shells plink, psftp, CYGWIN ssh/sftp/telnet/ftp Proxy32 terminal connects to remote computers.
Via local universal shells PowerShell, cmd, CYGWIN bash/screen/mc Proxy32 terminal can control local computer and also connect to remote computers by invoking local communication shells plink, psftp, CYGWIN ssh/sftp/telnet/ftp.
To add new launchers to the LauncherTree there are button New (fig.4) on the toolbar of the floating window LauncherTree and built-in Proxy32 TreeNode Editor. Both will provide user with the templates to create new Launchers and to add them to the LauncherTree. Built-in Proxy32 TreeNode Editor is invoked via the right-click Popup menu in the LauncherTree floating window. Built-in Proxy32 TreeNode Editor can also be used to modify the launchers that are already present on the LauncherTree. Details on using button New and Proxy32 TreeNode Editor to add new launchers to the LauncherTree are covered in sections 2.3.---.
Launcher configuration can be simple or parametrized:
– simple launchers store all values of the configuration parameters in the launcher itself. For example, simple terminal launcher can contain port number, IP address, user name etc;
– parametrized launchers have some of the values of the configuration parameters replaced by substitution parameters. Values of substitution parameters are supplied by user or stored outside of the launcher. On the execution of the parametrized launcher user will receive dialog window to enter values for the substitution parameters used in the launcher. For example, on the launch of the parametrized terminal launcher user will receive dialog asking to supply connection parameters.
For creation and connection of the terminal window in Proxy32 instead of single launcher one can use pair of launchers that is comprised of terminal launcher and PLUGIN or I-SCRIPT launcher located immediately under terminal launcher. Such pair provide full automation of the login procedure, including automatically entering user name and password into terminal upon connection. Second launcher (PLUGIN or I-SCRIPT) is executed automatically when terminal created via terminal launcher is connected. This mechanism is referred to as AUTOLOGIN and it is covered in the section 2.2.6.
Terminal window can be disconnected from the current connection. Disconnected terminal window can be connected again to any TELNET or TELNET-TLS server, COM-PORT or local SHELL using any existing TELNET-TERMINAL, COM-PORT-TERMINAL or SHELL-TERMINAL launcher. To disconnect and reconnect terminal window and for indication of the terminal connection state (terminal is connected or disconnected) one can use CONNECT/DISCONNECT button in the window of the built-in terminal (reference 23 on fig.1).
In Proxy32 one can create and connect window of the built-in terminal by executing terminal launcher ( COM-PORT-TERMINAL, TELNET-TERMINAL or SHELL-TERMINAL launcher). Such launcher is prepared in advance on the Tree in the LauncherTree floating window and executed by double-clicking on the launcher.
The initial Tree of the Launchers in the LauncherTree window is created during the installation of the Proxy32. This initial Tree contains launchers that are prepared in advance, so that user can start using them immediately. Later, user can add his/her own launchers to the Launcher Tree.
First launcher on the Launcher Tree is created during Proxy32 installation and designed to create window of the built-in terminal and connect it to CYGWIN Bash shell. This launcher is automatically executed on every start of Proxy32 (unless this launcher is deleted from the LauncherTree by the user) and creates CYGWIN Bash terminal in the workspace Workspace0. User can immediately start working in this terminal.
As shown on Figure.4 this launcher has following command line:
proxycygterm.exe -s '/usr/bin/bash -i -l'If one double-clicks on this launcher, then another CYGWIN Bash shell terminal will be created in the current workspace.
Similarly, to create new window of the built-in terminal and connect it to COM-PORT, TELNET or TELNET-TLS server or to any local Windows/CYGWIN shell, one can execute existing terminal launcher ( COM-PORT-TERMINAL, TELNET-TERMINAL, SHELL-TERMINAL) by double-click on such launcher in the LauncherTree floating window. Details on using button New and Proxy32 TreeNode Editor to add new terminal launchers to the LauncherTree are covered in sections 2.3.---.
Therefore, we have established that window of the built-in telnet terminal is created and connected on execution of the terminal launcher by double-clicking on this launcher on the Launcher Tree.
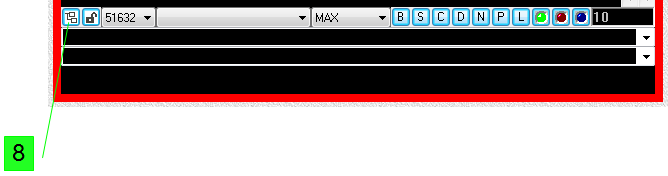
I addition, one can use button Favorites  in the main window and button Favorites in the terminal widow (reference 8 on fig. 1) to quickly create and connect window of the built-in terminal.
Proxy32 installation process creates on the launcher Tree SUBTREE named Quick Connect (fig. 4) that contains launcher for creation and connection of the terminals. Proxy32 installation process places references to those launchers into the menu of the above mentioned Favorites buttons.
Fig. 5 shows menu that is invoked when one presses Favorites button in the menu bar of the main window. Pressing Favorite button in the window of the built-in terminal opens the same menu.
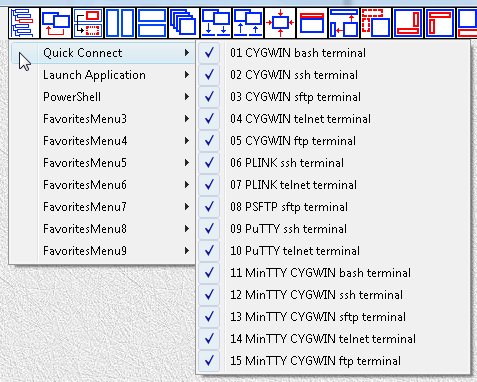
Fig. 5. Opened submenu Quick Connect in the menu of the Favorites button
The menu of the Favorites button has 10 submenus. To create new terminal one should open Quick Connect subsmenu. Proxy32 installation process creates initial set of favorites in this menu. As it was mentioned above, those favorites are the references to the launchers that are created in the LauncherTree during the installation of the Proxy32.
User can add his/her own launchers to the LauncherTree, and then those launchers can be added to Favorites menu so that they can be executed even when LauncherTree floating window is hidden.
To quickly create new window of the built-in terminal one should clcik on the favorite (reference to the launcher) in the submenu Quickconnect of Favorites button.
If both LauncherTree floating window and menu bar of the main window (that has Favorites button) are hidden, one can still create and connect new terminal windows using Favorites button in the existing terminal window. If one uses Favorites button in the main window, then one should first select the workspace and then create new terminal window. If one uses Favorites button in the existing terminal window, then one should first create new terminal window and then if needed move the new window to the desired workspace using button  in the menu bar of the main window.
Therefore, in Proxy32 new window of built-in terminal can be created and connected by execution of the terminal launcher (SHELL-TERMINAL, TELNET-TERMINAL, COM-PORT-TERMINAL) directly on the LauncherTree, and indirectly by using references to the launcher in the menu of the Favorites button, that is present in the main window and in the terminal window.
In Proxy32 launchers can be used to create not only windows of the built-in terminal but also to create windows of the external processes (Notepad, PuTTY, FireFox etc). Proxy32 knows that it should create window of the built-in terminal by looking at the launcher type. There are three types of terminal launchers to create window of the built-in terminal - COM-PORT-TERMINAL, TELNET-TERMINAL и SHELL-TERMINAL. They all contain word TERMINAL in the type of the launcher.
When Proxy32 executes the launcher, it checks the type of the launcher and know that it has to create window of the built-in terminal in the current workspace. Then Proxy32 will look into the launcher configuration to extract connection information for the newly created terminal. How Proxy32 uses launcher configuration to connect terminal window is covered in details in sections 2.2.3, 2.2.4.
If user wants to create new connection then he/she has following choices:
create and connect new terminal window as described above using one of the terminal launchers: COM-PORT-TERMINAL, TELNET-TERMINAL и SHELL-TERMINAL. If connection attempt was unsuccessful, then newly created terminal window will be left not connected;
disconnect existing connection in any existing terminal windows with the button CONNECT/DISCONNECT (or use existing not connected terminal window) and then re-connect this terminal window using connection information from another terminal launcher (COM-PORT-TERMINAL, TELNET-TERMINAL or SHELL-TERMINAL) by middle-clicking on the CONNECT/DISCONNECT button after highlighting needed terminal launcher on the LauncherTree (refer to section --- for the information on this button). Please, note that terminal title is taken from terminal launcher tooltip field only once when the window is first created but not on the re-connect of the existing window. If terminal is re-connected to another computer and user wants to change terminal title to reflect this change, user has to change terminal title manually using button --- in the menu bar of the main window or by right-clicking on terminal title bar and editing title in place or using command Change Title of Terminal Window in the menu File of the terminal window. Details on changing title of the terminal window are covered in section -----. To check if existing terminal window is not connected user can check the color of the CONNECT/DISCONNECT button: if this button has dark green color then terminal window is not connected, if this button has bright green color then this window is connected and has to be disconnected from current connection before it can be re-connected somewhere else (refer to section ....).
if user is using existing CYGWIN bash terminal (that was launched on the Proxy32 start or user has started it by clicking on the SHELL-TERMINAL launcher), then he/she can invoke communication shell (ssh/sftp/telnet/ftp) from the Bash prompt to connect to the remote equipment. Communication shell can be invoked either manually, by typing command into terminal, or automatically, via one of the launchers COMMAND, SCRIPT, I-SCRIPT или PLUGIN. CYGWIN Bash shell allows both control local computer and invoke communication shells to control remote computers.
Lets have a look at examples of how one can work with communication shells in the existing CYGWIN Bash terminal:
Option 1: а) manually type (or copy and paste from the text file) command ssh belous@192.168.1.5 into terminal б) manually type (or copy and paste from the text file) text test123 (password) into terminal
Option 2: а) execute COMMAND launcher, that contains command ssh belous@192.168.1.5 б) execute COMMAND launcher, that contains text test123 (password) or type password manually into terminal
Option 3: execute SCRIPT launcher, that refers to the SCRIPT file that contains command ssh belous@192.168.1.5 in the first line and text test123 (password) in the second line
Option 4: execute I-SCRIPT launcher, that refers to the I-SCRIPT file that contains command ssh belous@192.168.1.5 in the first line and text test123 (password) in the second line. Both first and second line should also contain expected prompt and timeout values according to I-SCRIPT line format specs (refer to ...)
Option 5: execute PLUGIN or I-PLUGIN launcher that will first sent to the terminal command ssh belous@192.168.1.5 and then will send text test123 (password) into terminal.
Proxy32 built-in terminal is connecting to the LOCAL SHELL, TELNET server or COM-PORT using information that is contained in the terminal launcher.
Fig. 6 shows LauncherTree with highlighted simple launcher that is used to create new SHELL-TERMINAL window and connect it to SSH server. Simple terminal launcher contains all connection information (parameter values) inside of itself.

Fig.6. SHELL-TERMINAL launcher to connect built-in terminal to SSH server.
As can be seen from the Figure 6, this launcher has following format:
SHELL-TERMINAL: proxycygterm.exe -s '/usr/bin/ssh -o Port=22 -o User=belous 192.168.1.9'
First part of the launcher is the launcher type. In this case launcher type is SHELL-TERMINAL. SHELL-TERMINAL means that terminal will be connected to the local shell process.
Then after the colon follows launcher command line. SHELL-TERMINAL command line for CYGWIN shells will always start from launching CYGWIN wrapper (proxycygterm.exe) that provides interface between Proxy32 and CYGWIN shell (in this case - CYGWIN ssh shell).
On its command line proxycygterm.exe receives the information which CYGWIN shell should be launched and with which parameters. Command line for CYGWIN shell is passed to proxycygterm.exe after -s switch and included between single quotes (-s here stands for shell). This command line is shown below:
'/usr/bin/ssh -o Port=22 -o User=belous 192.168.1.9'
Above command line should be given in CYGWIN-style, as proxycygterm.exe is executed in the CYGWIN environment. This command line at the beginning contains full path to the ssh client (/usr/bin/ssh) which is given relative to CYGWIN root (/) and with CYGWIN-style path separator (/). After CYGWIN path to ssh client command line contains parameters for connecting ssh client to remote SSH server. Format of the parameters is described in ssh client documentation (OpenSSH SSH_CONFIG man page). Parameters are given in the format parameter=value after -o switch (here -o stands for option). - Parameter -o Port=22 specifies TCP port number on which SSH server is waiting for connection. - Parameter -o User=belous specifies user name for connection to SSH server. - Mandatory parameter 192.168.1.9 specifies IP address of SSH server.
Initial title of the created terminal window is specified in the tooltips field of the terminal launcher. All other initial settings of the created terminal window (color, font, size, position etc) are taken from the Global Initial Terminal settings. After terminal is created user can change settings of the existing terminal window according to his/her taste using menu in this terminal window.
Note: 1. Terminal window title can be changed later both manually by user (right click on the terminal window title to edit it in-place, terminal menu item File/Change Title of Terminal Window, button  in the main window, main window menu item
 Change Title of Selected Window) and automatically by command from the remote computer. 2. Global initial terminal settings can be changed by user in two ways. First way - is to change global settings directly via menu Settings/Initial Terminal Settings in the LauncherTree window (reference). Second way - is to save settings of the current terminal window as global terminal settings. To do so, user should configure existing terminal window to his/her taste (color, font, size, position etc) using menu in this existing terminal window. Then one should save configured settings as global terminal settings using menu File/Save Terminal Settings in the current terminal window. After this all newly created terminal windows will mimic settings of the user-configured terminal window.
After terminal is created, depending on where terminal is connected, user may be asked to provide user name and/or password. CYGWIN bash terminal is ready for work immediately, but, for example, when CYGWIN ssh terminal is created and connected using simple launcher described above, CYGWIN ssh client will give user prompt to enter the password. After entering password user can start working in this terminal. If connection to particular SSH server is made for the first time, user should confirm public key of the SSH server.
Note: Proxy32 can automatically enter password when terminal is connected. In order to do so along with terminal launcher should be used second launcher (of the type PLUGIN or I-SCRIPT) that should be located immediately below terminal launcher on the launcher tree. This additional launcher is automatically executed when terminal is connected and types user's password into terminal. For details, please, refer to section 2.2.6.
Button CONNECT/DISCONNECT in the terminal window (reference 23 in Fig.1) provides color indication of the terminal state (терминал is connecting, connected or disconnected), and also performs functions related to disconnecting and re-connecting terminal window and several other functions.
If there is an attempt to establish connection to the non-existent TELNET or SSH server, several second should pass (time-out) before connection to server will be declared failed. Until connection failed button CONNECT/DISCONNECT will stay bright green. When connecting to COM-PORT success or failure of the connection is determined quickly and intermediate changes in the color of the button CONNECT during connection establishment are not noticeable for the user.
Next we will discuss connecting terminal to the server though all that said below is also applicable for connection to COM-PORT and to local SHELL:
If terminal is connected successfully then appropriate message is shown in the terminal and button CONNECT/DISCONNECT in the terminal window changes its color from dark green to bright green.
If terminal connection attempt has failed then appropriate message is shown in the terminal and button CONNECT/DISCONNECT will have dark green color.
If user (after unsuccessful connection attempt or after server has disconnected from its side) wants to repeat connection attempt in the same terminal window using the same launcher, then user should press button CONNECT/DISCONNECT in the terminal window.
If user wants to disconnect from the server then user should press button CONNECT/DISCONNECT in the existing terminal window. Then appropriate message is shown in the terminal and button CONNECT/DISCONNECT in the terminal window changes its color from bright green to dark green.
If user wants to know to which server terminal is connected at the moment, user should right-click button CONNECT/DISCONNECT in the terminal window. Then Proxy32 will highlight on the LauncherTree terminal launcher that contains information about current connection. If floating window LauncherTree is hidden, user can make it visible by pressing button  in the menu bar of the main window.
As it was noted above, Proxy32 uses launchers to create and connect terminal windows and to automate work in the terminal. Brief classification of the launchers is given in the section 2.2.1.
Lets have a look at the launchers that are used to create and connect terminal windows. These launchers can be simple or parametrized. Out of three types of the terminal launchers (SHELL-TERMINAL, COM-PORT-TERMINAL и TELNET-TERMINAL) only SHELL-TERMINAL launcher can be parametrized. Parametrized launchers have advantage that will be described next.
Simple launchers contain connection parameters immediately in their configuration. For example, simple launcher for creating terminal and connecting it to the SSH server contains in its configuration port number, IP address, user name etc. Configuration of such launcher and how to use it to create and connect SHEL-TERMINAL was covered in detail in section 2.2.3 of this chapter. This launcher has following configuration:
SHELL-TERMINAL: proxycygterm.exe -s ‘/usr/bin/ssh -o Port=22 -o User=belous 192.168.1.9′
Parametrized launchers contain special substitution parameters in place of the connection parameters.
Parametrized launcher can be created from simple launcher.
Lets consider two variations of the parametrized launcher based on the simple launcher.
Parametrized launcher 1:
SHELL-TERMINAL: proxycygterm.exe -s '/usr/bin/ssh -o Port=<PROXYPARM=Port> -o User=<PROXYPARM=User Name> <PROXYPARM=IP address>'
Parametrized launcher 2:
SHELL-TERMINAL: proxycygterm.exe -s '/usr/bin/ssh -o Port=<PROXYPARM=SSH Server port> -o User=<PROXYPARM=SSH server user name> <PROXYPARM=SSH server IP address>'
From the above examples we can see that in order to create parametrized launcher one should simply replace parameter value in the simple launcher by the substitution parameter.
Port number to connect to SSH server is configured in simple launcher as follows:
-o Port=22
In parametrized launcher 1 port number is configured as follows:
-o Port=<PROXYPARM=Port>
In parametrized launcher 2 port number is configured as follows:
-o Port=<PROXYPARM=SSH Server port>.
lets compare:
-o Port=22
-o Port=<PROXYPARM=Port>
-o Port=<PROXYPARM=SSH Server port>.
From the comparison one can see that in parametrized launcher particular value of the connection parameter from simple launcher (22) after equal sign is replaced by substitution parameter. Similar comparison can be made for other connection parameters of the compared launchers:
User=belous
User=<PROXYPARM=User Name>
User=<PROXYPARM=SSH server user name>.
Similarly:
192.168.1.9
<PROXYPARM=IP address>
<PROXYPARM=SSH server IP address>.
Substitution parameter in the launcher is included into angle brackets and contains mandatory fixed part PROXYPARM= in the beginning. While creating/editing the launcher user types name of the parameter after equal sign and up to closing angle bracket >. On launcher execution this parameter name will be given to user in the dialog where user will have to enter particular value for this parameter. Therefore, Port and SSH Server port in above launchers are names of the substitution parameters. Name of the substitution parameter is given by user during creation of the launcher. Indeed, in parametrized launcher 1 this name is Port, and in parametrized launcher 2 this name is SSH Server port.
When user request execution of such parametrized SHELL-TERMINAL launcher, Proxy32 will detect substitution parameter with the name Port (in parametrized launcher 1) or with the name SSH Server port (in parametrized launcher 2) and will ask user to supply or modify its value via dialog. Then Proxy32 will substitute new value (entered by user) into launcher configuration before executing the launcher.
Therefore, user will receive dialog window Fig.7 for the parametrized launcher 1 and dilaog window Fig.8 for the parametrized launcher 2. Fig. 7 and 8 show empty dialogs, and Fig. 9 and 10 show dialogs populated by user.
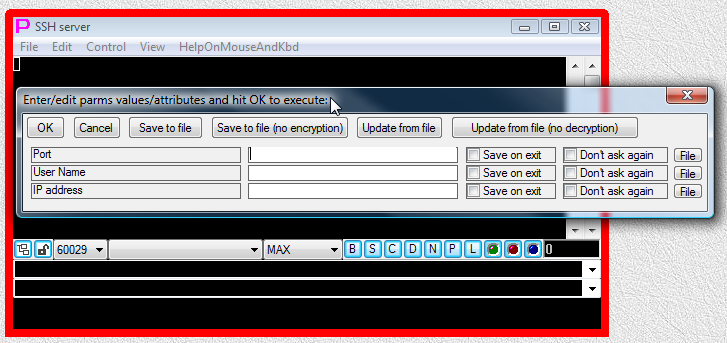
Fig.7. Empty dialog window for parametrized launcher 1.
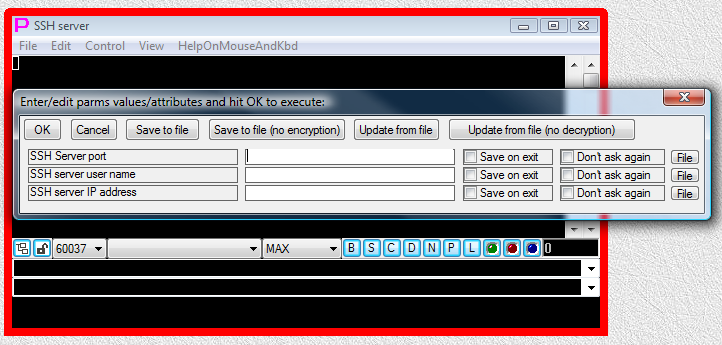
Fig.8. Empty dialog window for parametrized launcher 2.
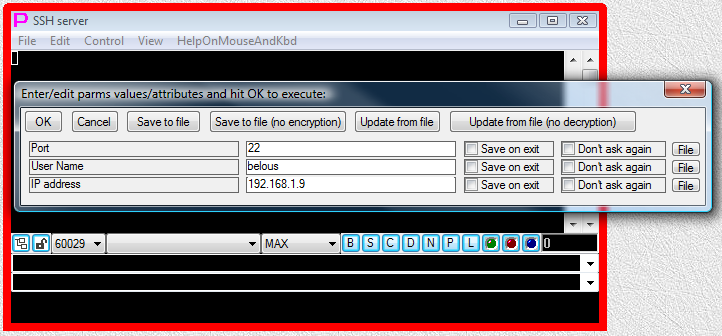
Fig.9. Populated dialog window for parametrized launcher 1.
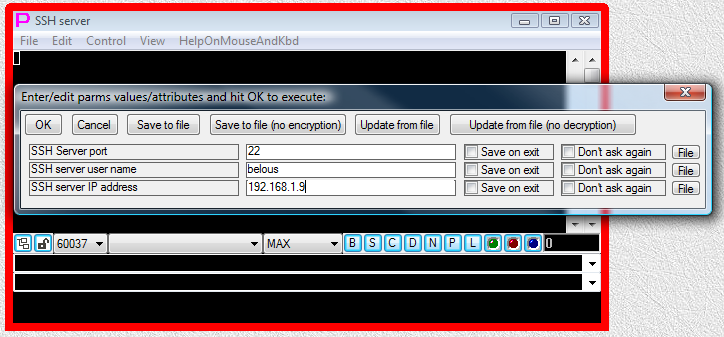
Fig.10. Populated dialog window for parametrized launcher 2.
In dialog window each substitution parameter has parameter name and parameter value. Parameter name is given in the launcher configuration when launcher is created or edited (as described above), and parameter value is given by the user in the dialog during launcher execution. In the dialog Fig.9 SSH Server port, SSH server IP address and SSH server user name are parameter names, that are automatically extracted from the configuration of the parametrized launcher 2 on its execution and substituted into the dialog that is given to the user. Against every parameter name in the dialog user can enter (assign) parameter values.
Lets see what advantages substitution parameters can give when they are used in the launchers.
Lets use following SHELL-TERMINAL launcher as an example:
proxycygterm.exe -s ′/usr/bin/ssh -o Port=22 -o User=belous 192.168.1.9′
On launcher execution CYGWIN TTY-interface wrapper proxycygterm.exe will start local CYGWIN OpenSSH ssh client and connect it to the server 192.168.1.9 on the port 22, using user name belous. If server 192.168.1.9 is one of the servers in the group of 8 redundant servers with IPs in the range 192.168.1.2 – 192.168.1.9, then user has to specify particular IP address every time before creating new terminal and connecting it to one of the 8 redundant servers. One can create 8 separate launchers with different IP addresses and use particular launcher for each of the 8 servers. Another possibility is to have single launcher and to edit this launcher every time before execution to type in required IP address.
To make things easier for the user we will introduce substitution parameter into launcher configuration. The launcher will look as follows:
proxycygterm.exe -s '/usr/bin/ssh -o Port=22 -o User=belous <PROXYPARM=IP адрес резервного сервера>'
In this launcher <PROXYPARM=IP address of standby server> is substitution parameter.
When user requests execution of such SHELL-TERMINAL launcher, Proxy32 will detect substitution parameter with the name IP address of standby server and ask user to supply or modify its value via dialog (Fig.11). Then Proxy32 will substitute new value of the IP address into launcher configuration before its execution.

Fig.11. Populated dialog window for substitution parameter <PROXYPARM=IP address of standby server>.
Depending on the task performed by launcher, launchers can contain several substitution parameters. The more substitution parameters are present in the launcher configuration, the more lines will be in the dialog that user will receive when execution of the launcher is requested. This is illustrated by Fig. 7-11. After user typed in all parameter values in the dialog, he/she can press OK button to start execution of the launcher.
Every parameter value that is entered by user via dialog will stay in the memory until Proxy32 is closed (if dialog is closed by OK button). This value will appear in the dialog during next execution of the launcher and user can edit it before pressing OK button.
If in the parametrized launcher 1 or 2 one should change only IP address, there is no need to enter all other parameter values as they have already been entered during previous execution of this launcher.
Parameter value entered by user in the dialog will also appear in the dialog during execution of any other launcher if such launcher contains substitution parameter with the same name.
To make entered values appear in the dialog after the next start of Proxy32, user should set check mark Save on exit in the dialog against those parameters that are to be saved.
If one will set both Save on Exit and Don't ask again check marks for all parameters in the dialog, then dialog will not appear on the next execution of the launcher and launcher will be executed with parameter values that were entered via dialog before. Launcher will be executed with the values that were saved on exit. That may be convenient in some cases.
Button File invokes dialog to select file on the disk. When user selects file in this dialog, path to the file is substituted into the text field of parameter value. This may be helpful when parameter should contain path to the file.
For example, OpenSSH ssh client can take all connection parameters from the configuration file. In Proxy32 configuration file can be passed to the ssh client via substitution parameter. Path to configuration file, that is passed via substitution parameter, can be entered not manually but via file selection dialog that is opening when button File is pressed.
For example, ssh connection launchers that have all connection parameters in the configuration file would look as follows:
proxycygterm.exe -s ′/usr/bin/ssh -F /home/belous/my_ssh_config_file_1 192.168.1.9′

proxycygterm.exe -s ′/usr/bin/ssh -F /home/belous/my_ssh_config_file_2 192.168.1.9′
Parametrized launcher that allows to pass different configuration files to ssh program via substitution parameter would look as follows:
proxycygterm.exe -s ′/usr/bin/ssh -F <PROXYPARM=ssh_config_file> 192.168.1.9′
During execution of this launcher user will receive dialog with one line that contains substitution parameter named ssh_config_file. One can type path to the file manually into parameter value field. Alternatively, one can press File button, select needed file in the dialog and watch path to this file populating parameter value field.
Six buttons in the top part of the dialog apply to the dialog as the whole, rather then to individual parameters.
When OK button is pressed, parameter values are substituted into the launcher (and saved to memory).
When "Cancel" button is pressed, launcher is not executed (terminal will not connect) and all changes to the values of the parameters that are made in this dialog will not be saved.
When pressing Save to file button Proxy32 will save to file list of parameters and their values from the dialog window. Password (<PROXYPASSWORD=...>) values are encrypted when written to disk, so they cannot be seen by viewing the file. Later list from the file can be loaded to the dialog with the button "Update from file". When list is loaded into dialog with the button "Update from file" password (<PROXYPASSWORD=...>) values are decrypted.
When pressing "Save to file (no encryption)" button Proxy32 will save to file list of parameters and their values from the dialog window. Password (<PROXYPASSWORD=...>) values are written to disk in open text, so they can be seen when viewing the file. Later list from the file can be loaded to the dialog with the button "Update from file (no decryption)" . When list is loaded into dialog with the button "Update from file (no decryption)" password (<PROXYPASSWORD=...>) values are not decrypted.
Обьяснить когда и что используется. И главное, какие преимущества это дает.
All launchers are saved in the LauncherTree and can be used multiple times. Substitution parameters allows user to modify launcher configuration immediately before its execution, to adapt it to the current task. Therefore, launcher for terminal window creation can be used many times to create new terminal windows (next time user can enter in dialog another server IP address and another port etc). In other words, parameters substitution occurs on every execution of the launcher. Such launcher can be passed to another user (on another computer). Then another user can eneter his user name, password, IP address and port when creating terminal window.
When password is entered into terminal on terminal connection, regardless of the way the the password is entered (manually, via copy and paste, via automation launchers COMMAND, SCRIPT, I-SCRIPT, PLUGIN or via terminal launchers SHELL-TERMINAL, COM-PORT-TERMINAL и TELNET-TERMINAL) password is not visible on the terminal screen.
Though in simple launchers (section 2.2.3), that are not using substitution parameters, password will be visible in the text of the launcher shown on the LauncherTree (or in the file related to the launcher). If password is supplied via substitution parameter PROXYPARM (refer to section 2.2.5), it can be seen in parameter value text field in the dialog and also in the parameter file on the disk.
That is why proxy32 uses special substitution parameter PROXYPASSWORD to substitute passwords into the launchers. When using this substitution parameter password will not be seen in open text. When password is entered in dialog it will be represented by dots, and it is also not seen in launcher representation on the LauncherTree. If password is saved to disk in parameter file, its value will be encrypted. PROXYPASSWORD is described in more detail in section ---.
If configuration of the connection launcher allows to supply password on the command line, password into such launcher should be substituted using PROXYPASSWORD substitution parameter.
SHELL-TERMINAL launchers for Plink and Psftp allow to specify user name and password on the command line.
SHELL-TERMINAL: plink.exe -ssh -P 22 -l belous -pw mytestpassword 192.168.1.9
In such a launcher password is seen in open text on the LauncherTree.
SHELL-TERMINAL launcher for connection via the Plink communication shell using substitution parameter PROXYPASSWORD for password and substitution parameter PROXYPARM for user name will look as follows:
SHELL-TERMINAL: plink.exe -ssh -P 22 -l <PROXYPARM=User Name for ssh server> -pw <PROXYPASSWORD=Password for ssh server> 192.168.1.9
On execution of such launcher user will have to enter in the dialog window (Fig.12) user name as the value of PROXYPARM substitution parameter and password as the value of PROXYPASSWORD substitution parameter. Password in this dialog is shown with the dots while in terminal on connection user name and password will be supplied automatically as part of the Plink built-in automatic login (AUTOLOGIN).
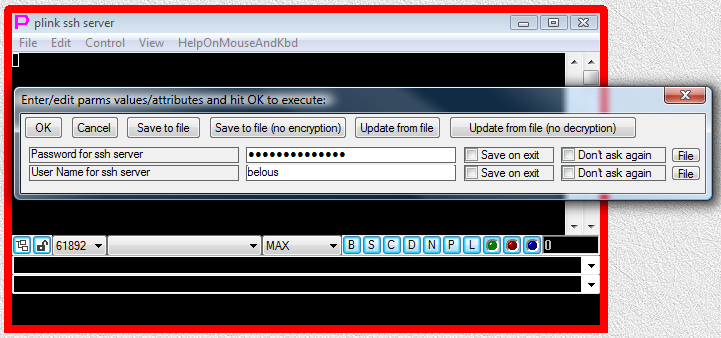
Fig.12. Dialog window to enter values for above command line
Even in the cases when username and password cannot be supplied as a part of command line of the terminal launcher, Proxy32 still allows for automatic entering of username/password on creating and connecting terminal window (AUTOLOGIN).
To achieve this one has to use a pair of launchers. First launcher is used to create and connect terminal window. Second launcher executes PLUGIN or I-SCRIPT designed to perform AUTOLOGIN in the terminal window created and connected by the first launcher. Second launcher (of the type PLUGIN or I-SCRIPT) should be located immediately under the first launcher (of the type SHELL-TERMINAL, TELNET-TERMINAL or COM-PORT-TERMINAL)
On execution of the terminal launcher (SHELL-TERMINAL, TELNET-TERMINAL or COM-PORT-TERMINAL) it will first create terminal window and connect it to local shell, TELNET server or COM-PORT. Then it will search for the next launcher on the launcher tree that is located immediately under itself, and if such launcher has the type of I-SCRIPT or PLUGIN, it will be automatically executed to complete login procedure.
AUTOLOGIN I-SCRIPT or PLUGIN contain substitution parameters. This allows user to supply/modify user name and password immediately before execution of the pair of launchers, consisting of terminal launcher and AUTOLOGIN I-SCRIPT or PLUGIN.
When terminal is disconnected and re-connected again with CONNECT/DISCONNECT button, using the same launcher pair, then on such re-connection attempt parameter substitution and automatic execution of AUTOLOGIN I-SCRIPT or PLUGIN performed the same way as it is done on creation of the terminal window.
When creating SHELL-TERMINAL with the New button on the toolbar of the LauncherTree floating window user can use the checkmark do select whether to add pre-configured I-SCRIPT or PLUGIN launcher for AUTOLOGIN, and also user can supply name of the substitution parameter PROXYPASSWORD (but not the password itself!). When adding launchers with Proxy32 TreeNode Editor user can also insert I-SCRIPT or PLUGIN launchers for AUTOLOGIN. It is described in more details in section 2.2.7
Depending on the communication shell that is used in the SHELL-TERMINAL, AUTOLOGIN can be performed in different ways.
Plink (in ssh mode) and Psftp allow to supply user name and password on their command line in the SHELL-TERMINAL, so there is no need to add separate AUTOLOGIN I-SCRIPT or PLUGIN launcher (pls, see example above).
CYGWIN OpenSSH ssh/sftp clients allow to supply user name on their command line in the SHELL-TERMINAL, but they do not allow to supply password on the command line. Therefore, separate AUTOLOGIN I-SCRIPT or PLUGIN launcher is needed to automatically type password into terminal in order to complete login procedure.
CYGWIN telnet and ftp clients do not allow to supply user name and password on their command line in the SHELL-TERMINAL. Therefore, separate AUTOLOGIN I-SCRIPT or PLUGIN launcher is needed to automatically type user name and password into terminal in order to complete login procedure.
TELNET-TERMINAL and COM-PORT-TERMINAL launcher do not allow to supply user name and password. Therefore, separate AUTOLOGIN I-SCRIPT or PLUGIN launcher is needed to automatically type user name and password into terminal in order to complete login procedure.
Details on using AUTOLOGIN when connecting terminal to CYGWIN ssh/sftp/telnet/ftp communication shells are covered in detail in section AUTOLOGIN.
The pair of SHELL-TERMINAL launcher and AUTOLOGIN (I-SCRIPT/PLUGIN) launcher that was described above is also used when user is creating and connecting terminal window via Quick Connect sub-menu that is accessible via Favorites button (refer to section ---). As it was said in section ---, Quick Connect submenu (that is accessible via Favorites button) contains references to the terminal launchers, that are located in the Launcher Tree floating window in the subtree named Quick Connect. During installation of Proxy32 those launchers are created on the LauncherTree in the Quick Connect subtree, while references to those launchers are placed into Quick Connect submenu (that is accessible via Favorites button in the main window and in the terminal window).
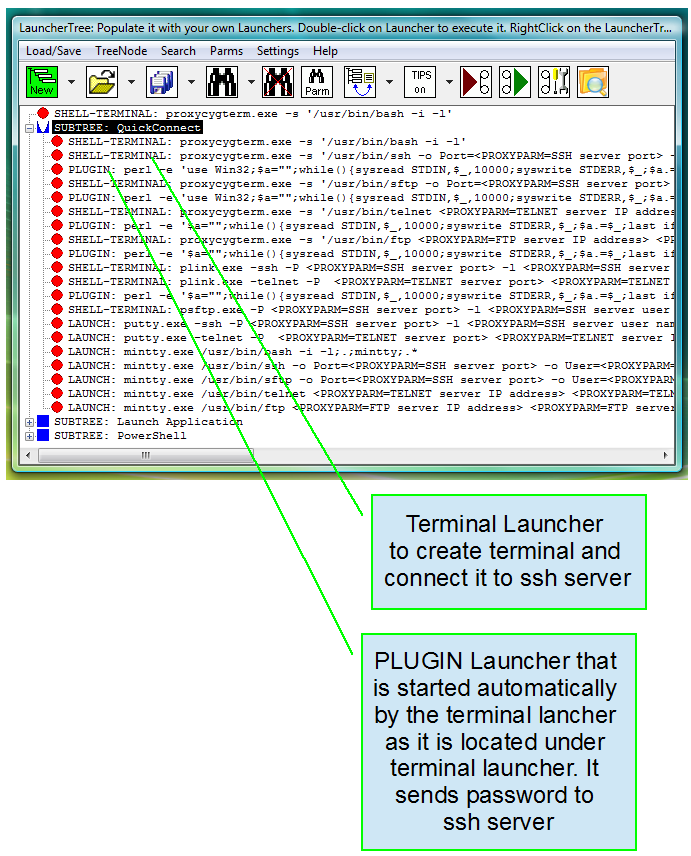
Fig. 13. Open subtree Quick Connect with referenced terminal launcher and AUTOLOGIN PLUGIN launcher.
On figure 13 in subtree QuickConnect second and third launcher are constituting a pair (second launcher creates ssh terminal and connects it and third launcher is finishing login procedure by sending password into terminal).
On figure 13 in subtree QuickConnect is open and one can see all terminal launchers (SHELL-TERMINAL) and following them AUTOLOGIN PLUGIN launchers.
Consider following launcher to create ssh connection (upper reference on fig.13):
SHELL-TERMINAL: proxycygterm.exe -s '/usr/bin/ssh -o Port=<PROXYPARM=SSH server port> -o User=<PROXYPARM=SSH server user name> <PROXYPARM=SSH server IP address>'
It contains substitution parameters PROXYPARM to connect terminal window (IP address, port and user name), and following PLUGIN launcher uses substitution parameter PROXYPASSWORD and automatically enters password into terminal.
perl -e 'use Win32;
$a="";while(){sysread STDIN,$_,10000;syswrite STDERR,$_;$a.=$_;last if $a=~/assword:|yes\/no/;}
if($a=~/yes\/no/)
{
my $iRetCode = Win32::MsgBox($a, 4, q{Never connected before to this server!});
if($iRetCode == 6)
{
syswrite STDOUT,\'yes\';syswrite STDOUT,"\r\n";
$a="";while(){sysread STDIN,$_,10000;syswrite STDERR,$_;$a.=$_;last if $a=~/assword:/;}
}
else
{
exit(0);
}
}
syswrite STDOUT,\'<PROXYPASSWORD=SSH server user password>\';syswrite STDOUT,"\r\n";'On execution of such launcher pair (terminal launcher and PLUGIN launcher) user will receive dialog window for the launcher pair to substitute connection parameters and password (Fig. 14 and 15). Those figures show empty and filled dialog windows. Connection process in the terminal created and connected by such pair of launchers is shown in fig.16.
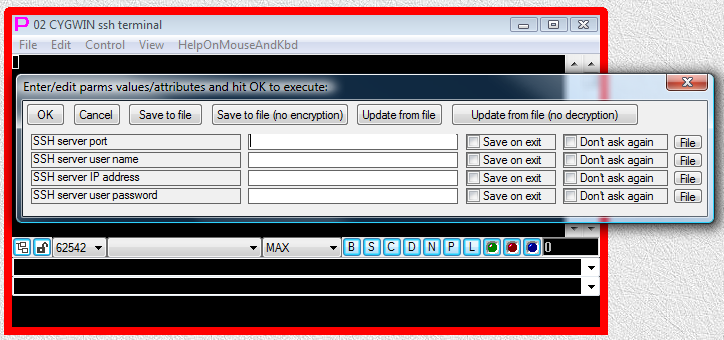
Fig. 14. Empty dialog window for the pair of launchers (terminal launcher and PLUGIN launcher).
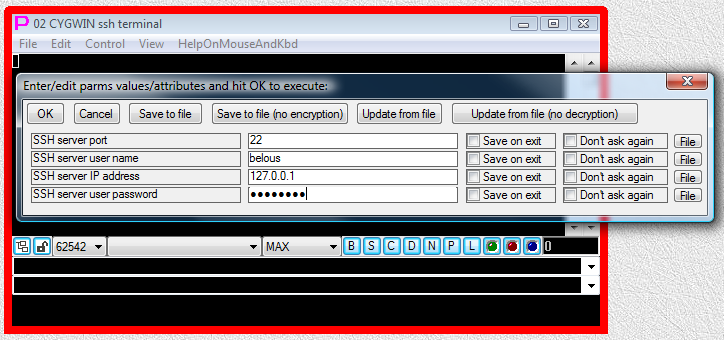
Fig. 15. Filled dialog window for the pair of launchers (terminal launcher and PLUGIN launcher).

Fig. 16. Terminal connection process for the pair of launchers (terminal launcher and PLUGIN launcher).
Proxy32 has launcher types for creating and connecting windows of built-in terminal (SHELL-TERMINAL, TELNET-TERMINAL и COM-PORT-TERMINAL) and launcher types (LAUNCH и VIEWER) for creating and capturing of windows of external processes (such as Putty, Notepad, browser etc). Proxy32 also has launcher types to automate work in connected terminal window (COMMAND, SCRIPT, I-SCRIPT, PLUGIN и I-PLUGIN, refer to section ... ). All launchers can be created on the LauncherTree and also, references to the most frequently used launchers can be placed into the menu of the button Favorites (refer to section ...).
Next (in section 2.3) we will take a detailed look at creation of the launchers for the Proxy32 built-in terminal (SHELL-TERMINAL, TELNET-TERMINAL и COM-PORT-TERMINAL).
To create or edit any launchers including terminal launchers Proxy32 has TreeNode Editor.
SHELL-TERMINAL launchers differs from TELNET-TERMINAL and COM-PORT-TERMINAL launchers because they have more complex configuration. On command line of such launcher (for example, SHELL-TERMINAL launcher for ssh connection) can be given almost unlimited number of options (parameters) and those parameters can take many different values. In such launchers it is very convenient to use substitution parameters, because it is easier to change the value for one of the many command line parameters via substitution in existing launcher rather than create brand new launcher for such parameter change.
TELNET-TERMINAL и COM-PORT-TERMINAL launchers contain limited number of options and values for those options can be defined in advance. Those launchers have simpler configuration and they are easier to create.
Therefore, approach to creation of SHELL-TERMINAL launchers is slightly different from approach to creation of TELNET-TERMINAL and COM-PORT-TERMINAL launchers.
In addition to Proxy TreeNode Editor there is a New button on the toolbar of the LauncherTree floating window. That button is flashing by green light (refer to Fig.17). Button New is intended for beginners to simplify the task of creation of the complicated launchers and to provide an understanding (via example) of how this should be done in Proxy32. This button will invoke templates for creation of the SHELL-TERMINAL launchers.
Fig.17. Button New of the floating window LauncherTree.
Lets have a look at how SHELL-TERMINAL launcher can be created with templates.
When button New is pressed, dialog window will appear (fig. 18). On the left side of this dialog window there is a list of the names of various launcher creation templates that are provided by this dialog. Most of the terminal creation templates will add sophisticated SHELL-TERMINAL launcher to the LauncherTree. When one selects name of the launcher creation template on the left, the template itself will appear on the right side of the dialog.
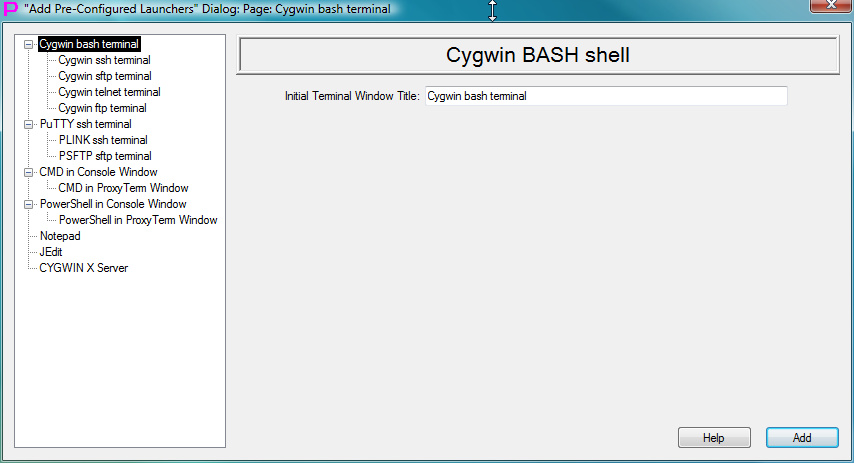
Fig.18. Dialog window with selected CYGWIN Bash Terminal template.
Fig. 18. is showing dialog window with selected CYGWIN Bash Terminal template. This is the simplest launcher creation template. To create launcher and add it to the LauncherTree user should supply name for the launcher and press Add button. This name will be placed into tooltips field of the created launcher and (from there) into the title of all terminal windows created by the execution of this launcher. The way added launcher will look on LauncherTree will depend on selected LauncherTree display mode. By default, launcher tooltip field is used as the body of the launcher representation on the LauncherTree, while launcher configuration is shown in the floating popup tooltip window when mouse pointer is hovering over the launcher. This default setting is chosen for the beginners to hide configuration of the launcher and to show just the name of the launcher on the LauncherTree. For the advanced users another display mode may be more convinient. In this mode launcher configuration and launcher tooltip field will switch places - launcher configuration is used as the body of the launcher representation on the LauncherTree, while launcher tooltip field is shown in the floating popup tooltip window when mouse pointer is hovering over the launcher. Pressing button  on the toolbar of the floating window LauncherTree will toggle between the two ways the launchers are displayed on the LauncherTree (refer to fig. 9,10 in Introduction section).
Lets look how to create more complicated SHELL-TERMINAL launcher with the help of the New button using Cygwin ssh terminal launcher creation template as an example. Lets select Cygwin ssh terminal on the left side of the dialog window (fig.19).
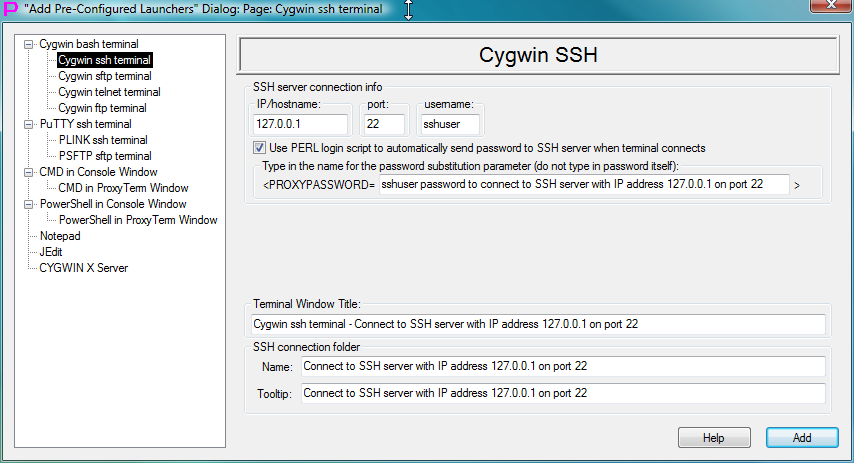
Fig.19. Dialog window with selected Cygwin ssh terminal template.
On the right side we will see the template to create launchers for the ssh terminal. THis template has text fields for the IP/hostname, port number and user name. One should fill those fields first. Then selection should be made with the check mark on whether to use special script to automatically enter password when terminal is connecting to the ssh server. If the check mark is set, then user should enter the name for the PROXYPASSWORD substitution parameter (but not the password itself!) that will store the password value. PROXYPASSWORD substitution parameter unlike the PROXYPARM substitution parameter is intended for storing the password, because it will provide confidentiality. It is described in more detail in section 2.2.6. Name of the substitution parameter one can choose arbitrarily (refer to section 2.2.5) but the ultimate goal is to provide clear idea what kind of information is stored in this parameter. If the check mark is not set, added launcher will be created using other fields in the template. But during execution of such launcher, after terminal is created and connected user will have to type password into terminal manually to complete login to ssh server.
At the bottom of the dialog window there are text fields for entering terminal window title (launcher tooltip) and name and tooltip for the SUBTREE (LauncherTree Folder). Those names are given by the user.
Вопрос. А можно ли использовать уже существующую папку? Видимо, нет. А почему бы не сделать так, чтобы папку можно было создавать только, если используется AUTOLOGIN, а когда нет AUTOLOGIN, то чтобы папка создавалась по желанию пользователя??????
After filling in all necessary fields user should press button Add to add new SUBTREE with created terminal launcher at the end of the LauncherTree (launcher for Cygwin bash terminal is added to the LauncherTree without creating SUBTREE). If the check mark was set in the template to add AUTOLOGIN script, then added SUBTREE will contain a pair of the launchers: terminal launcher and then immediately under terminal launcher there will be AUTOLOGIN PLUGIN launcher (refer to section ...) that is automatically executed after execution of the terminal launcher to type password into the terminal. To execute such a pair of launchers one should double-click on the terminal launcher. AUTOLOGIN PLUGIN launcher will be executed automatically at the right moment after execution of the terminal launcher (refer also to section 2.2.6).
After adding a launcher dialog is not closing automatically. User does not have to close the dialog right away, but instead can continue working with launcher creation templates. One can edit content of the fields in the current template to add modified launcher to the LauncherTree next to the previously added launcher. Or one can select another template on the left side of the dialog to work on adding different kind of launcher to the LauncherTree next to the previously added launcher. Every time user enters texts in the template fields and presses Add new launcher is added to the LauncherTree next to the previously added launcher. Therefore, one can create the whole lot of launchers before closing the dialog window. This can save a lot of time, as user does not have to press New button every time to create next launcher in the group.
Proxy32 TreeNode Editor is intended for creation and modification of launchers by advanced user who is familiar with launcher configurations. Editor is invoked by right click on the empty space in the LauncherTree or on the launcher in the LauncherTree. In both cases LauncherTree popup menu will appear and user should select submenu ADD TreeNode (fig.20 и 21). Content of the submenu ADD TreeNode is shown on fig.22.
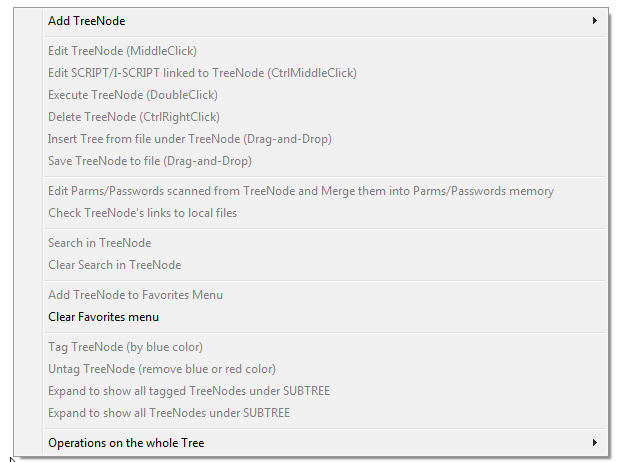
Fig.20. - LauncherTree popup menu when right-clicking on the empty space in the LauncherTree.
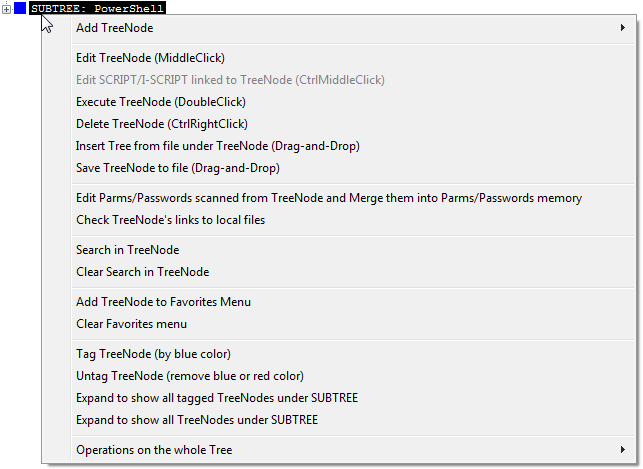
Fig.21. - LauncherTree popup menu when right-clicking on the launcher in the LauncherTree.
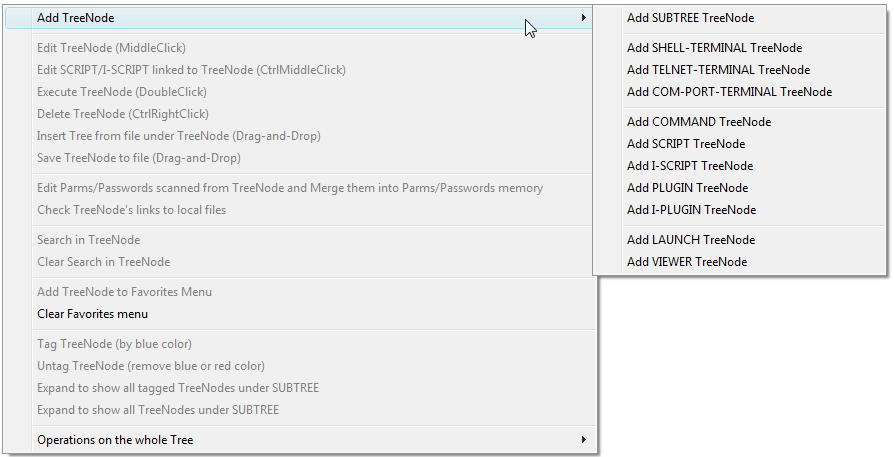
Fig.22. - Content of the submenu ADD TreeNode
If user selects command Add SHELL-TERMINAL TreeNode in the the submenu ADD TreeNode (fig.22), dialog window of the SHELL-TERMINAL editor will appear with the pre-configured text for creation of CYGWIN bash terminal launcher (fig.23), and launcher that is being added will appear on the LauncherTree. If SHELL-TERMINAL editor is exited by pressing Cancel button, then added launcher will disappear from the LauncherTree. If SHELL-TERMINAL editor is exited by pressing OK button, then added laucher will stay at the bottom of the LauncherTree. If submenu ADD TreeNode was invoked by the right-click on the empty space in the LauncherTree, new launcher will be added at the end of the LauncherTree. If submenu ADD TreeNode was invoked by the right-click on the existing launcher, new launcher will be added under right-clicked launcher instead of being placed at the end of the LauncherTree. If the right-clicked launcher is SUBMENU, then new launcher will be added inside of the SUBMENU if the SUBMENU is open and under the SUBMENU if SUBMENU is closed.

Fig.23. Window of SHELL-TERMINAL editor.
Pre-defined text for creation of the CYGWIN bash terminal that is present in the command line field of the SHELL-TERMINAL editor can be used as the template for creation of different SHELL-TERMINAL launchers. To configure a call to another CYGWIN program user should only modify text of the CYGWIN shell command line ('/usr/bin/bash -i -l') that is present in the single quotes after the mandatory part proxycygterm.exe -s. Mandatory part proxycygterm.exe -s is needed to provide interface between SHELL-TERMINAL and CYGWIN TTY on which CYGWIN shell will be started. Also, user can insert additional text using buttons at the top of the editor window.
There are three buttons at the top of the editor window:
Insert new parameter/password,Insert existing parameter/password,Select Plugin/Application to start.Pressing button Insert new parameter/password invokes dialog window with the list of the substitution parameters that can be used in the launchers (fig.24).
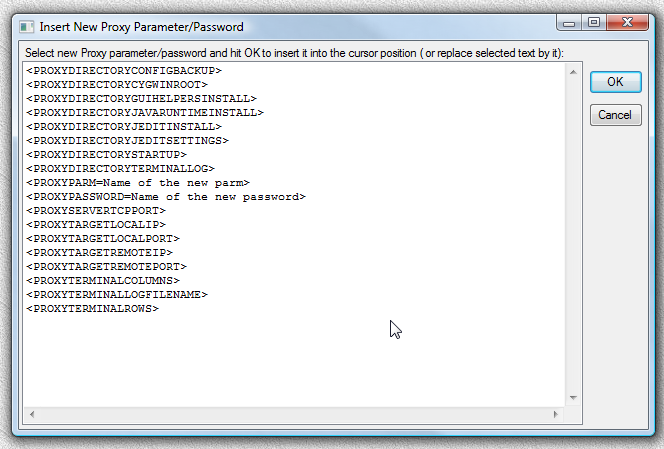
Fig.24. Dialog window Insert new parameter/password.
Only PROXYPARM and PROXYPASSWORD substitution parameters are useful for the terminal launchers. Use of PROXYPARM and PROXYPASSWORD in the terminal launchers is covered in detail in sections 2.2.5, 2.2.6. User should highlight needed parameter (PROXYPARM or PROXYPASSWORD) in the list in the dialog and then press OK button to insert selected parameter into the launcher text at the cursor position. After parameter is inserted, user should give it the meaningful name that reflects its purpose. Inserted parameters are simply text templates for user's convenience. User can also insert new parameters into launcher text by typing them in manually. Insert new parameter/password button helps to speed up parameter insertion.
Pressing button Insert existing parameter/password invokes dialog window with the list of the names of the existing PROXYPARM and PROXYPASSWORD substitution parameters. Those include: - substitution parameters that were already used during current Proxy32 session for the execution of other launchers.
- substitution parameters that are saved permanently when user set Save on exit check mark when entering such parameter (refer to section 2.2.5).
Using this dialog will insert existing substitution parameter that was already used before and has value already assigned to it. When user requests execution of the launcher, parameter input dialog will popup and existing substitution parameter will have its existing value shown in this dialog. User can keep existing value unchanged or modify it. Substitution of the existing parameter is convenient when such parameter is frequently used in many launchers and has value that does not change very often.
Button Select Plugin/Application to start allows to insert path to the Windows executable module into the launcher text field. It is intended to be used by advanced user when building complex SHELL-TERMINAL launchers.
Note:
Proxy32 TreeNode Editor can be also invoked via drop-down arrow button located next to the New button on the toolbar of the LauncherTree window. Pressing drop-down arrow button opens submenu ADD TreeNode (fig.25), where user can select type of the added launcher. If submenu ADD TreeNode was invoked when no launcher is highlighted on the LauncherTree, new launcher will be added at the end of the LauncherTree. If submenu ADD TreeNode was invoked when some launcher is highlighted on the LauncherTree, new launcher will be added under highlighted launcher instead of being placed at the end of the LauncherTree. If the highlighted launcher is SUBMENU, then new launcher will be added inside of the SUBMENU if the SUBMENU is open and under the SUBMENU if SUBMENU is closed. Submenu ADD TreeNode under selected TreeNode can also be invoked via TreeNode menu of the LauncherTree window (fig. 25a).
Fig.25. Submenu ADD TreeNode is invoked via drop-down arrow button located next to the "New" button on the toolbar of the LauncherTree window.
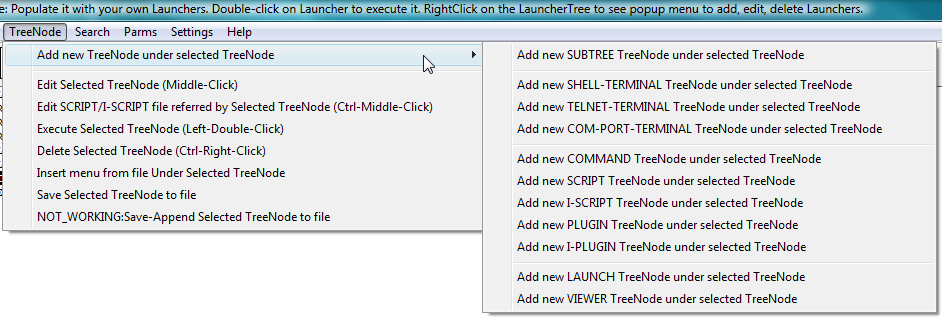
Fig.25a. Submenu ADD TreeNode under selected TreeNode is invoked via TreeNode menu of the LauncherTree window.
Advanced user can open existing SHELL-TERMINAL launcher (created via New button or via Proxy32 TreeNode Editor) in the TreeNode Editor to modify it directly. To open launcher in TreeNode Editor one should middle-click on this launcher. Another way to open launcher in the TreeNode Editor is to right click on the launcher and select option Edit TreeNode from the popup menu. After opening launcher in the TreeNode Editor one can modify it. For example, one can select some connection parameter in the launcher text field and replace it by substitution parameter using buttons on the top of the editor window. Or one can completely replace launcher text. The type of the launcher (for example, SHELL-TERMINAL) cannot be changed, and the type is defining how the launcher text will be interpreted on launcher execution. Launcher type is defined when launcher is created and cannot be changed later.
Advanced users can quickly create new launchers by creating duplicate copy of existing launcher and modifying this copy according to the new task. First, one should create copy of existing launcher by dragging it with the mouse and dropping it on itself. This will add duplicate launcher under original launcher. Then one should middle-click on duplicate launcher to edit it in the TreeNode Editor.
In addition, Proxy32 allows user to move launcher from one place to another on the LauncherTree and to group launchers into SUBTREEs using drag-and-drop (reference section ----).
Lets have a look at how TELNET-TERMINAL and COM-PORT-TERMINAL are created.
TELNET-TERMINAL and COM-PORT-TERMINAL launchers are created Proxy32 TreeNode Editor using its dialog windows as templates (fig.26 and 27).
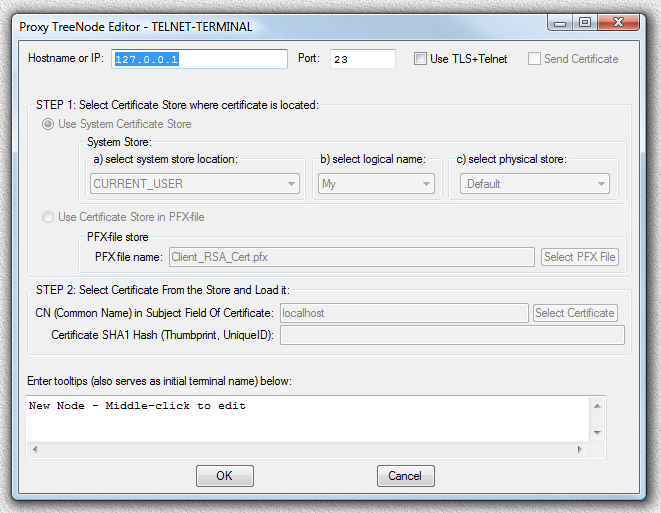
Fig.26. Proxy32 TreeNode Editor dialog window for creation of TELNET-TERMINAL launcher.
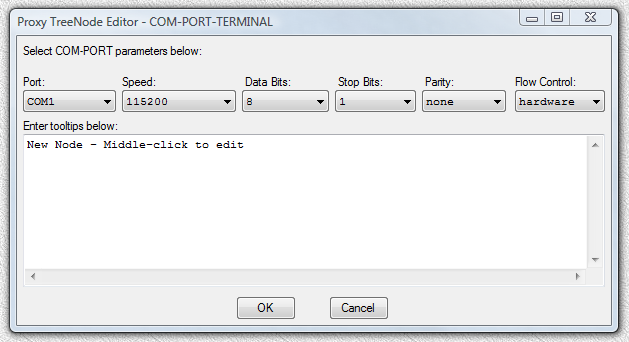
Fig.27. Proxy32 TreeNode Editor dialog window for creation of COM-PORT-TERMINAL launcher.
These dialog windows will appear when user selects submenu ADD TreeNode in the LauncherTree right-click popup menu (fig.20, fig.21), and then selects command Add TELNET-TERMINAL TreeNode or Add COM-PORT-TERMINAL TreeNode in this submenu (fig.22). User has to fill in text fields in this dialog window. Some fields in the COM-PORT-TERMINAL launcher creation template/dialog have drop-down lists with pre-dedfined selection.
TELNET-TERMINAL launcher creation template/dialog has a check mark Use TLS+Telnet to turn on cyphering if TELNET server to which terminal will be connecting uses TLS+Telnet protocol.
Both dialogs allow user to enter tooltip text that will be used both as launcher name and as initial title of created terminal window.
Depending on the way the Proxy32 TreeNode Editor was invoked, on pressing OK button new launcher will be added either at the end of the LauncherTree or after the selected launcher.
Examples of TELNET-TERMINAL and COM-PORT-TERMINAL on the LauncherTree are shown on fig.4 (references ---- and -----).
TELNET-TERMINAL and COM-PORT-TERMINAL launchers that are already present on the LauncherTree can be modified by invoking Proxy32 TreeNode Editor the same way as it was already explained for SHELL-TERMINAL launcher. Unlike SHELL-TERMINAL launcher, TELNET-TERMINAL and COM-PORT-TERMINAL launchers do not contain command line and do not support substitution parameters. Therefore, they do not have the flexibility related to configuring multitude of command line options. Modification of TELNET-TERMINAL and COM-PORT-TERMINAL launchers amounts to changing connection parameters and settings that are already present in the dialog window.
In created and connected terminal window user can type commands manually or send commands with the help of the special launchers that are designed for automation of the work in the terminal. Those are launchers of COMMAND, SCRIPT, I-SCRIPT, PLUGIN and I-PLUGIN type. Like any other luanchers in Proxy32 they are created on the LuancherTree with the help of Proxy32 TreeNode Editor that is invoked as described in section 2.3 via LauncherTree right-click popup menu ( fig.-- or --). References to those launchers can also be placed into menu of the Favorites button (refer to section ---).
COMMAND launcher si the simplest launcher that is intended for execution of the single command. It can be created via Proxy32 TreeNode Editor. User should selects submenu ADD TreeNode in the LauncherTree right-click popup menu (fig.20, fig.21), and then select command Add COMMAND TreeNode in this submenu (fig.22). When Proxy32 TreeNode Editor dialog window appears, user can type desired command into the text field in this dialog. Fig 28 shows Proxy32 TreeNode Editor dialog window for creation of COMMAND launcher.
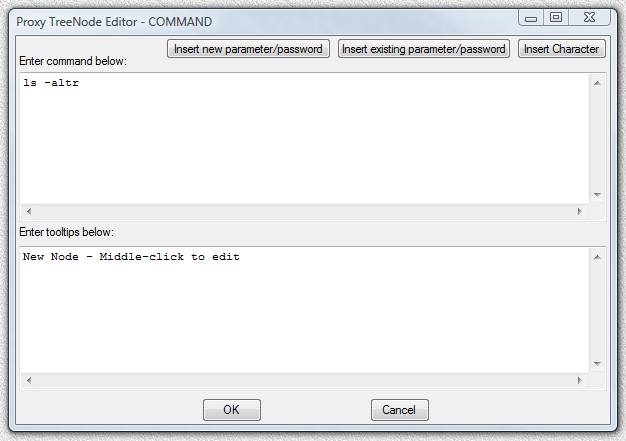
Fig.28. Proxy32 TreeNode Editor dialog window for creation of COMMAND launcher.
Fig.4 shows COMMAND launcher (reference ---), that will automatically send ls -altr command to terminal.
To execute sequence of command instead of entering those commands manually, user can execute sequence of predefined COMMAND launchers in the necessary order. This will eliminate all errors as the launchers are configured in advance without rush and then used as when necessary. Using substitution parameters in COMMAND launchers further simplifies users job as the same COMMAND launcher can be used in different situations. If substitution parameters are used in COMMAND launchers, then on execution of such launcher user will be asked to supply parameter value via dialog, as it was described in section ---. Section --- covers substitution parameter used in COMMAND launchers.
COMMAND launchers can be executed into active window of the built in terminal when terminal is connected and ready to receive next command. Active terminal window is highlighted by the red frame. For more details please refer to section ---. Alternatively, COMMAND launchers can be executed into active window of the external process. Active window of external process is labelled on the title bar by the red sticker with the word ACTIVE. For more details please refer to section ---.
SCRIPT, I-SCRIPT, PLUGIN and I-PLUGIN launchers are intended for the automatic execution of command sequences.
If the sequence of executed command does not change depending on the result of any particular command, then SCRIPT or I-SCRIPT launcher can be used for automatic execution of such command sequence. In order to do so, one should place sequence of command into the text file and then create SCRIP/I-SCRIPT file that refers to this file and specifies conditions which allow to proceed to the execution of the next command in the script command sequence.
Those conditions are different for the SCRIPT and I-SCRIPT launcher.
If substitution parameters are present in the text of the commands that are contained in the text files referred by SCRIPT or I-SCRIPT launchers, then on execution of such launcher user will receive dialog window to enter values for those parameters.
Creating of SCRIPT and I-SCRIPT launchers and files that are referred by those launcher is covered in detail in section ----. To use SCRIPT and I-SCRIPT launchers, one does not have to be a programmer, but rather to be an experienced user. SCRIPT and I-SCRIPT launchers do not work for the windows of the external processes, as only built-in terminal has interpreter for SCRIPT and I-SCRIPT files.
PLUGIN and I-PLUGIN launchers are used to launch local programs (PLUGINs) that are specifically written to interface with the built-in terminal and to automatically send sequence of command into terminal via this interface. PLUGIN program defines sequences of executed commands and the condition of their execution, processes results of command execution and presents them to user via terminal output or via its own interface. Programs for the use as PLUGIN/I-PLUGIN can be written only by the programmer. In particular, in order to interface PLUGIN process with terminal programmer should be able to code read/write operations for STDIN/STDOUT/STDERR byte streams of the PLUGIN process. Therefore, PLUGIN allows full control over the automatic command execution flow in the terminal, but it requires programmer to code this execution flow.
If substitution parameters are present on the command line of the PLUGIN/I-PLUGIN launchers, then on execution of such launchers user will receive dialog window to enter values for those parameters.
PLUGIN and I-PLUGIN launchers do not work for the windows of the external processes, as only built-in terminal has interface for interaction with PLUGIN and I-PLUGIN processes.
Details on how to automate work in the built-in terminal by using COMMAND, SCRIPT, I-SCRIPT, PLUGIN and I-PLUGIN launchers are covered in the sections --- dedicated to the mentioned launcher types.
Section --- covering AUTOLOGIN contains many examples of automation.
Automation of the work in the built-in terminal by using COMMAND, SCRIPT, I-SCRIPT, PLUGIN and I-PLUGIN launchers along with convenient panel of controls in the terminal itself simplify users work, save time and minimize chances of the error.
Terminal menu contains following top level menus: File, Edit, Control, View, HelpOnMouseAndKbd.
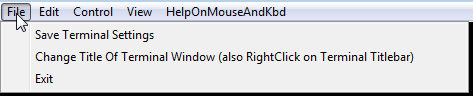
Save Terminal Settings - saves all settings of the current terminal window as global initial terminal settings. This includes size, position, color and font of the terminal window and also all terminal emulator settings. Global initial terminal settings in turn will be used for creating of any new terminal window. Size and Position from the global initial terminal settings are used also during the normalization operation and also when creating or capturing windows of the external processes in the workspace.Typically, user configures terminal window to his/her taste and then saves setting of this window as global initial terminal settings. After this, all newly created terminal windows will be automatically configured the same as the initial terminal window that user has configured manually.
Larger part of those global initial terminal settings user can change directly from menu Settings/Initial Terminal Settings in the LauncherTree window. Global initial terminal settings are saved on exit as part of the Proxy32 application configuration in the file Settings.xml in the Proxy32 start up directory. They are loaded automatically from this file when Proxy32 application starts.
Refer to here to/from description of normalization and to/from description of working with external processes.
Change Title of Terminal Window - allows user to change terminal window title. This operation can be also performed via right click on the terminal window title and editing title in-place. When terminal window title is changing the name of the terminal session log file is also changing to reflect in this name new title of the terminal window. When title of the terminal window is changing the old terminal session log file is closed and new file is opened that is reflecting new title of the terminal window. This automatic terminal session log file re-naming (re-opening) can be turned off in the terminal settings. In addition, title of the terminal window can be changed automatically by command from remote computer to which terminal is connected. Unless remote change of the terminal window title is disabled in the terminal settings.
Exit - closes current terminal window. Terminal is disconnected from the remote computer (SCRIPT/PLUGIN is stopped if running), then terminal session sharing users are disconnected from this terminal, then terminal window is destroyed. Terminal session log file is saved on disk (by default in directory log inside of Proxy32 start up directory). Terminal scroll back buffer file is destroyed. Before terminal window is destroyed, user is asked for confirmation (unless confirmation is disabled in the Proxy32 settings).
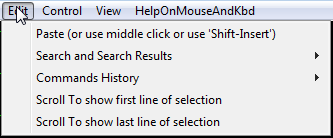
Paste - inserts text from the clipboard into terminal. Inserted text is sent to remote computer to which terminal is connected, if the size of the text does not exceed 1MB. If terminal is not connected or running SCRIPT/PLUGIN or text size is exceeding 1MB then text is not inserted (paste operation request is ignored). If previous paste operation is in progress (still feeding text into remote computer), then size of the text that is still to be inserted by ongoing paste operation plus size of the text to be inserted by new paste request cannot exceed 1MB in total. If clipboard contains text in UNICODE this text by default is converted to ASCII (or to utf8, if enabled in terminal settings) before sending to remote computer. Paste operation can also be executed with key combination Shift-Insert (this key combination is never transmitted to remote computer). Paste operation can also be executed by pressing middle mouse button in the terminal work area (in terminal window). To prevent paste when middle mouse button is pressed by accident, user can select option Paste On LeftCtrlMiddleClick instead of MiddleClick in submenu Control/WORKAROUNDS. If this option is selected, user has to hold left Ctrl key to paste text with middle mouse button. It is recommended for user to check clipboard content before executing paste operation. Clipboard content can be checked in the terminal clipboard viewer (reference 14 on Fig.1), that is located at the bottom of the terminal window.
When terminal is executing SCRIPT/PLUGIN, paste operation is ignored.
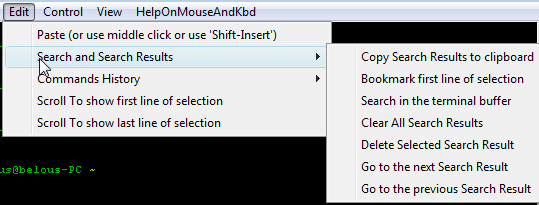
Search and Search Results - submenu that contains commands, related to search results drop-down list (reference 12 on Fig.1), that is located in the bottom part of the terminal window.
Copy Search Results to clipboard - copy content of the search results drop-down list to the clipboard.
Bookmark first line of selection - create bookmark referring to the first line of text selection in the terminal and add this bookmark to the search results drop-down list. Works only if more than one line of text is selected in the terminal. User is asked for the name of the bookmark that is being created. Later this bookmark can be used to go to the bookmarked line in the terminal scrollback buffer. To go to the bookmarked line user has to select bookmark in the search results drop-down list. Bookmark can also be created by clicking on the button B (reference 16 on Fig. 1), that is located in the bottom part of the terminal window.
Search in the Terminal buffer - performs search in the whole terminal scrollback buffer or in the selected text (if more then one line of text is selected in terminal). Search results are added to the search results drop-down list that is located in the bottom part of the terminal window. Search operation can be also performed by clicking on the button S (reference 17 on Fig. 1), that is located in the bottom part of the terminal window.
To go to the found line, user has to select it in the search results drop-down list.
Clear all search results - removes all content of the search result drop-down list.Delete selected search result - removes one search result that is currently selected in the search results drop-down list.go to the Next search result/go to the Previous search result - go to next/previous search result in the search result drop-down list.Operations Clear/Delete/Next/Previous can be executed by clicking on the buttons C, D, N, P respectively (references 18, 19, 20, 21 on Fig. 1), that are located in the bottom part of the terminal window.
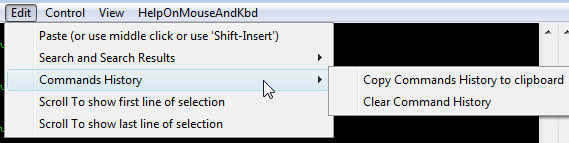
commands history - submenu that contains commands, related to commands history drop-down list (reference 13 on Fig.1), that is located in the bottom part of the terminal window.
copy command history to clipbord - copies content of the commands history drop-down list to the clipboard. Content of this list is accumulated gradually as user sends commands into terminal. To scroll to particular command stored in the list user has to select this command in the commands history drop-down list.clear command history - removes all content from commands history drop-down list.
scroll to show first line of selection/scroll to show last line of selection - scroll terminal buffer to show first/last line of the selected text.
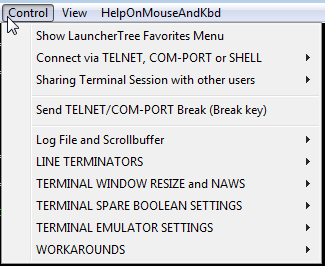
Menu "Control" - is the top-level menu, that contains commands and options for terminal connections, terminal session sharing, terminal emulator and terminal log file.
Show LauncherTree Favorites Menu - show LauncherTree favorites menu. This operation duplicates Favorite button located at the left bottom part of the terminal window (reference 8 on Fig. 1).
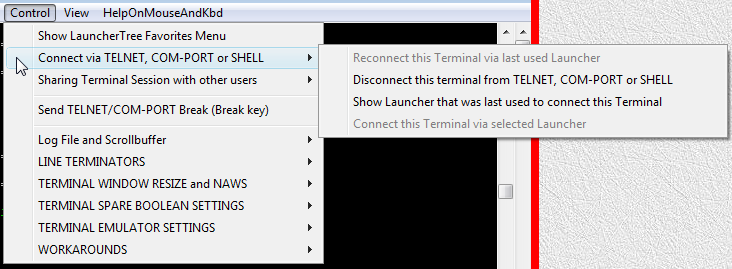
Connect via TELNET, COM-PORT or SHELL - submenu that contains commands to connect terminal to TELNET server, COM-PORT or SHELL process.
Reconnect this Terminal via last used Launcher - works only if terminal is not connected. Connects terminal using information from terminal launcher (TELNET-TERMINAL, COM-PORT-TERMINAL, SHELL-TERMINAL) that was used during the last attempt to connect this terminal. AUTOLOGIN I-SCRIPT/PLUGIN launcher will also be executed if it is present under terminal launcher. This operation can also be executed by left click on the green button CONNECT/DISCONNECT (reference 23 on fig.1).
Result of execution of this operation is displayed by messages in the terminal window, and also with the color of CONNECT/DISCONNECT button. If AUTOLOGIN I-SCRIPT/PLUGIN did not receive expected prompt from remote computer, it will hung. User can detect when SCRIPT/PLUGIN is hung when Kill button and SCRIPT/PLUGIN progress indicator (reference 28 on Fig.2) do not disappear from the bottom part of the terminal window and, if SCRIPT/I-SCRIPT is running, progress indicator does not move forward (when PLUGIN/I-PLUGIN is running this indicator shows percentage of filling PLUGIN input buffer and does not reflect general progress of PLUGIN execution).
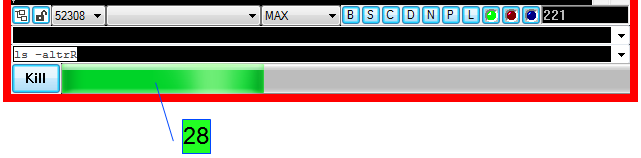
In such case user should kill AUTOLOGIN I-SCRIPT/PLUGIN with the button Kill in the left bottom part of the terminal window (reference 27 on fig.2), and then continue login manually.
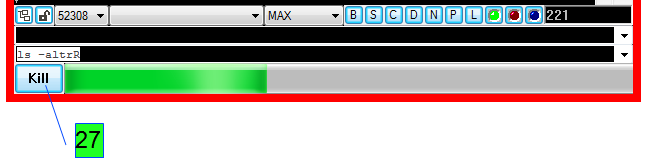
Disconnect this terminal from TELNET, COM-PORT or SHELL - disconnects terminal from Telnet server, COM-PORT or SHELL process. Works only if terminal connected. This operation can also be performed by left click on the green button CONNECT/DISCONNECT (reference 23 on fig.1). Result of execution of this operation is displayed by messages in the terminal window, and also with the color of CONNECT/DISCONNECT button. If AUTOLOGIN I-SCRIPT/PLUGIN is running, its execution will be stopped.
Show Launcher that was last used to connect this Terminal - highlights on the LauncherTree terminal launcher (TELNET-TERMINAL, COM-PORT-TERMINAL, SHELL-TERMINAL), that contains connection info for the current terminal. If terminal is connected, it will highlight the launcher that holds information for active connection. If terminal is not connected, it will highlight the launcher that was used during last connection attempt (regardless of whether it was successful connection attempt or not). This operation can also be performed by right click on the green button CONNECT/DISCONNECT (reference 23 on fig.1).
Connect this Terminal via selected Launcher - works only if terminal is not connected. Connects terminal using information from terminal launcher (TELNET-TERMINAL, COM-PORT-TERMINAL, SHELL-TERMINAL) that is highlighted on the LauncherTree. AUTOLOGIN I-SCRIPT/PLUGIN launcher will also be executed if it is present under terminal launcher. This operation can also be performed by middle click on the green button CONNECT/DISCONNECT (reference 23 on fig.1). Result of execution of this operation is displayed by messages in the terminal window, and also with the color of CONNECT/DISCONNECT button. If AUTOLOGIN I-SCRIPT/PLUGIN did not receive expected prompt from remote computer, it will hung. User can detect when SCRIPT/PLUGIN is hung when Kill button and SCRIPT/PLUGIN progress indicator (reference 28 on Fig.2) do not disappear from the bottom part of the terminal window and, if SCRIPT/I-SCRIPT is running, progress indicator does not move forward (when PLUGIN/I-PLUGIN is running this indicator shows percentage of filling PLUGIN input buffer and does not reflect general progress of PLUGIN execution).
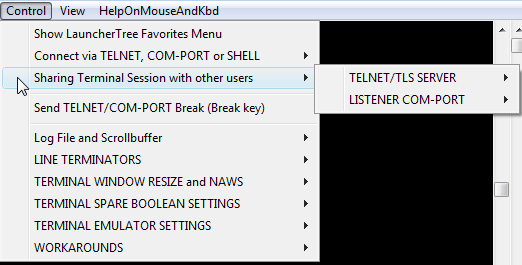
Sharing Terminal Session with other users - this submenu contains commands and setting related to sharing terminal session.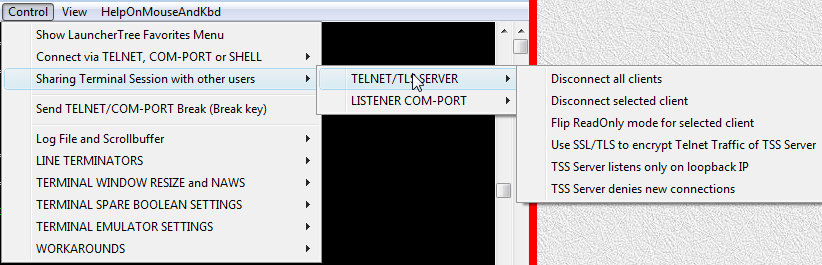
TELNET/TLS SERVER - this submenu contains commands and setting related to sharing terminal session via TELNET/TLS protocol.
Disconnect all clients - disconnect all users that are sharing current terminal session via TELNET/TLS protocol. List of those users is in the second drop-down list counting from the left edge of terminal window (reference 11 on fig.1).
Disconnect selected client - disconnect one of the users that are sharing current terminal session via TELNET/TLS protocol. List of those users is in the second drop-down list counting from the left edge of terminal window (reference 11 on fig.1). This operation disconnects only the user that is selected in above drop-down list.
Flip ReadOnly mode for selected client - toggle Read-Only mode of one of the users that are sharing current terminal session via TELNET/TLS protocol. List of those users is in the second drop-down list counting from the left edge of terminal window (reference 11 on fig.1).
This operation toggles Read-Only mode only for the user that is selected in above drop-down list. After user connects to shared terminal session, he/she can see all information that arrives to terminal screen, and is also able to send commands into terminal session (type commands into remote equipment to which shared terminal is connected). Owner of the shared terminal session can change status of any sharing user to Read-Only by using this command. Read-Only user will not be able to send commands into the shared terminal session. Owner of the shared terminal session can change status of the user back to Read-Write by using this command for the second time.
Use SSL/TLS to encrypt Telnet Traffic of TSS Server - turns on or off use of TLS protocol when sharing terminal session via TELNET protocol. Change has effect only for this particular terminal window and only on the new connection attempts arriving after the change took place. This function is duplicated by the button (reference 9 on Fig. 1).
This function only toggles use of TLS protocol. All TLS settings are configured in the Proxy32 Options Dialog. To change default value for this setting, one should use global initial terminal settings (menu Settings/Initial Terminal Settings/Terminal Session Sharing (TSS)/Use SSL/TLS to encrypt Telnet Traffic of TSS Server in the LauncherTree window).
TSS Server listens only on loopback IP - by default terminal session sharing TELNET/TLS server listens for new connections on all IPv4 addresses on the computer where it is running. If session sharing TELNET connection is always performed locally (on the same computer) or it is protected by some external software that creates encrypted tunnel with local end point, it may be desirable for security reasons to deny all connections that are received on externally-visible IP addresses. When this option is enabled, TELNET TSS server only accepts local connections (that are destined to loopback IP address 127.0.0.1).
TSS Server denies new connections - After this option is enabled, all connections to TELNET-TLS Terminal Session Sharing (TSS) server will be denied. This is convenient if Proxy32 user wants to disable all connections to TSS server for every newly created terminal window (in this case this option should be set at the global level – "Settings/Initial Terminal Settings/Terminal Session Sharing (TSS)/TSS Server denies new connections" menu in the LauncherTree window) or to disable all new connection to TSS server in existing terminal window after all major players are connected already. This is thought to be extra security feature.
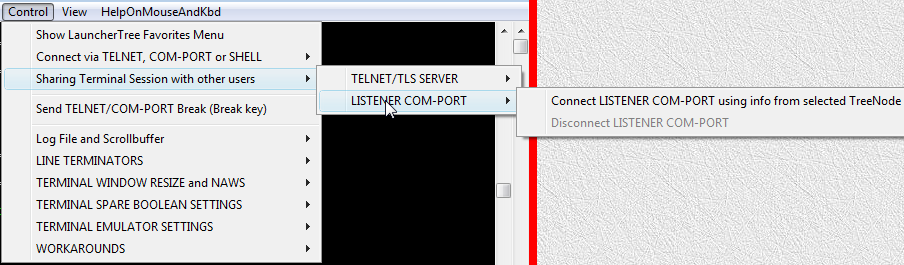
LISTENER COM-PORT - this submenu contains commands and setting related to sharing terminal session via COM-PORT protocol.
Connect LISTENER COM-PORT using info from selected TreeNode - connects shared terminal session to local COM-PORT, using information from selected COM-PORT launcher. After this external user can connect to shared terminal session via this port. External user can connect via cable, modem or Bluetooth protocol. This operation can also be executed by ctrl-right-click on green button CONNECT/DISCONNECT. Result of the operation is shown via messages in the terminal window. This command becomes disabled in the menu if it has succeeded.
Disconnect LISTENER COM-PORT - disconnects shared terminal session from local COM-PORT. After this external user cannot connect to shared terminal session via this port. This operation can also be executed by ctrl-right-click on green button CONNECT/DISCONNECT. Result of the operation is shown via messages in the terminal window. This command becomes disabled in the menu if it has succeeded.
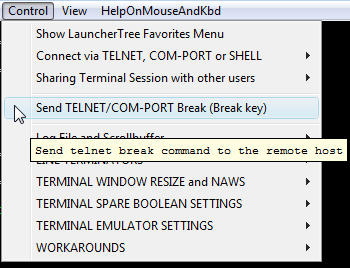
Send TELNET/COM-PORT Break (Break key) - Sends TELNET BREAK command if terminal is connected to TELNET server. Sends COM-PORT BREAK command if terminal is connected to COM-PORT. This operation can also be performed by pressing the Break key.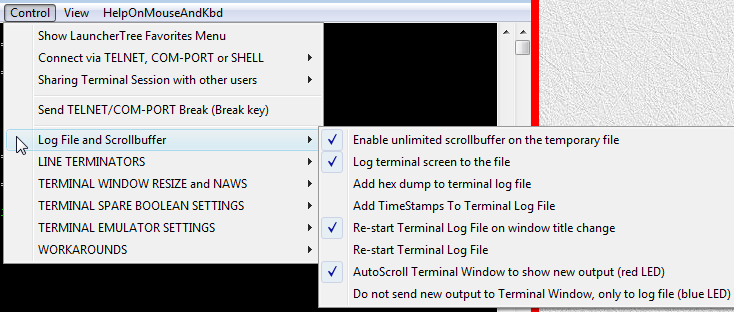
LogFile and ScrollBuffer - this submenu contains commands and settings to control terminal session log file and terminal scroll back buffer file.
Enable unlimited scrollbuffer on the temporary file - this setting turns on unlimited scroll back buffer that is using temporary files on the disk. If this setting is off terminal scroll back buffer contains only 1000 lines and uses only system memory, but not temporary disk files. Temporary files of terminal scroll back buffer are created by default in directory log inside of the Proxy32 start up directory. During Proxy32 installation user can select another directory to store temporary files of the terminal scroll back buffer. Temporary files of the terminal scroll back buffer are deleted automatically when terminal window is closed. This files can contain hundreds of millions of lines, so it is recommended to place log directory on the disk with large amount of the free space. This directory contains also terminal session log files and files with the text that did not fit into system clipboard when it was selected in the terminal.
Log Terminal Screen to file - this setting turns on terminal session log file. Name of the terminal session log file includes title of the terminal window and the date and time of the file creation. Terminal session log files are created by default in directory log inside of the Proxy32 start up directory. During Proxy32 installation user can select another directory to store terminal session log files. Terminal session log files are never deleted automatically, so user will have to periodically clean up log directory when it grows too large. Proxy32 has Log Viewer dialog that allows to perform text search in all stored terminal session log files. This dialog can be invoked via Log Viewer button on the toolbar of the LauncherTree window.
Add hex dump to terminal log file - this setting turns on additional hexadecimal printout of data that is coming from remote computer to the terminal. This information is included into terminal session log file. This is convenient to see non-printable commands that can be sent from the remote computer to the terminal.
Add TimeStamps To Terminal Log File - this settings turns on additional time stamp that is attached to every segment of data that is coming from remote computer to the terminal. This information is included into terminal session log file. This will allow to measure time delays between responses of the remote computer.
Re-start Terminal Log File on Window Title change - Name of the terminal session log file includes title of the terminal window and the date and time of the file creation. If this setting is on, then on change of the terminal window title (by user or by the command from the remote computer) old terminal session log file is closed and the new terminal session log file is opened instead. Name of the new terminal session log file includes new title of the terminal window and the new date and time of the file creation.
Re-start Terminal Log File - on this command old terminal session log file is closed and the new terminal session log file is opened instead. Name of the new terminal session log file includes new title of the terminal window and the new date and time of the file creation.
Autoscroll Terminal Window to Show new output (Red LED) - when this setting is on terminal will automatically scroll its buffer to make sure that the new data arriving from the remote computer are always visible in the terminal window. When this setting is off, new data arriving from the remote computer is added to the end of the terminal scroll back buffer, but terminal will not scroll the buffer automatically to make new data visible in the terminal window. User will have to scroll manually to see new data in the terminal window. By default autoscroll is on, but sometimes it may be necessary to turn it off, when user is trying to copy text from terminal scroll back buffer. To copy text to clipboard, user will have to select it but this can be impossible when terminal is simultaneously performing autoscroll on arriving of the new data. Autoscroll can also be turned on and off via red button that is located in the right bottom part of the terminal window (reference 24 on Fig.1).
This button also indicates the state of autoscroll. If it is of dark red color, then autoscroll is on. If it is of bright red color, then autoscroll is off.
Do not send new output to terminal window, only to Log File (blue LED) - if this setting is on, then data coming from the remote computer are written to the terminal session log, but not into terminal scroll back buffer and they will not be shown on the screen of the terminal. This is convenient when one has to receive a lot of data but does not want this data to fill up terminal scroll back buffer and make it harder to work with data that is already present in the terminal scroll back buffer. This setting can be toggled by pressing blue button in the bottom part of the terminal window (reference 25 on Fig.1).
This button also indicates the state of the setting. If this button is of the dark blue color, then new data is added to the terminal scroll back buffer and displayed in terminal window. If this button is of the bright blue color, then new data only added to terminal session log file. Toggling this setting is also marked by the messages in the terminal window to let user know in which place new data were not shown on the terminal screen.
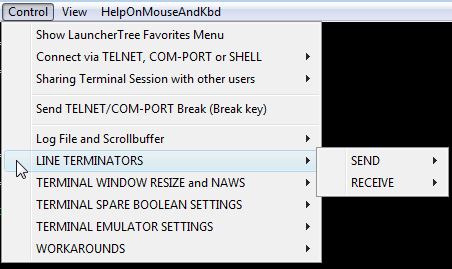
LINE TERMINATORS - sumenu that contains line terminator settings for terminal.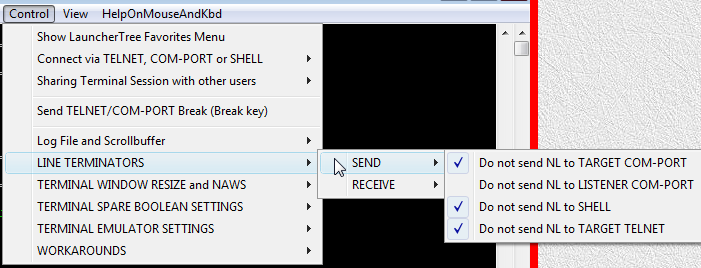
SEND - sumenu that contains line terminator settings that control how line terminators are sent from terminal to remote computer.
Do not send NL to TARGET COM-PORT - do not send NL to COM-PORT connecting terminal to remote computer.
Do not send NL to LISTENER COM-PORT - do not send NL to COM-PORT connecting terminal to remote user that is sharing current terminal session.
Do not send NL to SHELL - do not send NL to the input of the local SHELL process.
Do not send NL to TARGET TELNET - do not send NL to TELNET server, to which terminal is connected.
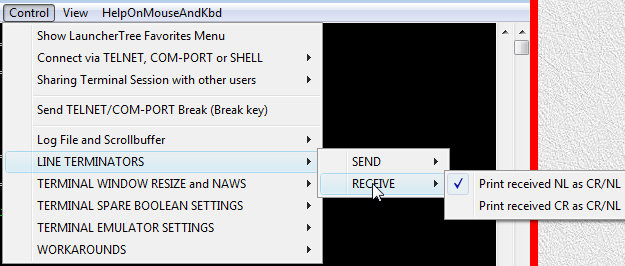
RECEIVE - sumenu that contains line terminator settings that control how line terminators are interpreted when received from remote computer.
Print received NL as CR/NL - process NL as if CR/NL was received. Normally CR and NL are processed separately, but there is some equipment that sends NL instead of pair CR/NL.
Print received CR as CR/NL - process CR as if CR/NL was received. Normally CR and NL are processed separately, but there is some equipment that sends CR instead of pair CR/NL.
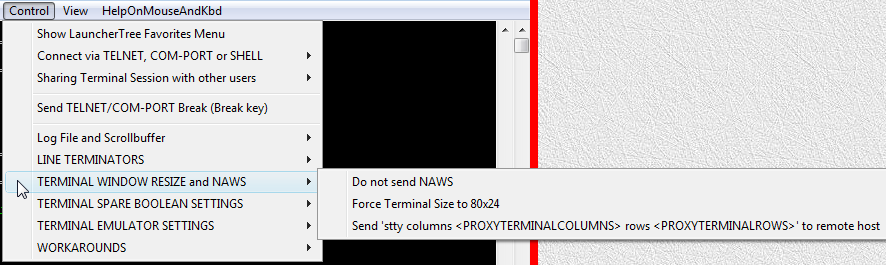
TERMINAL WINDOW RESIZE AND NAWS - submenu that contains setting related to terminal re-size.
Do not send NAWS - if this setting is on then then on terminal re-size information about new size of the terminal window is not sent to TELNET server or local SHELL process to which terminal is connected. If this setting is off, then on terminal re-size information about new size of the terminal window is sent to TELNET server (via TELNET protocol) or to local SHELL process (via proxycygterm.exe).
Force Terminal Size to 80x24 - if this setting is on, then size of the terminal is fixed to 80 columns by 24 rows. Terminal window size can be changed only by changing the size of the terminal font. This setting is useful when working with the remote equipment that does not support dynamic change of the of the terminal window size and always expects that terminal size is 80x24.
Send stty columns <PROXYTERMINALCOLUMNS> rows <PROXYTERMINALROWS> to remote host - in situations when information about dynamic terminal window re-size does not pass automatically through existing connection, if remote computer supports stty command, then information about new terminal windows size can be sent to remote computer manually with stty command. Terminal window size expressed by number of columns and rows can be automatically substituted into the text of the stty command being sent by using substitution parameters <PROXYTERMINALCOLUMNS> and <PROXYTERMINALROWS> in the text of the COMMAND launcher or in the text of the SCRIP/I-SCRIPT file or in the command line of the PLUGIN/I-PLUGIN. These substitution parameters contain size of the active terminal (terminal in which COMMAND/SCRIPT/PLUGIN is executed). This menu command is added for convenience of the user and equivalent to execution of the COMMAND launcher that contains following text: stty columns <PROXYTERMINALCOLUMNS> rows <PROXYTERMINALROWS>.
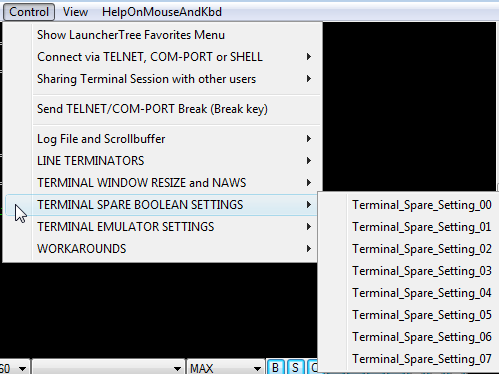
TERMINAL SPARE BOOLEAN SETTINGS - this submenu contains spare setting that can be used in the future.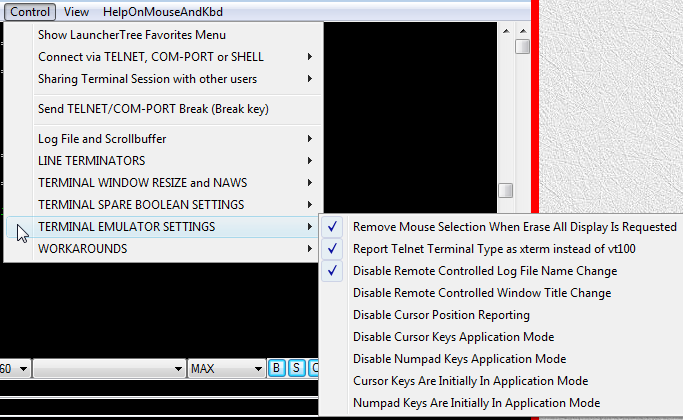
TERMINAL EMULATOR SETTINGS - this submenu contains terminal emulator settings.
Remove Mouse Selection When Erase All Display Is Requested - if this setting is on then on receiving Erase All Display command from the remote computer text selected in the terminal windows will no longer be selected.
Report Telnet Terminal Type as xterm instead of vt100 - if this setting is on terminal reports its type as XTERM to TELNET server. If this setting is off terminal reports its type as VT100 to TELNET server.
Disable Remote Controlled Log File Name Change - if this setting is on then terminal will not change the name of the terminal session log file on the command from remote computer. Please, note that by default name of the terminal session log file will automatically change on changing the title of the terminal window.
Disable Remote Controlled Window Title Change - if this setting is on then terminal will not change the title of the terminal window on the command from remote computer. Please, note that by default name of the terminal session log file will automatically change on changing the title of the terminal window.
Disable Cursor Position Reporting - if this setting is on, then terminal will not respond to requests from the remote computer about terminal cursor position .
Disable Cursor Keys Application Mode - Cursor Keys cannot be switched to Application Mode.
Disable Numpad Keys Application Mode - Numpad Keys cannot be switched to Application Mode.
Cursor Keys Are Initially In Application Mode - if this setting is on then Cursor Keys are set to Application Mode when terminal emulator is initialized or reset.
Numpad Keys Are Initially In Application Mode - if this setting is on then Numpad Keys are set to Application Mode when terminal emulator is initialized or reset.
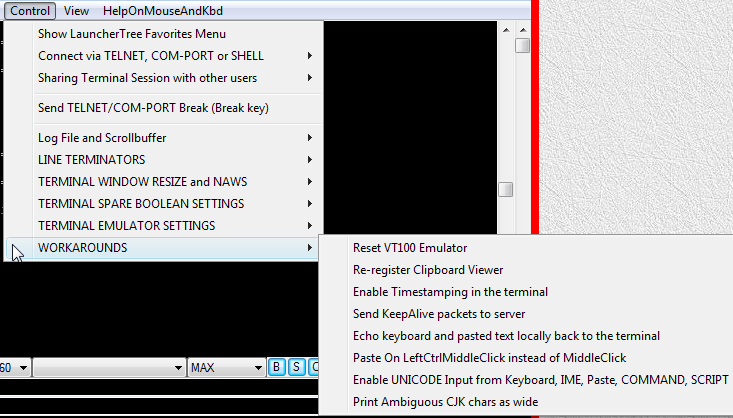
WORKAROUNDS - this submenu contains commands that can be useful is special situations.
Reset VT100 Emulator - resets terminal emulator to initial state. Useful, when some application did not properly finish working with terminal and did not restore terminal emulator settings back to defaults.
Re-register Clipboard Viewer - re-register proxy32 clipboard viewer with the system to receive notification from the system when the content of the clipboard is changing. Useful, when some rogue applications break registration chain in the system and proxy32 stops receiving notifications.
Enable Timestamping in the terminal - prints current time and date to terminal screen every 30 seconds. Usefull for time-logging while performing time-critical activities.
Send KeepAlive packets to server - periodically sends packets with NOP (TELNET No OPeration) command to TELNET server.
Echo keyboard and pasted text locally back to the terminal - turns on local echo in terminal. All input is mirrored back to terminal screen in addition to being sent to remote host.
Paste On LeftCtrlMiddleClick instead of MiddleClick - when this setting is on to paste text by middle click user also has to hold left Ctrl key pressed. This setting can help to reduce probability of the accidental text paste by middle click.
Enable UNICODE Input from Keyboard, IME, Paste, COMMAND, SCRIPT - when this option is on, all UNICODE input is translated to UTF8 before being sent to remote host. User can use Windows international keyboard layouts and Input Method Editors (IME) to type text in non-Engish languages. When this option is off, all UNICODE input is translated to ASCII before being sent to remote host. Windows international keyboard layouts and Input Method Editors (IME) are bypassed by terminal. Keys with printable ASCII chars are translated by terminal built-in key-mapper directly into printable ASCII chars.
Print Ambiguous CJK chars as wide - according to Unicode standard Ambiguous CJK chars should have width of two columns if they are used in East Asian context and only one column if they are used in Non East Asian context. Terminal cannot recognize which context is being used. That is why this setting was introduced. By default in Proxy32 terminal Ambiguous CJK chars are one column wide. When this setting is on, Ambiguous CJK chars will be two columns wide.
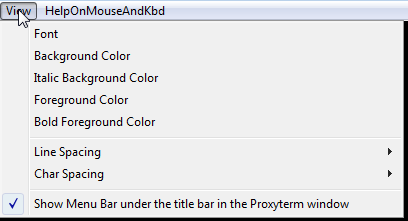
View - this submenu contains commands and settings that control appearance of the terminal window.
Font - this command invokes font selection dialog. Terminal can use only fixed-width fonts, so the dialog will show only fixed-width fonts.
Background Color - this command invokes color selection dialog to select default background color of the terminal screen cell.
Italic Background Color - ITALIC (slanted text) attribute in this terminal is presented by different background color of the terminal screen cell. This command invokes color selection dialog to select background color of the terminal screen cell with attribute ITALIC.
Foreground Color - this command invokes color selection dialog to select default text (foreground) color of the terminal screen cell.
Bold Foreground Color - BOLD (bright text) attribute in this terminal is presented by different foreground (text) color of the terminal screen cell. This command invokes color selection dialog to select foreground color of the terminal screen cell with attribute BOLD.
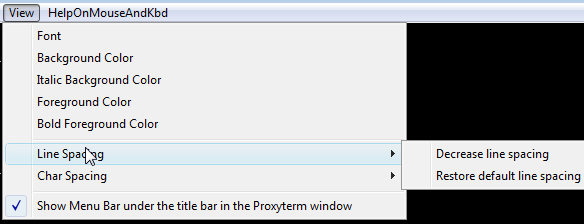
Line Spacing - this submenu contains commands that change the distance between the lines in the terminal.
Decrease line spacing - this command reduces distance between the lines in the terminal by one pixel on every execution.
Restore default line spacing - this command restores standard distance between the lines in the terminal. Standard distance is given by the selected font.
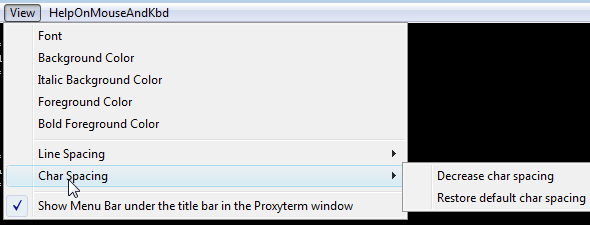
Char Spacing - this submenu contains commands that change the width of the terminal screen cell.
Decrease char spacing - this command reduces the width of the terminal screen cell by one pixel on every execution.
Restore default char spacing - this command restores standard width of the terminal screen cell. Standard width of the terminal screen cell is given by the selected font.
Show Menu Bar under the title bar in the Proxyterm window - if this setting is on, menu bar will be shown under the title bar of the terminal window. If this setting is off, user will have to access terminal menu via other ways, for example, via left click on the icon in the left side of the terminal title bar or Ctrl-Right-Click in the terminal work area.
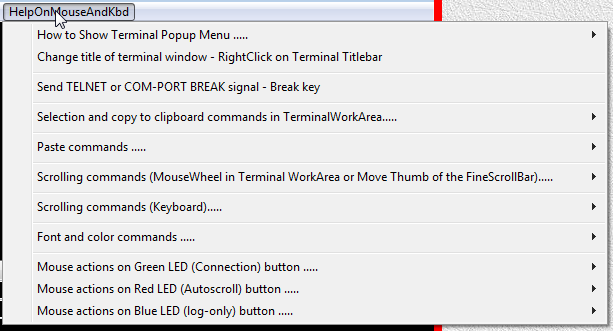
HelpOnMouseAndKbd - this submenu does not contain any executable commands or any settings. User should simply read the menu to get help with using mouse and keyboard commands in the terminal.
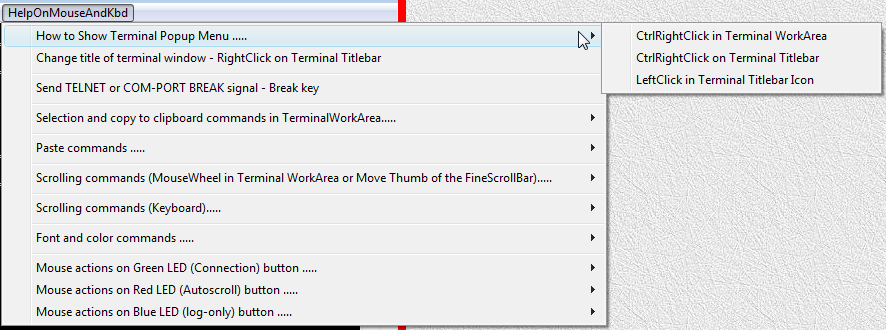
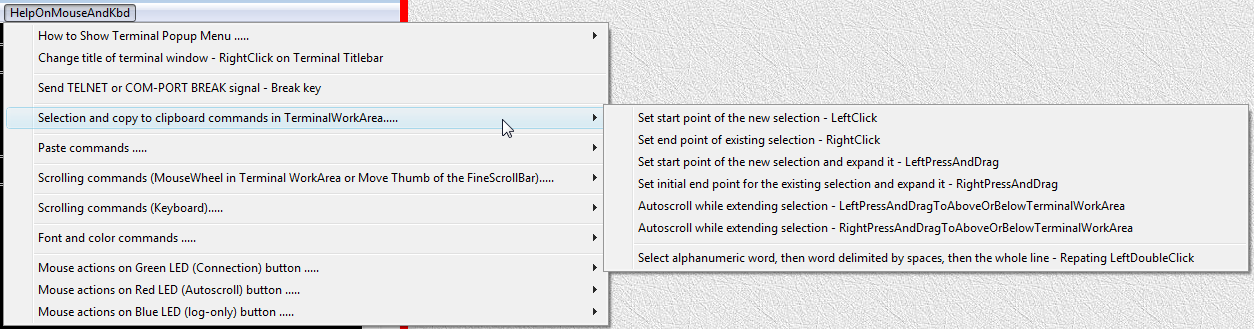
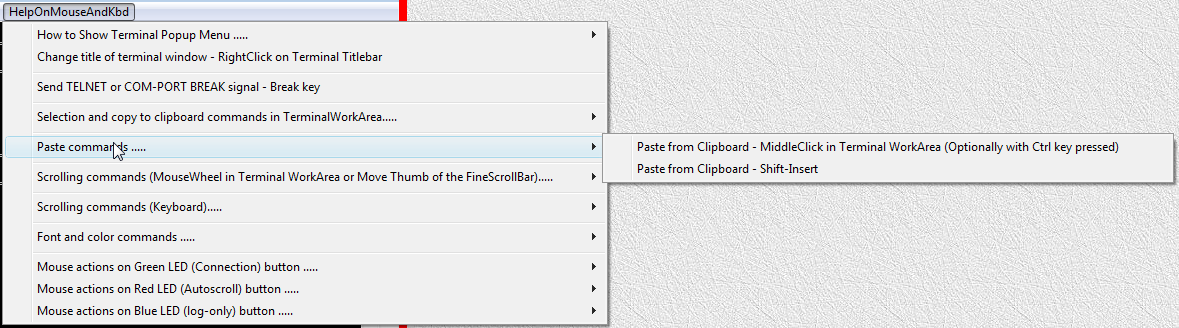
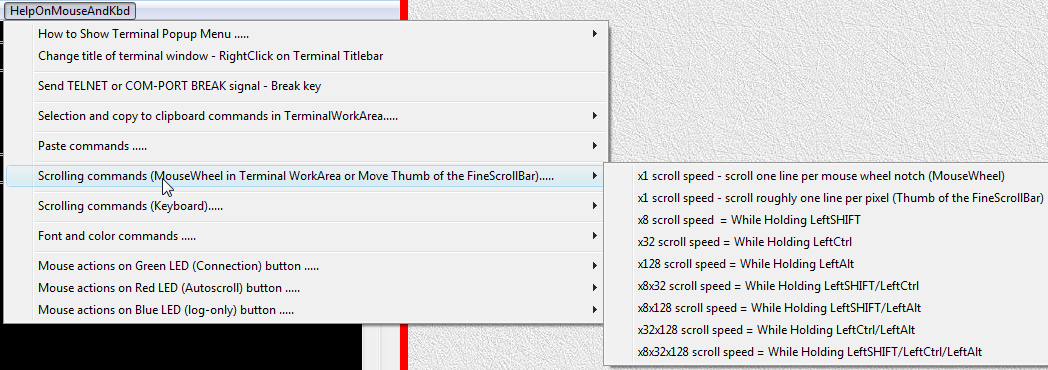
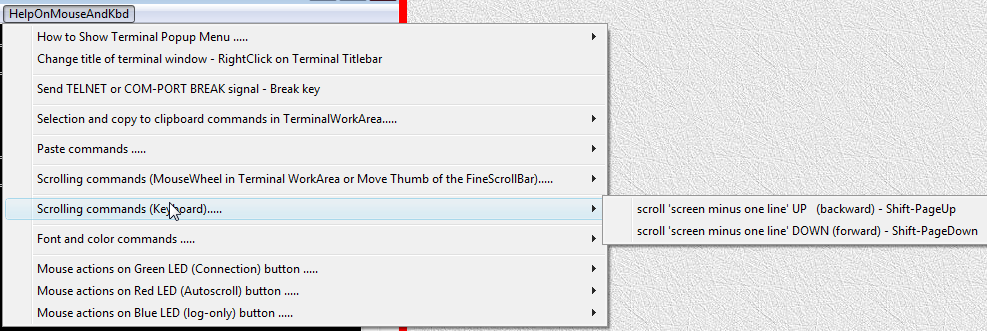
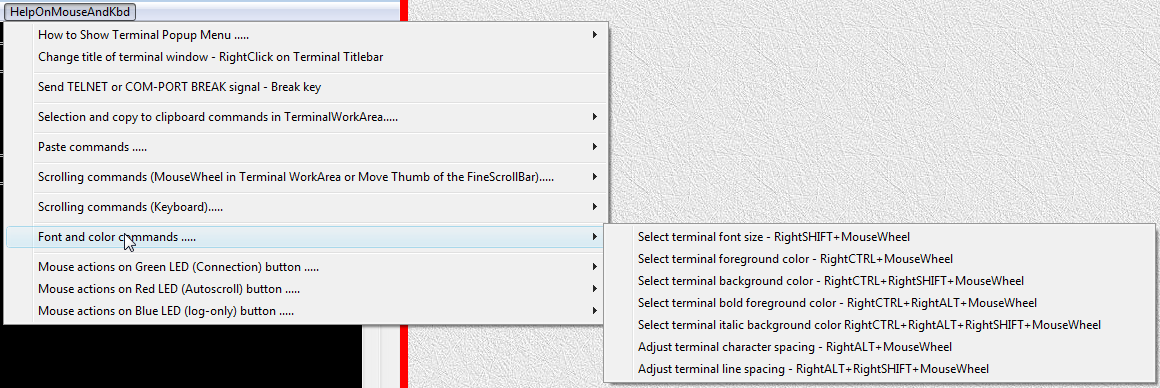
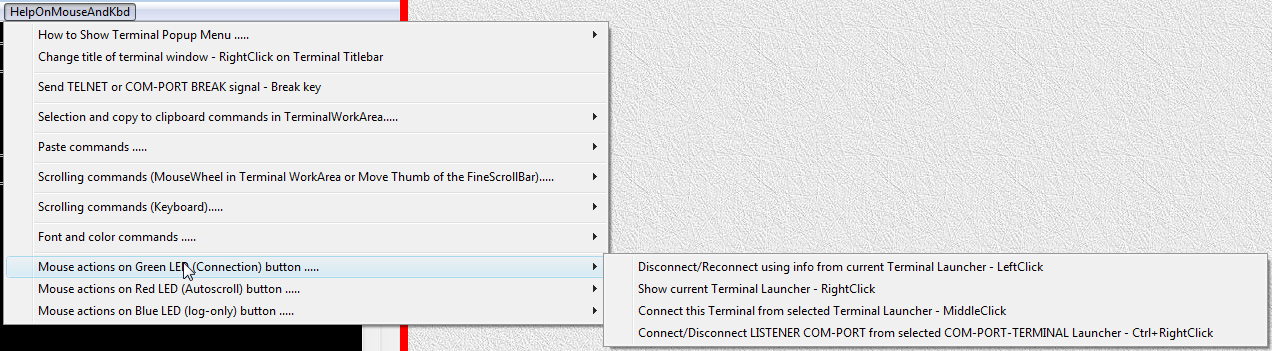
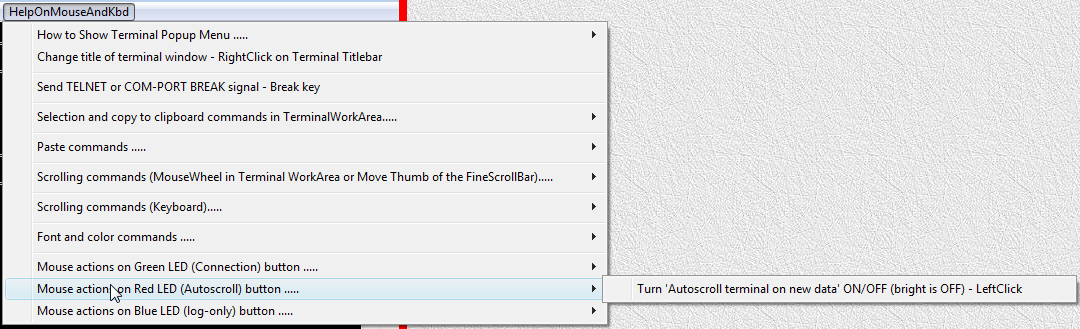

1.1 What is terminal emulator?
1.2 Terminal screen scrollback buffer
1.3 Search in the terminal scrollback buffer
1.4 Copy and paste via clipboard
1.5 Sharing terminal session between multiple users
2. Description of the Proxy32 built-in terminal
2.1. Capabilities of the built-in terminal
2.1.1. General information
2.1.2. Controls in the built-in terminal window
2.1.3. Scrolling in the built-in terminal
2.1.4. Bookmarking and text search in the scroll back buffer of the built-in terminal
2.1.5. Copy and Paste operations in the built-in terminal
2.1.6. Sharing Terminal Session with Remote users
2.1.7. Flow control in the terminal
2.2. Creating, connecting, disconnecting and re-connecting windows of the built-in terminal
2.2.1. Brief introductory information
2.2.2. Ways to create and connect window of the built-in terminal
2.2.3. Using launchers to create and connect windows of the built-in terminal
2.2.4. Disconnect, re-connect and terminal state indication (button CONNECT/DISCONNECT)
2.2.5. Using substitution parameters in the launchers for creation and connection of the built-in terminal windows
2.2.6. AUTOLOGIN and passwords
2.3. Creating launchers for Proxy32 built-in terminal
2.3.1. Creating SHELL-TERMINAL launchers with the "New" button
2.3.2. Creating SHELL-TERMINAL launchers with Proxy32 TreeNode Editor
2.3.3. Editing (modifying) SHELL-TERMINAL launchers
2.3.4. Creating and editing TELNET-TERMINAL and COM-PORT-TERMINAL launchers
2.4. Automating work in the built-in terminal
2.5. Terminal Menu Reference
2.5.1 Menu "File"
2.5.2 Menu "Edit"
2.5.3 Menu "Control"
2.5.3.1 Command "Control/Show LauncherTree Favorites Menu"
2.5.3.2 Submenu "Control/Connect via TELNET, COM-PORT or SHELL"
2.5.3.3 Submenu "Control/Sharing Terminal Session with other users"
2.5.3.4 Command "Control/Send TELNET/COM-PORT Break (Break key)"
2.5.3.5 Submenu "Control/Log File and Scroll Buffer"
2.5.3.6 Submenu "Control/LINE TERMINATORS"
2.5.3.7 Submenu "Control/TERMINAL WINDOW RESIZE AND NAWS"
2.5.3.8 Submenu "Control/TERMINAL SPARE BOOLEAN SETTINGS"
2.5.3.9 Submenu "Control/TERMINAL EMULATOR SETTINGS"
2.5.3.10 Submenu "Control/WORKAROUNDS"
2.5.4 Menu "View"
2.5.5 Menu "HelpOnMouseAndKbd"