Fig.1. Adding SHELL-TERMINAL launcher via right click on the LauncherTree.
1.General information
2.CYGWIN OpenSSH ssh/sftp client
2.1.SHELL-TERMINAL launcher for CYGWIN ssh/sftp
2.2.PLUGIN launcher for CYGWIN ssh/sftp
2.3.I-SCRIPT launcher for CYGWIN ssh/sftp
2.4.Pre-configured launchers for CYGWIN ssh/sftp
2.5.SSH port forwarding for CYGWIN ssh
2.5.1.SSH port forwarding before login
2.5.2.SSH port forwarding after login
3.CYGWIN telnet/ftp clients
3.1.SHELL-TERMINAL launcher for CYGWIN telnet/ftp
3.2.PLUGIN launcher for CYGWIN telnet/ftp
3.3.I-SCRIPT launcher for CYGWIN telnet/ftp
3.4.Pre-configured launchers for CYGWIN telnet/ftp
4.Using TELNET and COM-PORT clients that are built into TERMINAL
4.1.TELNET-TERMINAL and COM-PORT-TERMINAL launchers
4.2.PLUGIN/I-SCRIPT launchers to automate connection via TELNET-TERMINAL and COM-PORT-TERMINAL launchers
5.Plink in ssh mode and Psftp
5.1.SHELL-TERMINAL launchers for Plink in ssh mode and Psftp
5.2.Pre-configured launchers for Plink in ssh mode and Psftp
6.Plink in telnet and serial mode
6.1.SHELL-TERMINAL launchers for Plink in telnet and serial mode
6.2.PLUGIN/I-SCRIPT launchers to automate connection via Plink in telnet and serial mode
6.3.Pre-configured launchers for Plink in in telnet mode
7.Putty in ssh, telnet or serial mode
7.1.LAUNCH launchers for Putty in ssh, telnet or serial mode
7.2.Pre-configured launchers for Putty in ssh or telnet mode
8.CYGWIN ssh/sftp/telnet/ftp in bash terminal
Term AUTOLOGIN is referring to the mechanism that will automatically complete login procedure on single mouse click when terminal is connecting to the remote equipment and then requires to enter user name and password to complete connection establishment.
Proxy32 has special feature to help with AUTOLOGIN. If there is I-SCRIPT or PLUGIN launcher located on the LauncherTree directly under some terminal launcher (SHELL-TERMINAL, TELNET-TERMINAL or COM-PORT-TERMINAL), such I-SCRIPT or PLUGIN launcher will be automatically executed after user executed terminal launcher located above I-SCRIPT or PLUGIN launcher. Such automatically executed I-SCRIPT or PLUGIN launcher will be referred to as AUTOLOGIN script because it is intended to automatically type into terminal last part of user login credentials.
Depending on which communication shell is used, AUTOLOGIN functionality can be achieved in different ways.
<PROXYPASSWORD=...> substitution parameters and protect them.Proxy32 will create collection of the pre-configured AUTOLOGIN launchers during the installation, so that user will be able to use them immediately (directly via LauncherTree and via LauncherTree Favorites menu).
Also, user can easily add many pre-configured AUTOLOGIN launchers via Add Pre-Configured Launchers Dialog without going into unnecessary details.
The following sections explain how AUTOLOGIN works for different scenarios and how to create AUTOLOGIN launchers manually. If user will learn following sections, he/she should be able to create AUTOLOGIN launchers for any possible scenario (and not only for pre-configured scenarios).
To manually add launcher to LauncherTree, right click on the LauncherTree and select Add TreeNode from the popup context menu, then select type of the launcher you want to add. Once you have added the launcher, you can move it around in the LauncherTree (with drag-and-drop), edit it (with middle click), delete it (with CtrlRightClick). More options are available in the right-click popup context menu of the LauncherTree.
Fig.1. Adding SHELL-TERMINAL launcher via right click on the LauncherTree.
CYGWIN OpenSSH ssh/sftp client allows to supply user name on its command line in SHELL-TERMINAL launcher, but it does not allow to supply the password. It is necessary to add separate AUTOLOGIN I-SCRIPT or PLUGIN launcher to type password into terminal to complete login procedure.
One can use SHELL-TERMINAL launcher with following command line:
proxycygterm.exe -s '/usr/bin/ssh -o Port=22 -o User=belous 192.168.1.3'or for sftp:
proxycygterm.exe -s '/usr/bin/sftp -o Port=22 -o User=belous 192.168.1.3'One should edit IP address of the server and user name (to replace them by needed values) before inserting this command line into the SHELL-TERMINAL launcher.
Fig.2. Dialog to add new SHELL-TERMINAL launcher with command line to start CYGWIN OpenSSH ssh client as terminal shell.
Fig.3. Dialog to add new SHELL-TERMINAL launcher with command line to start CYGWIN OpenSSH sftp client as terminal shell.
Fig.4. CYGWIN OpenSSH ssh and sftp SHELL-TERMINAL launchers on the LauncherTree, ready to be executed.
On double click such launcher will create terminal window and connect it to the server, but user will have to type in password manually in the terminal in response to Password: prompt. To automatically type password into terminal to complete login procedure it is necessary to add separate AUTOLOGIN I-SCRIPT or PLUGIN launcher.
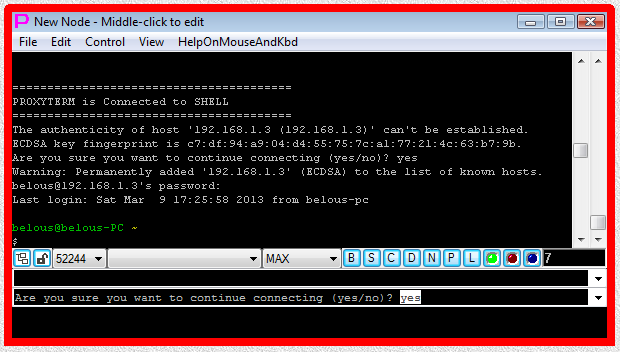
Fig.5. Execution of CYGWIN OpenSSH ssh SHELL-TERMINAL launcher (password has to be typed manually into terminal).
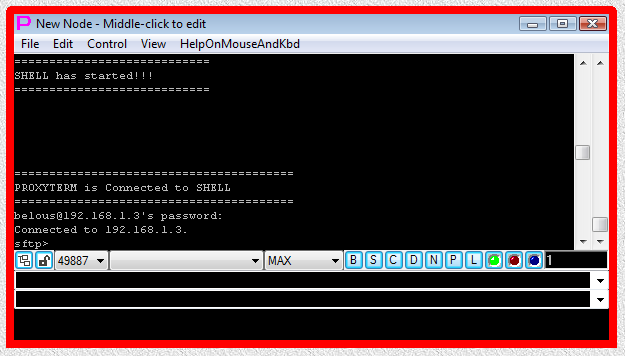
Fig.6. Execution of CYGWIN OpenSSH sftp SHELL-TERMINAL launcher (password has to be typed manually into terminal).
To automatically complete login procedure one can use PLUGIN launcher with following command line:
perl -e ' use Win32;
$a="";while(){sysread STDIN,$_,10000;syswrite STDERR,$_;$a.=$_;last if $a=~/assword:|yes\/no/;}
if($a=~/yes\/no/)
{
my $iRetCode = Win32::MsgBox($a, 4, q{Never connected before to this server!});
if($iRetCode == 6)
{
syswrite STDOUT,\'yes\';syswrite STDOUT,"\r\n";
$a="";while(){sysread STDIN,$_,10000;syswrite STDERR,$_;$a.=$_;last if $a=~/assword:/;}
}
else
{
exit(0);
}
}
syswrite STDOUT,\'<PROXYPASSWORD=SSH server user password>\';syswrite STDOUT,"\r\n";'PLUGIN code contains named password (substitution parameter) <PROXYPASSWORD=SSH server user password> that allows to store and manage individual password and protect it. One can type in password directly into the code of the PLUGIN in place of <PROXYPASSWORD=SSH server user password> , but that would be bad security practice as password would be visible in the code of the PLUGIN. The name of the substitution parameter that stores password in this case is SSH server user password (the string delimited by equal sign and by closing angle bracket). This name can contain any string. The rule of the Thumb is to name storage for different passwords differently, so that later you would know for sure which password will be inserted in place of particular substitution parameter.
This PLUGIN is capable to detect if instead of password prompt ssh/sftp client is asking user to confirm SSH server key (when client is connecting to this server for the first time). This question is detected by looking for yes/no prompt. If PLUGIN detects question about confirming server key, it passes this question to user via Windows MessageBox dialog (as user cannot type into terminal while PLUGIN is running). After passing user answer to the ssh/sftp client, PLUGIN continues with its main mission: detect Password: prompt and supply user password in response to it to finish login procedure.
Please, note that PLUGIN simply sends password and immediately exits without reading the responses of the server to the sent password and relaying them to the screen of the terminal. As PLUGIN takes some time to exit, to the time when PLUGIN exits, some of the server responses may already be saved in the input buffer of the PLUGIN and those responses will be lost (never seen on the screen) on PLUGIN exit. User can figure out what is going on by pressing Enter after PLUGIN has finished and seeing the responses of the server again. This approach helps to make PLUGIN simpler. Alternatively, one can add code to PLUGIN to read all expected server responses after password is sent and relay those responses to the terminal screen. For example, PLUGIN code may be written as follows:
perl -e ' use Win32;
$a="";while(){sysread STDIN,$_,10000;syswrite STDERR,$_;$a.=$_;last if $a=~/assword:|yes\/no/;}
if($a=~/yes\/no/)
{
my $iRetCode = Win32::MsgBox($a, 4, q{Never connected before to this server!});
if($iRetCode == 6)
{
syswrite STDOUT,\'yes\';syswrite STDOUT,"\r\n";
$a="";while(){sysread STDIN,$_,10000;syswrite STDERR,$_;$a.=$_;last if $a=~/assword:/;}
}
else
{
exit(0);
}
}
syswrite STDOUT,\'<PROXYPASSWORD=SSH server user password>\';syswrite STDOUT,"\r\n";
$a="";while(){sysread STDIN,$_,10000;syswrite STDERR,$_;$a.=$_;last if $a=~/\$|sftp>/;}'Last line here reads all server responses up to ssh shell prompt (dollar sign) or up to sftp prompt (sftp>) and prints them to the screen of the terminal. The advantage of this version of the PLUGIN is that all server responses will be shown on the screen. The disadvantage is the need for an extra line of code in PLUGIN and the need to specify exactly what pattern will mark the end of expected server responses. The rule of the thumb is as follows. In order for user to see all server responses on the screen PLUGIN must read and relay to the terminal screen all the server responses that it has triggered before PLUGIN can exit. This is by design as PLUGIN can be used to process server responses and present to the screen only processed (shorter, clarified, with totals etc) version of the server responses instead of always passing raw server responses to the screen.
To use above samples, create SHELL-TERMINAL launcher somewhere on LauncherTree and paste given sample SHELL-TERMINAL command line (edit IP address and user name first to the ones you need) in the command line text field of the SHELL-TERMINAL launcher. Then create PLUGIN launcher directly under previous SHELL-TERMINAL launcher and paste sample PLUGIN command line into command line text field of the PLUGIN launcher.
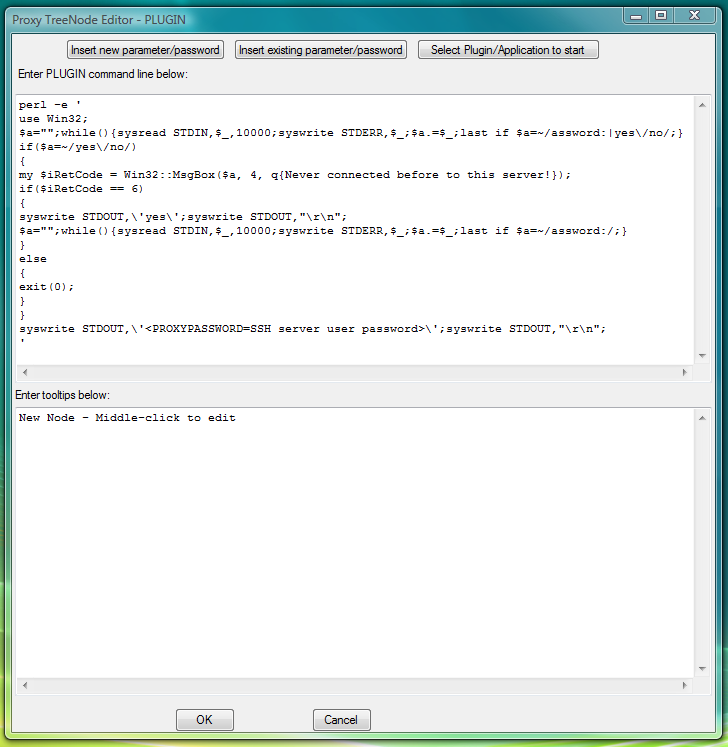
Fig.7. Dialog to add new PLUGIN launcher with command line designed to complete CYGWIN OpenSSH ssh/sftp login by sending password at password prompt into terminal.
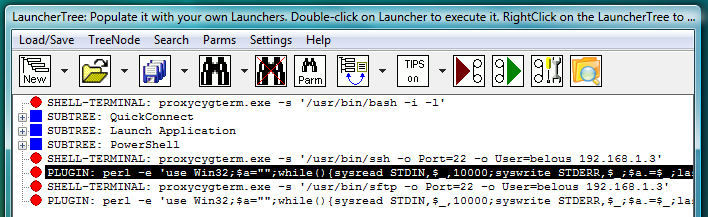
Fig.8. CYGWIN OpenSSH ssh and sftp SHELL-TERMINAL launchers on the LauncherTree (each coupled with its own AUTOLOGIN PLUGIN launcher), ready to be executed.
When one double clicks on SHELL-TERMINAL launcher, it will create terminal window, prompt user for password SSH server user password via parameter input dialog (because <PROXYPASSWORD=SSH server user password> was found in the command line of AUTOLOGIN PLUGIN), connect terminal to communication shell (ssh or sftp) and then automatically start PLUGIN that will catch Password: prompt in terminal and type in the password, that was previously supplied by the user via parameter input dialog. If user selects Do not ask again and Save on Exit checkmarks when supplying the password via parameter input dialog, this parameter input dialog will not appear next time when connecting to the same server.
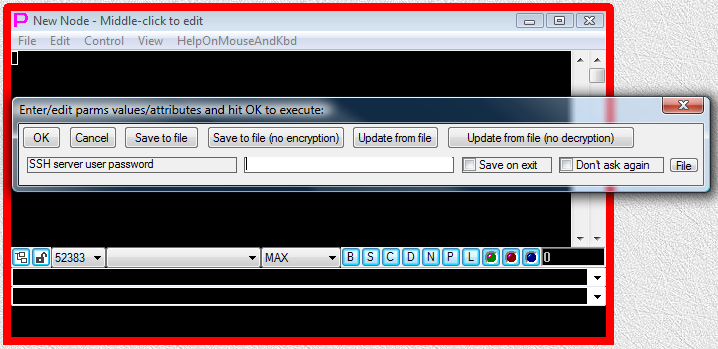
Fig.9. User is receiving parameter input dialog asking to supply the value for password SSH server user password.
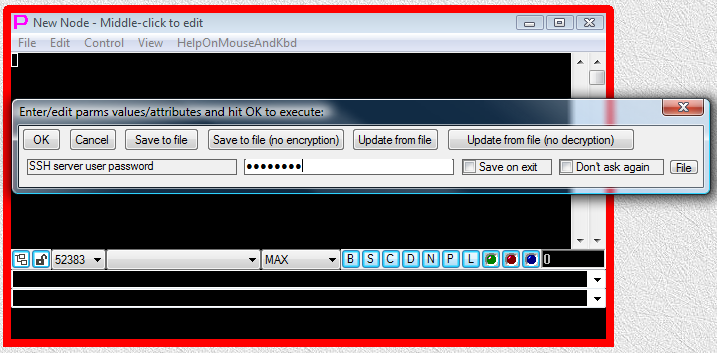
Fig.10. User is supplying the value for password SSH server user password and then pressing OK button in parameter input dialog.
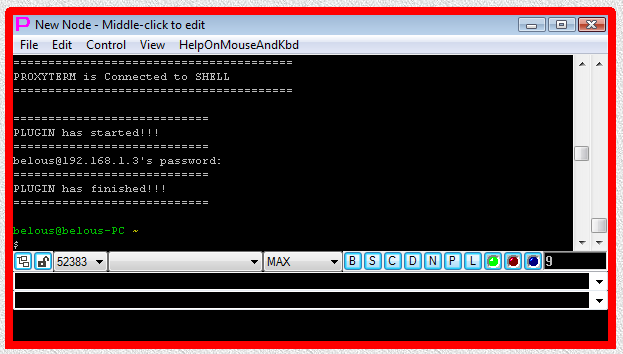
Fig.11. CYGWIN ssh SHELL-TERMINAL launcher and then PLUGIN launcher are executed after user has pressed OK button in the parameter input dialog. Login sequence is completed.

Fig.12. CYGWIN sftp SHELL-TERMINAL launcher and then PLUGIN launcher are executed after user has pressed OK button in the parameter input dialog. Login sequence is completed.
Above example uses inline PERL PLUGIN that has all its code stored inside of the command line. Alternatively, one can create text file named, for example, myplugin.pl (say in directory "test" inside of proxy32 startup directory) and place all code that is single quoted after perl -e part of command line into this file. Then <PROXYPASSWORD=SSH server user password> will be passed to such perl file as first command line argument $ARGV[0]. Resulting PLUGIN command line could look like:
perl .\test\plug\myplugin.pl '<PROXYPASSWORD=SSH server user password>'where file myplugin.pl on the disk would contain following code (original code from single quotes after removing escapes for internal single quotes):
1 2 3 4 5 6 7 8 9 10 11 12 13 14 15 16 | |
PLUGIN will function only if the file .\test\plug\myplugin.pl is present inside of proxy32 startup directory. If the LauncherTree is transferred to another user (exported from one user and then imported to another), then file .\test\plug\myplugin.pl should also be transferred to another user. To transfer myplugin.pl file together with LauncherTree when exporting/importing the LauncherTree, one should link this file to the LauncherTree by creating somewhere on the LauncherTree VIEWER launcher with the following text in the URL field of this launcher:
.\test\plug\myplugin.plLocal files referred in the VIEWER/SCRIPT/I-SCRIPT launchers are considered to be linked to the LauncherTree. Linked file is exported/imported as part of export/import of the LauncherTree (or the part of the LauncherTree) that contains launcher that links the file. Even if the same local file is linked to the same LauncherTree via multiple launchers, it is exported/imported only once per single export/import operation. What is important in our situation, VIEWER launcher linking the file should be located on the LauncherTree close to the PLUGIN launcher that is using the file. This would increase chances that user who is exporting PLUGIN launcher will also export VIEWER launcher to transfer the file needed by PLUGIN launcher.
One only need single VIEWER launcher to link .\test\plug\myplugin.pl file, but this file can be used in multiple PLUGIN launchers across the LauncherTree to complete login procedures to different ssh/sftp servers.
Aside from linking file to the LauncherTree, VIEWER has additional advantage, on double click it opens linked file in the text editor of your choice (as configured in VIEWER configuration for .pl extension).
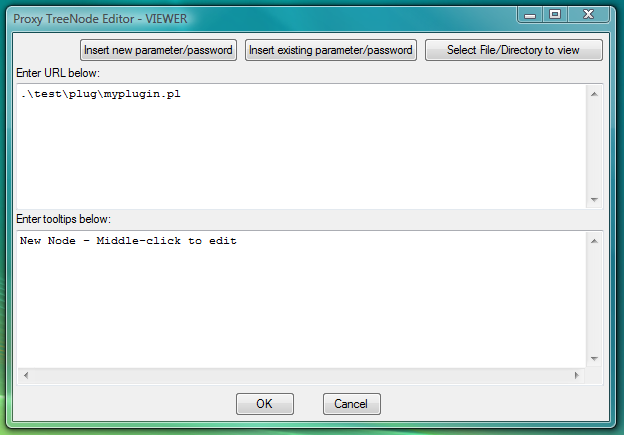
Fig.13. Dialog to add new VIEWER launcher designed to link file .\test\plug\myplugin.pl with PLUGIN code to the LauncherTree for export/import.
![Fig.14. Execution of the VIEWER launcher opens file with PLUGIN code in the Notepad (as configured in VIEWER file associations). Password is passed to PLUGIN as command line parameter ($ARGV[0]), so it is not visible in the file with PLUGIN code.](linked/AUTOLOGIN-section-CYGWIN-ssh-PLUGIN-in-the-file-launcher-view-of-plugin-file-in-the-notepad.png)
Fig.14. Execution of the VIEWER launcher opens file with PLUGIN code in the Notepad (as configured in VIEWER file associations). Password is passed to PLUGIN as command line parameter ($ARGV[0]), so it is not visible in the file with PLUGIN code.
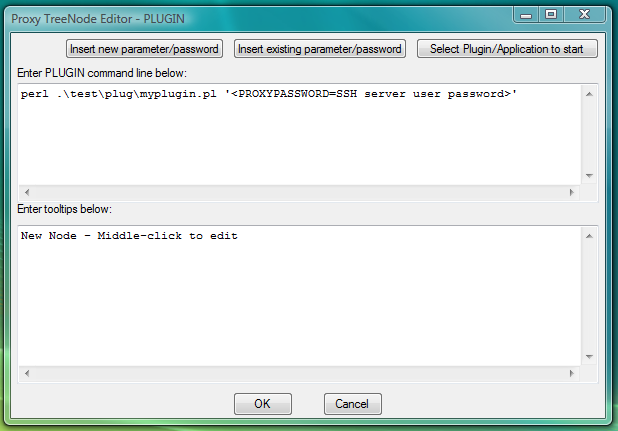
Fig.15. Dialog to add new PLUGIN launcher with command line designed to start perl interpreter and give it path to the file with PLUGIN perl code.
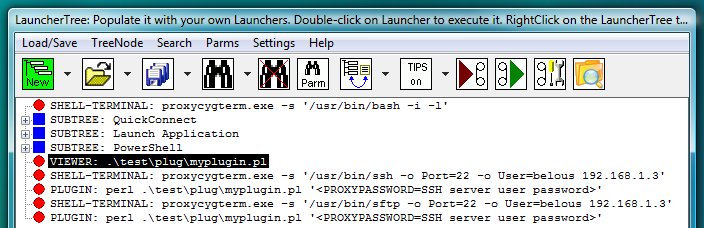
Fig.16. PLUGIN launchers contain reference to file with PLIGIN code instead of in-line code. VIEWER launcher links file with PLUGIN code to the LauncherTree. Password is passed to PLUGIN as command line parameter.
Execution of the PLUGIN with perl code moved to file is no different from PLUGIN that has its perl code located in the string given on the command line. Result of PLUGIN execution is shown in the Figures 9 through 11.
PLUGIN is the PROGRAM (external Window process started by Proxy32) and in the above PERL example it requires PERL interpreter and the PERL code that is to be executed by PERL interpreter. While PLUGIN is the most flexible approach to control the terminal, many automation cases can be covered by simpler means, for example, by using I-SCRIPT.
I-SCRIPT is text file that contains simple instructions to the I-SCRIPT interpreter that is built-in into every Proxy32 terminal. Each line of the I-SCRIPT file tells to the terminal's built-in I-SCRIPT interpreter three things:
Instead of using PLUGIN launcher in AUTOLOGIN mode, one can use I-SCRIPT launcher that is pointing to the text file named, for example, myscript.txt (say in directory test\scripts inside of proxy32 startup directory). I-SCRIPT launcher field called Path to SCRIPT/I-SCRIPT file should contain path to this file
.\test\scripts\myscript.txtand file itself should contain following text:
    <PROXY>assword:<PROXY>60
    <PROXYPASSWORD=SSH server user password><PROXY>.*<PROXY>60
There are only two lines in this text file, both lines should be terminated by CR/NL characters. That means that when editing this file in Notepad, last cursor position in the file should be in the first column of the third line.
I-SCRIPT file contains named password (substitution parameter) <PROXYPASSWORD=SSH server user password> that allows to store and manage individual password and protect it. One can type in password directly into the I-SCRIPT file in place of <PROXYPASSWORD=SSH server user password> , but that would be bad security practice as password would be visible in the I-SCRIPT file. The name of the substitution parameter that stores password in this case is SSH server user password (the string delimited by equal sign and by closing angle bracket). This name can contain any string. The rule of the Thumb is to name storage for different passwords differently, so that later you would know for sure which password will be inserted in place of particular substitution parameter.
First line of this I-SCRIPT file sends nothing to terminal and then starts searching terminal output for the prompt that would match line assword:. In a bad case when matching prompt is not received and there is a pause in terminal output for more than 60 seconds, I-SCRIPT execution is terminated before proceeding to the second line. In the good case when matching prompt is found, execution of the first line of the script is completed and script execution is passed to the second line. Second line of the I-SCRIPT sends substitution value of <PROXYPASSWORD=SSH server user password> to terminal and then waits for any prompt to be returned by terminal in order to finish the I-SCRIPT execution.
To use above samples, create SHELL-TERMINAL launcher somewhere on LauncherTree and paste given sample SHELL-TERMINAL command line (edit IP address and user name first to the ones you need) in the command line text field of the SHELL-TERMINAL launcher. Then create I-SCRIPT launcher as described above and place it directly under previous SHELL-TERMINAL launcher. When one double clicks on SHELL-TERMINAL launcher, it will create terminal window, prompt user for password via parameter input dialog, connect terminal to communication shell (ssh or sftp) and then automatically start I-SCRIPT that will catch Password: prompt in terminal and type in the password, that was previously supplied by the user via parameter input dialog. If user selects Do not ask again and Save on Exit checkmarks when supplying the password via parameter input dialog, this parameter input dialog will not appear next time when connecting to the same server.
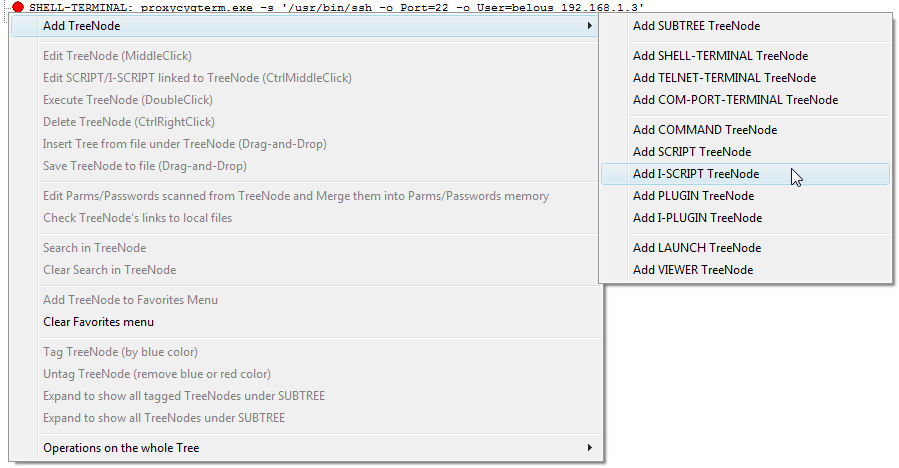
Fig.17. Add I-SCRIPT launcher via right click on the LauncherTree.
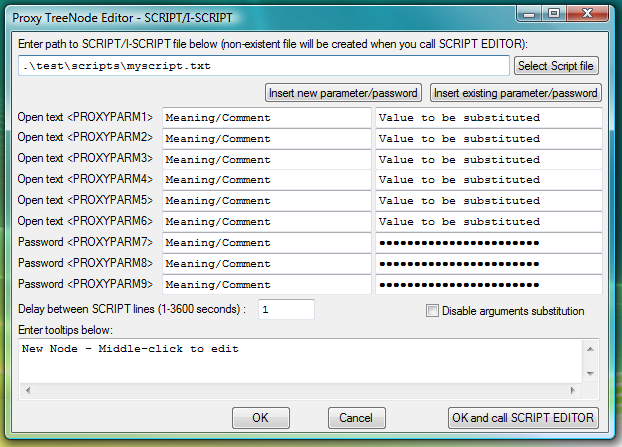
Fig.18. Specify path to script file in I-SCRIPT launcher and click OK and call SCRIPT EDITOR button.
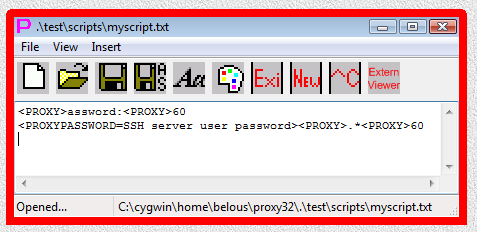
Fig.19. Edit and save content of I-SCRIPT script file in Proxy32 built-in script editor.
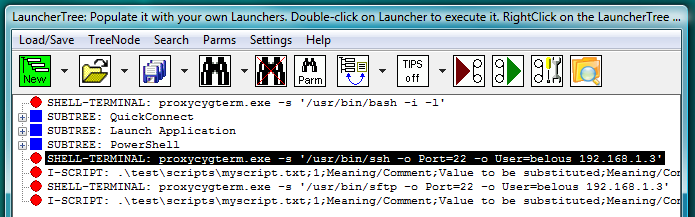
Fig.20. CYGWIN OpenSSH ssh and sftp SHELL-TERMINAL launchers on the LauncherTree (each coupled with its own AUTOLOGIN I-SCRIPT launcher), ready to be executed.
When one double clicks on SHELL-TERMINAL launcher, it will create terminal window, prompt user for password SSH server user password via parameter input dialog (because <PROXYPASSWORD=SSH server user password> was found in the command line part of the second line of AUTOLOGIN I-SCRIPT), connect terminal to communication shell (ssh or sftp) and then automatically start I-SCRIPT that will catch Password: prompt in terminal and type in the password, that was previously supplied by the user via parameter input dialog. If user selects Do not ask again and Save on Exit checkmarks when supplying the password via parameter input dialog, this parameter input dialog will not appear next time when connecting to the same server.
Fig.21. User is receiving parameter input dialog asking to supply the value for password "SSH server user password".
Fig.22. User is supplying the value for password "SSH server user password" and then pressing OK button in parameter input dialog.
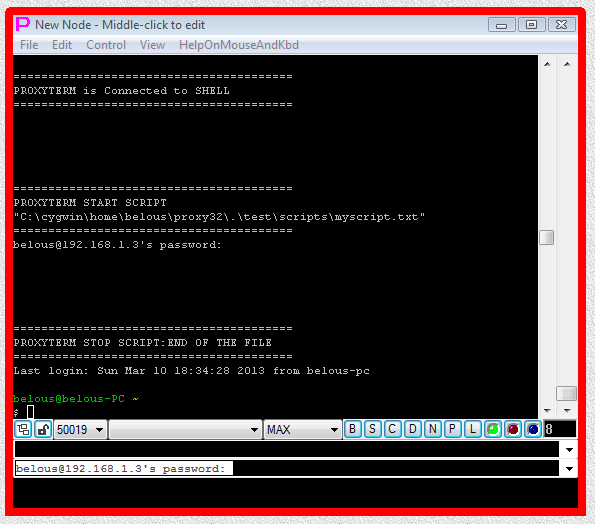
Fig.23. CYGWIN ssh SHELL-TERMINAL launcher and then I-SCRIPT launcher are executed after user has pressed OK button in the parameter input dialog. Login sequence is completed.

Fig.24. CYGWIN sftp SHELL-TERMINAL launcher and then I-SCRIPT launcher are executed after user has pressed OK button in the parameter input dialog. Login sequence is completed.
I-SCRIPT cannot handle deviation from fixed scenario, that is, when client connects to the server for the first time and asking user to confirm validity of the server key before asking user for the password. I-SCRIPT will hung on the question about server key and automatically stop in 60 second. When I-SCRIPT stops, user will be able to type into the terminal. Then user should answer the question about the server key manually, (by typing Y on the keyboard) and then Disconnect and Re-Connect the terminal (by pressing the green button two times) to initiate autologin sequence again. When attempting to login for the second time, there should be no question about server key and I-SCRIPT should be able to finish login sequence successfully.
Universal (fully parametrized) pre-configured versions of CYGWIN OpenSSH ssh/sftp launchers (SHELL-TERMINAL with associated PERL PLUGIN) are available in the LauncherTree created during Proxy32 installation (fig.25).
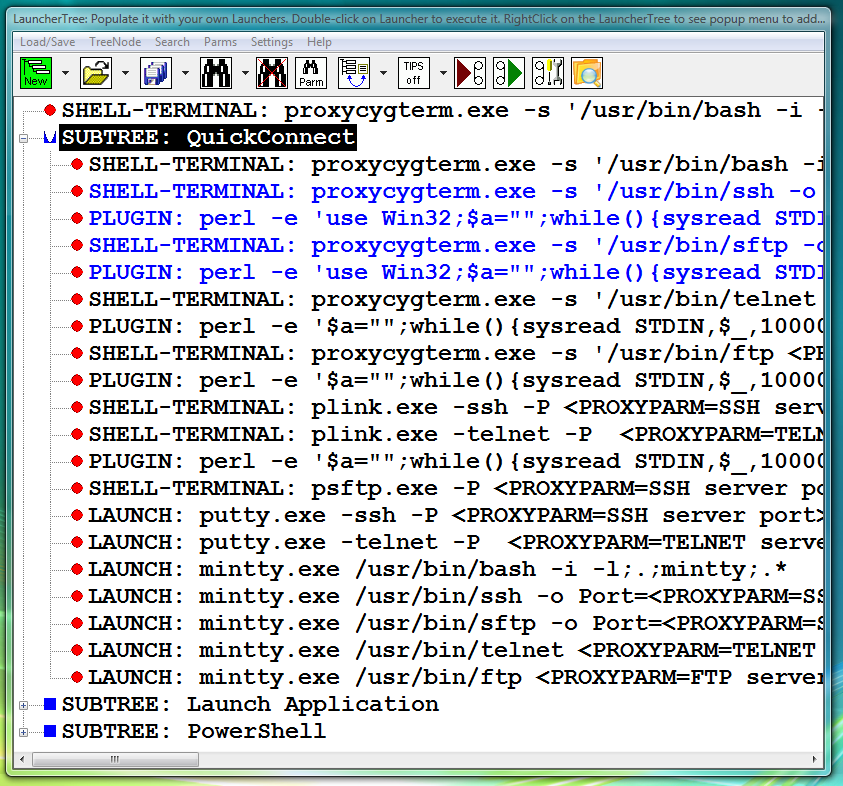
Fig.25. Pre-configured Launchers in the QuickConnect SUBTREE that was created during installation of Proxy32
They also can be executed from the menu of the "LauncherTree Favorites" button (fig.26) that is accessible from the main window and from terminal window.
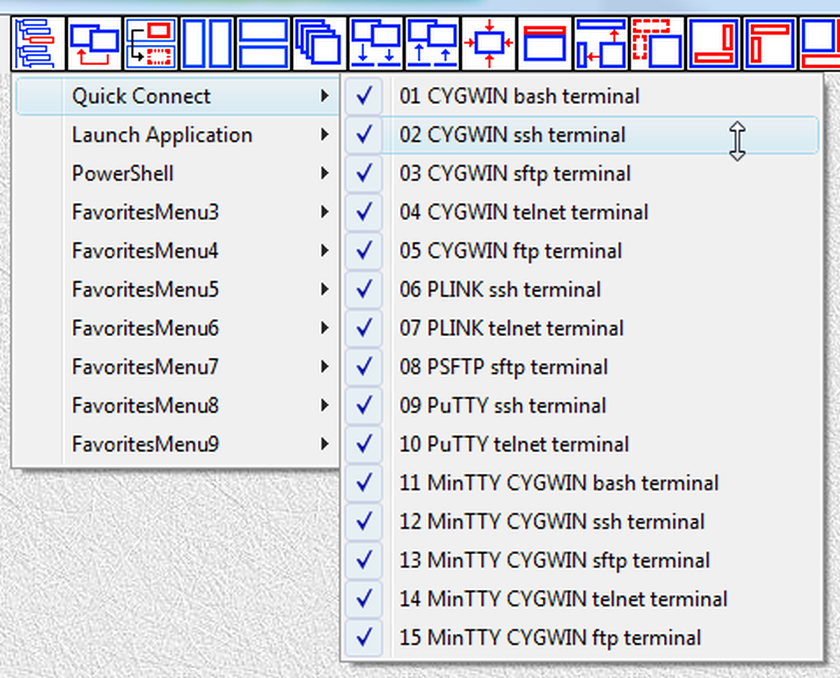
Fig.26a. References to launchers in QuickConnect SUBTREE are placed into submenu QuickConnect of the "LauncherTree Favorites" button in the main window
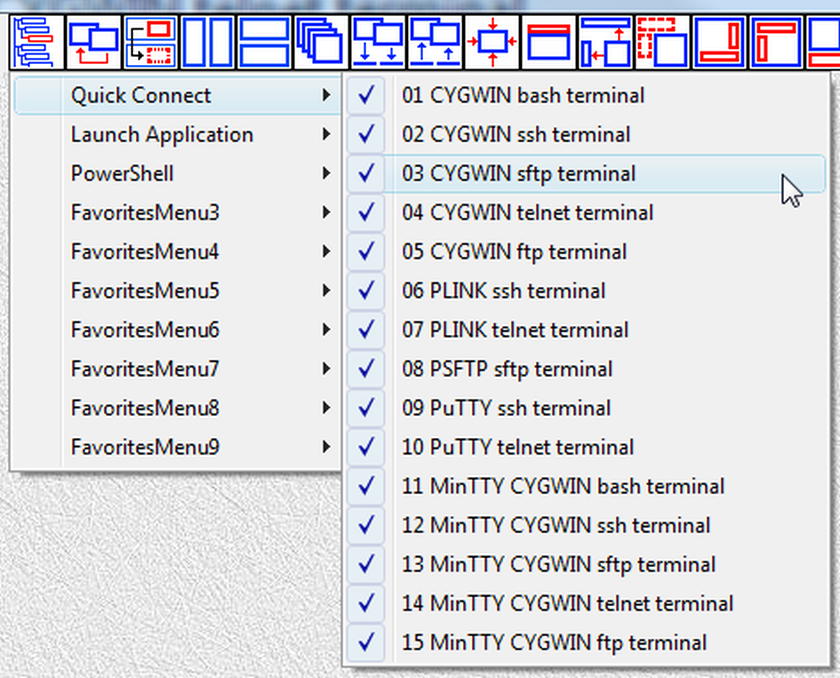
Fig.26b. References to launchers in QuickConnect SUBTREE are placed into submenu QuickConnect of the "LauncherTree Favorites" button in the main window
Customized pre-configured versions can be added by user as needed via Add Pre-Configured Launchers Dialog.
This dialog is invoked by pressing New button which is the first button on the toolbar of the LauncherTree Window (fig. 27).
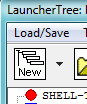
Fig.27. Button New on the toolbar of the LauncherTree window is invoking Add Pre-Configured Launchers Dialog
To add pre-configured launcher to LauncherTree:
Add button to add pre-configured launcher to the LauncherTree. Then you can modify some values on the page (for example, host IP address) and press Add again to add slightly different launcher. If you need to add another type of launcher, switch to another dialog page using the page selection tree on the left side of the dialog, fill needed values and press Add again.x button in the top right corner to close the dialog.After pre-configured launchers are added to the LauncherTree, they are ready to be used (executed) by double-clicking on them.
After pre-configured launchers are added to the LauncherTree, they can be further edited via TreeNode Edit Dialog (Middle Click on the Launcher to edit it) to add more customization. For example, SHELL-TERMINAL launcher that is using CYGWIN ssh can be further edited to add TCP forwarding options on the command line of SSH program.
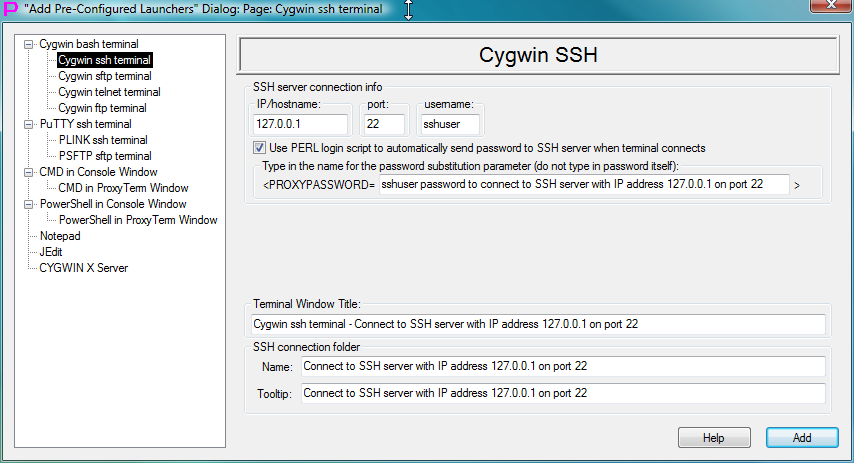
Fig.28. Template to create launcher for CYGWIN ssh terminal in the Add Pre-Configured Launchers Dialog
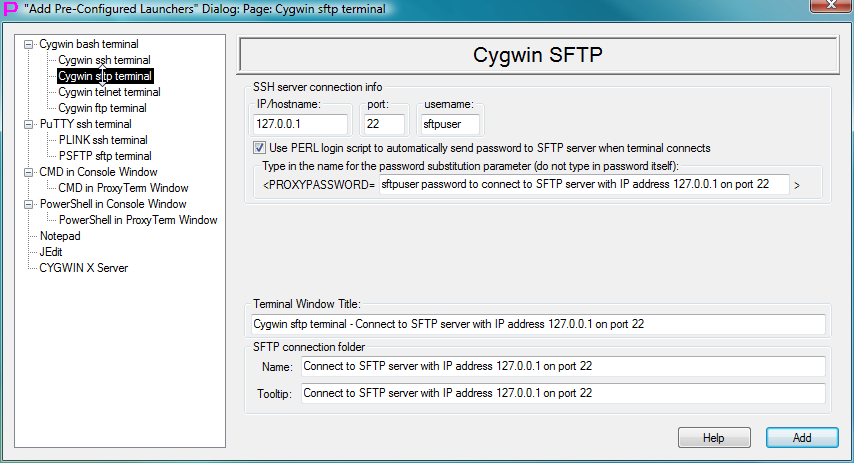
Fig.29. Template to create launcher for CYGWIN sftp terminal in the Add Pre-Configured Launchers Dialog
OpenSSH ssh client allows to add port forwarding during connection phase BEFORE login using command line switches or configuration file:
     ssh [-1246AaCfgKkMNnqsTtVvXxYy] [-b bind_address] [-c cipher_spec] [-D [bind_address:]port]
         [-e escape_char] [-F configfile] [-I pkcs11] [-i identity_file]
         [-L [bind_address:]port:host:hostport] [-l login_name] [-m mac_spec] [-O ctl_cmd] [-o option]
         [-p port] [-R [bind_address:]port:host:hostport] [-S ctl_path] [-W host:port]
         [-w local_tun[:remote_tun]] [user@]hostname [command]
where we are interested in:
    [-D [bind_address:]port]
    [-L [bind_address:]port:host:hostport]
    [-R [bind_address:]port:host:hostport]
or via -o option:
    DynamicForward
                 Specifies that a TCP port on the local machine be forwarded over the secure channel, and the
                 application protocol is then used to determine where to connect to from the remote machine.
                 The argument must be [bind_address:]port.

    LocalForward
                 Specifies that a TCP port on the local machine be forwarded over the secure channel to the spec‐
                 ified host and port from the remote machine.  The first argument must be [bind_address:]port and
                 the second argument must be host:hostport.

    RemoteForward
                 Specifies that a TCP port on the remote machine be forwarded over the secure channel to the
                 specified host and port from the local machine.  The first argument must be [bind_address:]port
                 and the second argument must be host:hostport.
To add SSH port forwarding during connection phase BEFORE login one can use SHELL-TERMINAL launcher command line. Examples:
proxycygterm.exe -s '/usr/bin/ssh -D1080 -o Port=22 -o User=belous 192.168.1.3'1080 via remote host 192.168.1.3 to any ip:port that is reachable from 192.168.1.3. Destination ip:port is specified as part of forwarding request by SOCKS4/SOCKS5 client that will be connecting to port 1080. proxycygterm.exe -s '/usr/bin/ssh -L1024:198.168.1.4:23 -o Port=22 -o User=belous 192.168.1.3'1024 via remote host 192.168.1.3 to 198.168.1.4:23. proxycygterm.exe -s '/usr/bin/ssh -R1024:198.168.1.4:23 -o Port=22 -o User=belous 192.168.1.3'1024 (on 192.168.1.3) via our local host to 198.168.1.4:23.Some SSH servers are configured to deny port forwarding requests before login is complete. To add SSH port forwarding during existing connection AFTER login is complete one can break into mini-shell that is built into OpenSSH ssh client. Mini-shell is invoked by pressing ~C (capital C) after login is completed. Escape combination ~C is only recognized by ssh client if it is typed after the new line (return key) was pressed. When one breaks into this mini-shell by pressing ~C, mini-shell only takes one command and immediately exits, so that following typing in terminal again goes to remote host. One can use -h command in mini-shell to see list of all available commands:
    belous@belous-PC ~
    $ ssh -o Port=22 -o User=belous 192.168.1.3
    belous@192.168.1.3's password:
    Last login: Tue Mar 12 18:18:13 2013 from belous-pc

    belous@belous-PC ~
    $
    ssh> -h
    Commands:
          -L[bind_address:]port:host:hostport    Request local forward
          -R[bind_address:]port:host:hostport    Request remote forward
          -D[bind_address:]port                  Request dynamic forward
          -KL[bind_address:]port                 Cancel local forward
          -KR[bind_address:]port                 Cancel remote forward
          -KD[bind_address:]port                 Cancel dynamic forward


    belous@belous-PC ~
    $
    ssh> -R1024:198.168.1.4:23
    Forwarding port.
Please, note, that to issue each command (-h to print help and -R1024:198.168.1.4:23 to add port forwarding) user has to break into mini-shell again as it exits automatically after execution of single command.
Adding port forwarding via mini-shell can be done by AUTOLOGIN PLUGIN or I-SCRIPT after password is sent to the ssh server.
In order to do so, some extra lines should be added to both .\test\plug\myplugin.pl and .\test\scripts\myscript.txt files without changing launchers that are referring to those files.
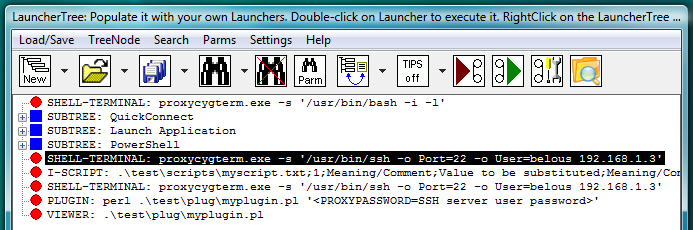
Fig.30. PLUGIN and I-SCRIPT launchers on the LauncherTree are not modified. Modifications are made only to the files to which launchers are referring.
Below is modified file .\test\plug\myplugin.pl:
1 2 3 4 5 6 7 8 9 10 11 12 13 14 15 16 17 18 19 20 | |
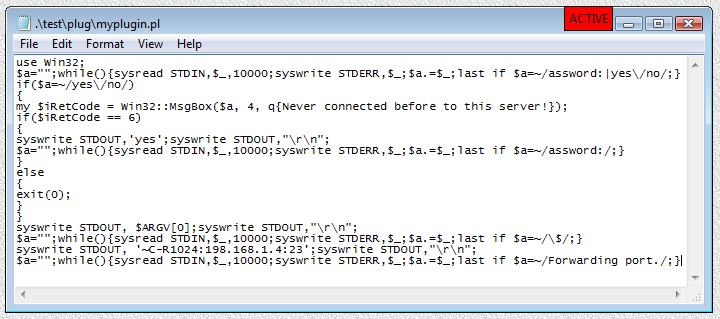
Fig.31. Modified PLUGIN file in the Notepad
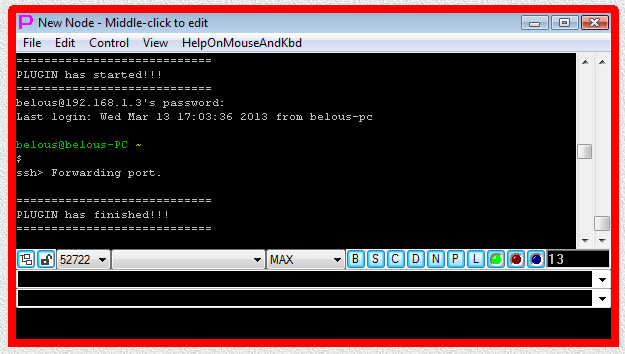
Fig.32. SHELL-TERMINAL launcher and then PLUGIN launcher are executed after user has pressed OK button in the parameter input dialog. Login sequence and port forwarding are completed.
Below is modified file .\test\scripts\myscript.txt:
    <PROXY>assword:<PROXY>60
    <PROXYPASSWORD=SSH server user password><PROXY>\$<PROXY>60
    ~C-R1024:198.168.1.4:23<PROXY>Forwarding port.<PROXY>60
Fig.33. Modified I-SCRIPT file in the Proxy32 script editor
Fig.34. SHELL-TERMINAL launcher and then I-SCRIPT launcher are executed after user has pressed OK button in the parameter input dialog. Login sequence and port forwarding are completed.
One can use SHELL-TERMINAL launcher for CYGWIN telnet with following command line:
proxycygterm.exe -s '/usr/bin/telnet 192.168.1.3 23'or for CYGWIN ftp:
proxycygterm.exe -s '/usr/bin/ftp 192.168.1.3 21'One should edit IP address and port of the server (to replace them by needed values) before inserting this command line into the SHELL-TERMINAL launcher.
Fig.35. Adding SHELL-TERMINAL launcher via right click on the LauncherTree.
Fig.36. Dialog to add new SHELL-TERMINAL launcher with command line to start CYGWIN telnet client as terminal shell.
Fig.37. Dialog to add new SHELL-TERMINAL launcher with command line to start CYGWIN ftp client as terminal shell.

Fig.38. CYGWIN telnet and ftp SHELL-TERMINAL launchers on the LauncherTree, ready to be executed.
On double click such launcher will create terminal window and connect it to the server, but user will have to type in user name and password manually in the terminal in response to login: and Password: prompt. To automatically type user name and password into terminal to complete login procedure it is necessary to add separate AUTOLOGIN I-SCRIPT or PLUGIN launcher.
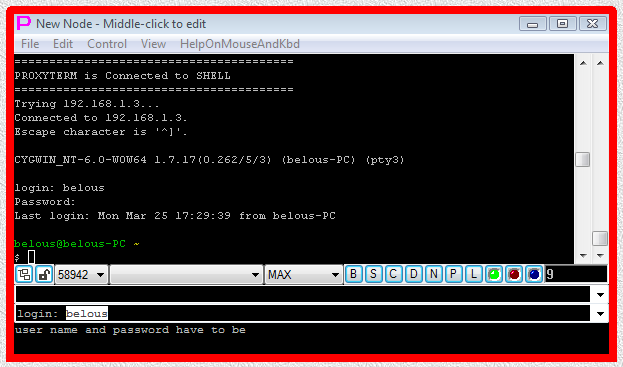
Fig.39. Execution of CYGWIN telnet SHELL-TERMINAL launcher (user name and password have to be typed manually into terminal).
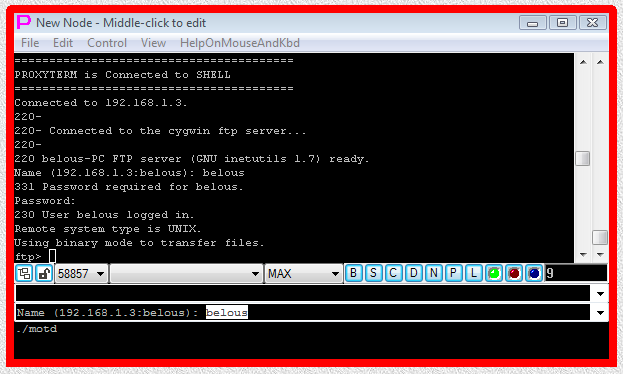
Fig.40. Execution of CYGWIN ftp SHELL-TERMINAL launcher (user name and password have to be typed manually into terminal).
To automatically complete login procedure one can use PLUGIN launcher with following command line:
perl -e ' $a="";while(){sysread STDIN,$_,10000;syswrite STDERR,$_;$a.=$_;last if $a=~/ogin:|Name/;}
syswrite STDOUT,\'<PROXYPASSWORD=TELNET/FTP server user name>\';syswrite STDOUT,"\r\n";
$a="";while(){sysread STDIN,$_,10000;syswrite STDERR,$_;$a.=$_;last if $a=~/assword:/;}
syswrite STDOUT,\'<PROXYPASSWORD=TELNET/FTP server user password>\';syswrite STDOUT,"\r\n";'PLUGIN code contains named password (substitution parameter) <PROXYPASSWORD=TELNET/FTP server user password> that allows to store and manage individual password and protect it. One can type in password directly into the code of the PLUGIN in place of <PROXYPASSWORD=TELNET/FTP server user password>, but that would be bad security practice as password would be visible in the code of the PLUGIN. The name of the substitution parameter that stores password in this case is TELNET/FTP server user password (the string delimited by equal sign and by closing angle bracket). This name can contain any string. The rule of the Thumb is to name storage for different passwords differently, so that later you would know for sure which password will be inserted in place of particular substitution parameter.
PLUGIN waits for prompt ogin: or prompt Name and when it is found PLUGIN sends value of the substitution parameter <PROXYPASSWORD=TELNET/FTP server user name> in response to this prompt. Then PLUGIN waits for prompt assword: and when it is found PLUGIN sends value of the substitution parameter <PROXYPASSWORD=TELNET/FTP server user password> in response to this prompt.
Please, note that PLUGIN simply sends password and immediately exits without reading the responses of the server to the sent password and relaying them to the screen of the terminal. As PLUGIN takes some time to exit, to the time when PLUGIN exits, some of the server responses may already be saved in the input buffer of the PLUGIN and those responses will be lost (never seen on the screen) on PLUGIN exit. User can figure out what is going on by pressing Enter after PLUGIN has finished and seeing the responses of the server again. This approach helps to make PLUGIN simpler. Alternatively, one can add code to PLUGIN to read all expected server responses after password is sent and relay those responses to the terminal screen. For example, PLUGIN code may be written as follows:
perl -e ' $a="";while(){sysread STDIN,$_,10000;syswrite STDERR,$_;$a.=$_;last if $a=~/ogin:|Name/;}
syswrite STDOUT,\'<PROXYPASSWORD=TELNET/FTP server user name>\';syswrite STDOUT,"\r\n";
$a="";while(){sysread STDIN,$_,10000;syswrite STDERR,$_;$a.=$_;last if $a=~/assword:/;}
syswrite STDOUT,\'<PROXYPASSWORD=TELNET/FTP server user password>\';syswrite STDOUT,"\r\n";
$a="";while(){sysread STDIN,$_,10000;syswrite STDERR,$_;$a.=$_;last if $a=~/\$|ftp>/;}'Last line here reads all server responses up to telnet shell prompt (dollar sign) or up to ftp prompt (ftp>) and prints them to the screen of the terminal. The advantage of this version of the PLUGIN is that all server responses will be shown on the screen. The disadvantage is the need for an extra line of code in PLUGIN and the need to specify exactly what pattern will mark the end of expected server responses. The rule of the thumb is as follows. In order for user to see all server responses on the screen PLUGIN must read and relay to the terminal screen all the server responses that it has triggered before PLUGIN can exit. This is by design as PLUGIN can be used to process server responses and present to the screen only processed (shorter, clarified, with totals etc) version of the server responses instead of always passing raw server responses to the screen.
To use above samples, create SHELL-TERMINAL launcher somewhere on LauncherTree and paste given sample SHELL-TERMINAL command line (edit IP address and port first to the ones you need) in the command line text field of the SHELL-TERMINAL launcher. Then create PLUGIN launcher directly under previous SHELL-TERMINAL launcher and paste sample PLUGIN command line into command line text field of the PLUGIN launcher.
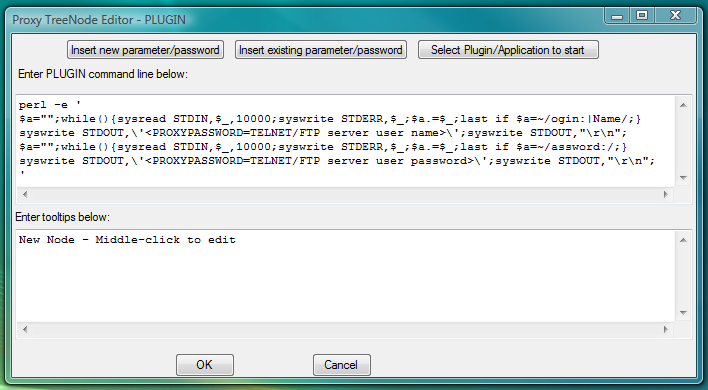
Fig.41. Dialog to add new PLUGIN launcher with command line designed to complete CYGWIN telnet login by sending user name and password into terminal in response to the server prompts.
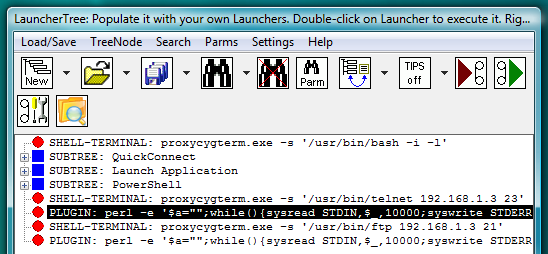
Fig.42. CYGWIN telnet and ftp SHELL-TERMINAL launchers on the LauncherTree (each coupled with its own AUTOLOGIN PLUGIN launcher), ready to be executed.
When one double clicks on SHELL-TERMINAL launcher, it will create terminal window, prompt user to supply values for TELNET/FTP server user name and TELNET/FTP server user password via parameter input dialog (because <PROXYPASSWORD=TELNET/FTP server user name> and <PROXYPASSWORD=TELNET/FTP server user password> were found in the command line of AUTOLOGIN PLUGIN), connect terminal to communication shell (telnet or ftp) and then automatically start PLUGIN that will catch prompts in terminal and type in user name and password, that were previously supplied by the user via parameter input dialog. If user selects Do not ask again and Save on Exit checkmarks when supplying values via parameter input dialog, this parameter input dialog will not appear next time when connecting to the same server.
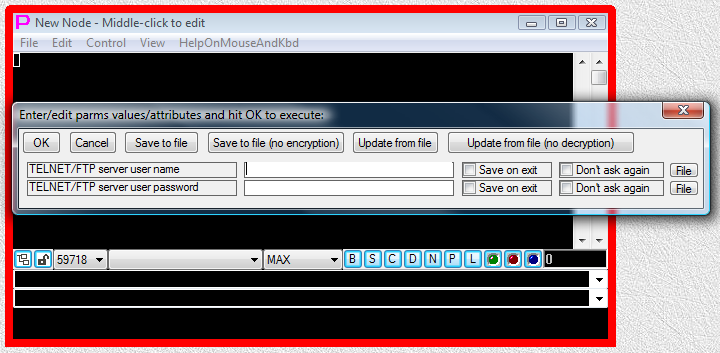
Fig.43. User is receiving parameter input dialog asking to supply values for TELNET/FTP server user name and TELNET/FTP server user password.
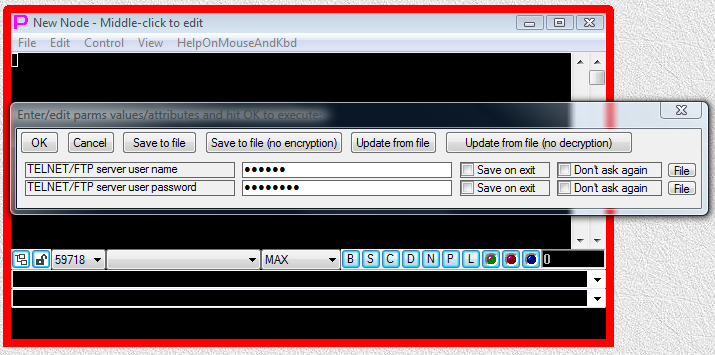
Fig.44. User is supplying the values for TELNET/FTP server user name and TELNET/FTP server user password and then pressing OK button in parameter input dialog.
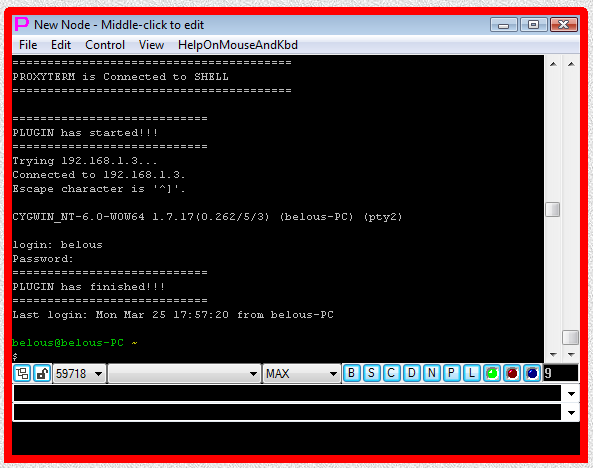
Fig.45. CYGWIN telnet SHELL-TERMINAL launcher and then PLUGIN launcher are executed after user has pressed OK button in the parameter input dialog. Login sequence is completed.
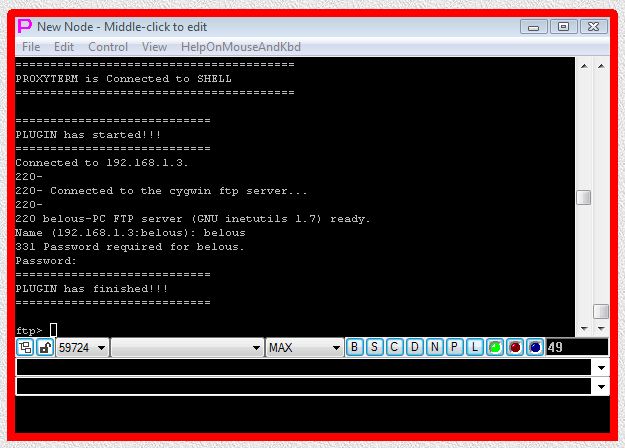
Fig.46. CYGWIN ftp SHELL-TERMINAL launcher and then PLUGIN launcher are executed after user has pressed OK button in the parameter input dialog. Login sequence is completed.
Above example uses inline PERL PLUGIN that has all its code stored inside of the command line. Alternatively, one can create text file named, for example, myplugin1.pl (say in directory test\plug inside of proxy32 startup directory) and place all code that is single quoted after perl -e part of command line into this file. Then <PROXYPASSWORD=TELNET/FTP server user name> and <PROXYPASSWORD=TELNET/FTP server user password> will be passed to such perl file as command line arguments $ARGV[0] and $ARGV[1] respectively. Resulting PLUGIN command line could look like:
perl .\test\plug\myplugin1.pl '<PROXYPASSWORD=TELNET/FTP server user name>' '<PROXYPASSWORD=TELNET/FTP server user password>'where file myplugin1.pl on the disk would contain following code (original code from single quotes after replacing substitution parameters <PROXYPASSWORD=TELNET/FTP server user name> and <PROXYPASSWORD=TELNET/FTP server user password> by $ARGV[0] and $ARGV[1] respectively):
1 2 3 4 | |
PLUGIN will function only if the file .\test\plug\myplugin1.pl is present inside of proxy32 startup directory. If the LauncherTree is transferred to another user (exported from one user and then imported to another), then file .\test\plug\myplugin1.pl should also be transferred to another user. To transfer myplugin.pl file together with LauncherTree when exporting/importing the LauncherTree, one should link this file to the LauncherTree by creating somewhere on the LauncherTree VIEWER launcher with the following text in the URL field of this launcher:
.\test\plug\myplugin1.plLocal files referred in the VIEWER/SCRIPT/I-SCRIPT launchers are considered to be linked to the LauncherTree. Linked file is exported/imported as part of export/import of the LauncherTree (or the part of the LauncherTree) that contains launcher that links the file. Even if the same local file is linked to the same LauncherTree via multiple launchers, it is exported/imported only once per single export/import operation. What is important in our situation, VIEWER launcher linking the file should be located on the LauncherTree close to the PLUGIN launcher that is using the file. This would increase chances that user who is exporting PLUGIN launcher will also export VIEWER launcher to transfer the file needed by PLUGIN launcher.
One only need single VIEWER launcher to link .\test\plug\myplugin1.pl file, but this file can be used in multiple PLUGIN launchers across the LauncherTree to complete login procedures to different telnet/ftp servers.
Aside from linking file to the LauncherTree, VIEWER has additional advantage, on double click it opens linked file in the text editor of your choice (as configured in VIEWER configuration for .pl extension).
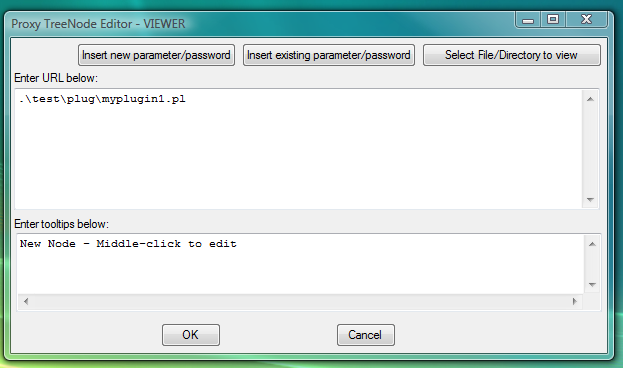
Fig.47. Dialog to add new VIEWER launcher designed to link file .\test\plug\myplugin1.pl with PLUGIN code to the LauncherTree for export/import.
![Fig.48. Execution of the VIEWER launcher opens file with PLUGIN code in the Notepad (as configured in VIEWER file associations). User name and password are passed to PLUGIN as command line parameters (ARGV[0] and `ARGV[1]`), so they are not visible in the file with PLUGIN code.](linked/AUTOLOGIN-section-CYGWIN-telnet-ftp-PLUGIN-in-the-file-launcher-view-of-plugin-file-in-the-notepad.png)
Fig.48. Execution of the VIEWER launcher opens file with PLUGIN code in the Notepad (as configured in VIEWER file associations). User name and password are passed to PLUGIN as command line parameters ($ARGV[0] and `$ARGV[1]`), so they are not visible in the file with PLUGIN code.
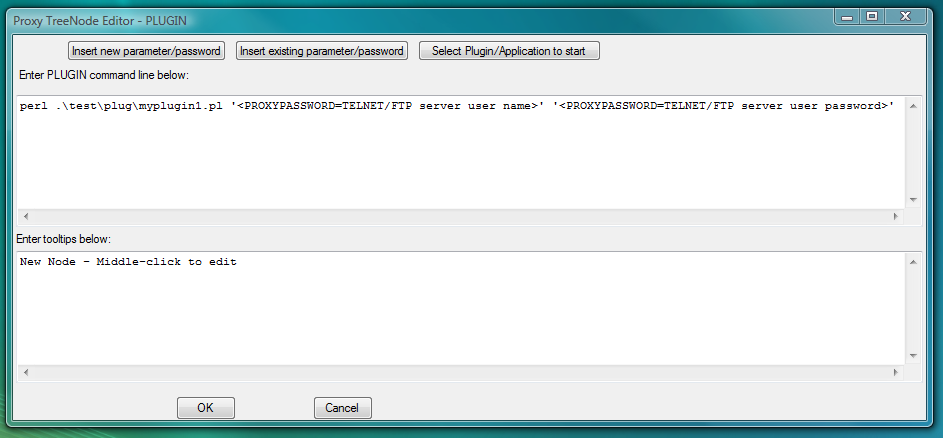
Fig.49. Dialog to add new PLUGIN launcher with command line designed to start perl interpreter and give it path to the file with PLUGIN perl code.
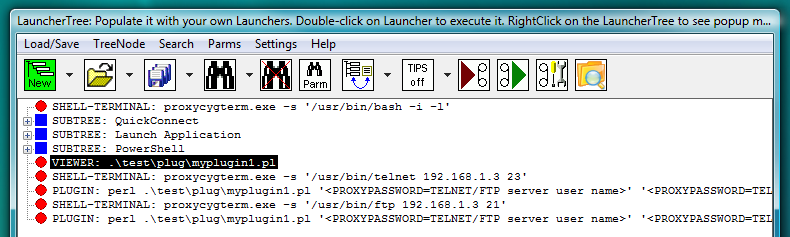
Fig.50. PLUGIN launchers contain reference to file with PLIGIN code instead of in-line code. VIEWER launcher links file with PLUGIN code to the LauncherTree. User name and password are passed to PLUGIN as command line parameters.
Execution of the PLUGIN with perl code moved to file is no different from PLUGIN that has its perl code located in the string given on the command line. Result of PLUGIN execution is shown in the Figures 43 through 45.
PLUGIN is the PROGRAM (external Window process started by Proxy32) and in the above PERL example it requires PERL interpreter and the PERL code that is to be executed by PERL interpreter. While PLUGIN is the most flexible approach to control the terminal, many automation cases can be covered by simpler means, for example, by using I-SCRIPT.
I-SCRIPT is text file that contains simple instructions to the I-SCRIPT interpreter that is built-in into every Proxy32 terminal. Each line of the I-SCRIPT file tells to the terminal's built-in I-SCRIPT interpreter three things:
Instead of using PLUGIN launcher in AUTOLOGIN mode, one can use I-SCRIPT launcher that is pointing to the text file named, for example, myscript1.txt (say in directory test\scripts inside of proxy32 startup directory). I-SCRIPT launcher field called Path to SCRIPT/I-SCRIPT file should contain path to this file
.\test\scripts\myscript1.txtand file itself should contain following text:
    <PROXY>ogin:|Name<PROXY>60
    <PROXYPASSWORD=TELNET/FTP server user name><PROXY>assword:<PROXY>60
    <PROXYPASSWORD=TELNET/FTP server user password><PROXY>.*<PROXY>60
There are only three lines in this text file, all lines should be terminated by CR/NL characters. That means that when editing this file in Notepad, last cursor position in the file should be in the first column of the fourth line.
I-SCRIPT file contains named password (substitution parameter) <PROXYPASSWORD=TELNET/FTP server user password> that allows to store and manage individual password and protect it. One can type in password directly into the I-SCRIPT file in place of <PROXYPASSWORD=TELNET/FTP server user password> , but that would be bad security practice as password would be visible in the I-SCRIPT file. The name of the substitution parameter that stores password in this case is TELNET/FTP server user password (the string delimited by equal sign and by closing angle bracket). This name can contain any string. The rule of the Thumb is to name storage for different passwords differently, so that later you would know for sure which password will be inserted in place of particular substitution parameter.
First line of this I-SCRIPT file sends nothing to terminal and then starts searching terminal output for the prompt that would match line ogin: or Name. In a bad case when matching prompt is not received and there is a pause in terminal output for more than 60 seconds, I-SCRIPT execution is terminated before proceeding to the second line. In the good case when matching prompt is found, execution of the first line of the script is completed and script execution is passed to the second line. Second line of the I-SCRIPT sends substitution value of <PROXYPASSWORD=TELNET/FTP server user name> to terminal and then waits for the matching prompt (assword:) to be returned by terminal. In a bad case second line of the script is completed and script execution is passed to the third line. Third line of the I-SCRIPT sends substitution value of <PROXYPASSWORD=TELNET/FTP server user password> to terminal and then waits for any prompt to be returned by terminal in order to finish the I-SCRIPT execution.
To use above samples, create SHELL-TERMINAL launcher somewhere on LauncherTree and paste given sample SHELL-TERMINAL command line (edit IP address and port first to the ones you need) in the command line text field of the SHELL-TERMINAL launcher. Then create I-SCRIPT launcher as described above and place it directly under previous SHELL-TERMINAL launcher. When one double clicks on SHELL-TERMINAL launcher, it will create terminal window, prompt user for password via parameter input dialog, connect terminal to communication shell (telnet or ftp) and then automatically start I-SCRIPT that will catch prompts in terminal and type in user name and password, that was previously supplied by the user via parameter input dialog. If user selects "Do not ask again" and Save on Exit checkmarks when supplying the password via parameter input dialog, this parameter input dialog will not appear next time when connecting to the same server.

Fig.51. Add I-SCRIPT launcher via right click on the LauncherTree.
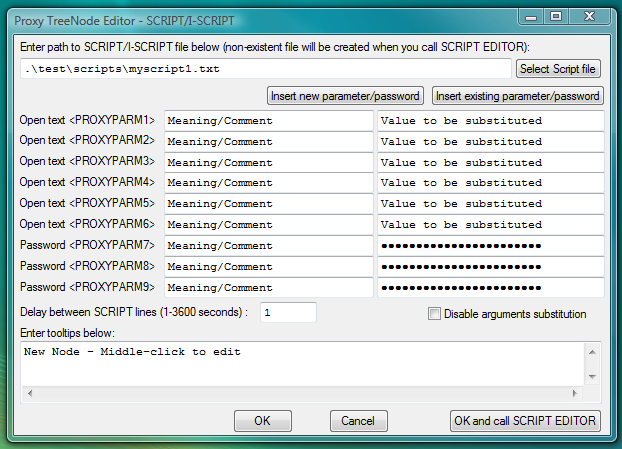
Fig.52. Specify path to script file in I-SCRIPT launcher and click OK and call SCRIPT EDITOR button.
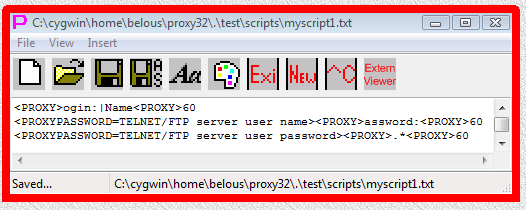
Fig.53. Edit and save content of I-SCRIPT script file in Proxy32 built-in script editor.
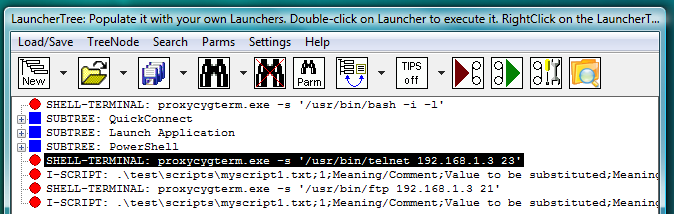
Fig.54. CYGWIN OpenSSH ssh and sftp SHELL-TERMINAL launchers on the LauncherTree (each coupled with its own AUTOLOGIN I-SCRIPT launcher), ready to be executed.
When one double clicks on SHELL-TERMINAL launcher, it will create terminal window, prompt user for password SSH server user password via parameter input dialog (because <PROXYPASSWORD=SSH server user password> was found in the command line part of the second line of AUTOLOGIN I-SCRIPT), connect terminal to communication shell (ssh or sftp) and then automatically start I-SCRIPT that will catch Password: prompt in terminal and type in the password, that was previously supplied by the user via parameter input dialog. If user selects Do not ask again and Save on Exit checkmarks when supplying the password via parameter input dialog, this parameter input dialog will not appear next time when connecting to the same server.
Fig.55. User is receiving parameter input dialog asking to supply values for TELNET/FTP server user name and TELNET/FTP server user password.
Fig.56. User is supplying the values for TELNET/FTP server user name and TELNET/FTP server user password and then pressing OK button in parameter input dialog.
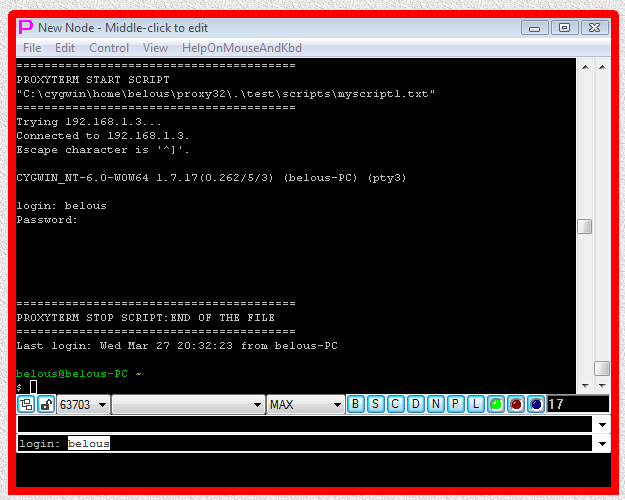
Fig.57. CYGWIN telnet SHELL-TERMINAL launcher and then I-SCRIPT launcher are executed after user has pressed OK button in the parameter input dialog. Login sequence is completed.
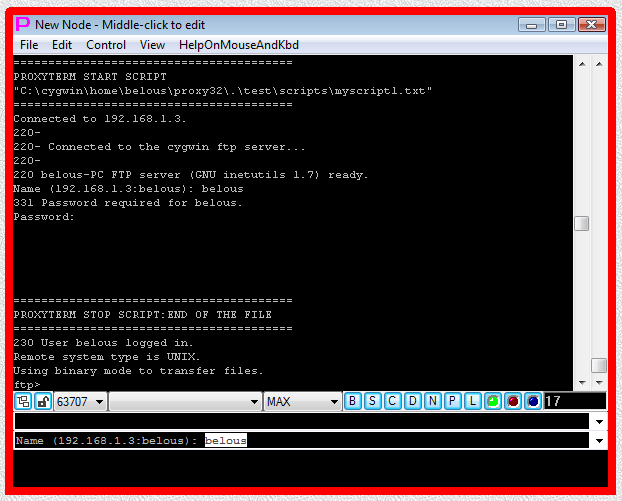
Fig.58. CYGWIN ftp SHELL-TERMINAL launcher and then I-SCRIPT launcher are executed after user has pressed OK button in the parameter input dialog. Login sequence is completed.
Universal (fully parametrized) pre-configured versions of CYGWIN telnet/ftp launchers (SHELL-TERMINAL with associated PERL PLUGIN) are available in the LauncherTree created during Proxy32 installation (fig.59).
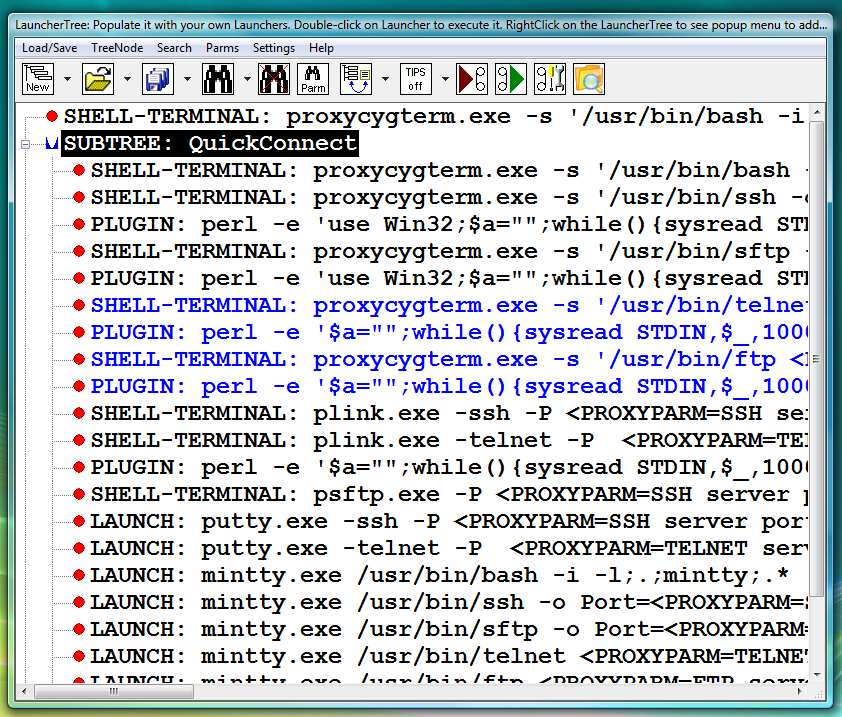
Fig.59. Pre-configured Launchers in the QuickConnect SUBTREE that was created during installation of Proxy32
They also can be executed from the menu of the "LauncherTree Favorites" button (fig.60) that is accessible from the main window and from terminal window.
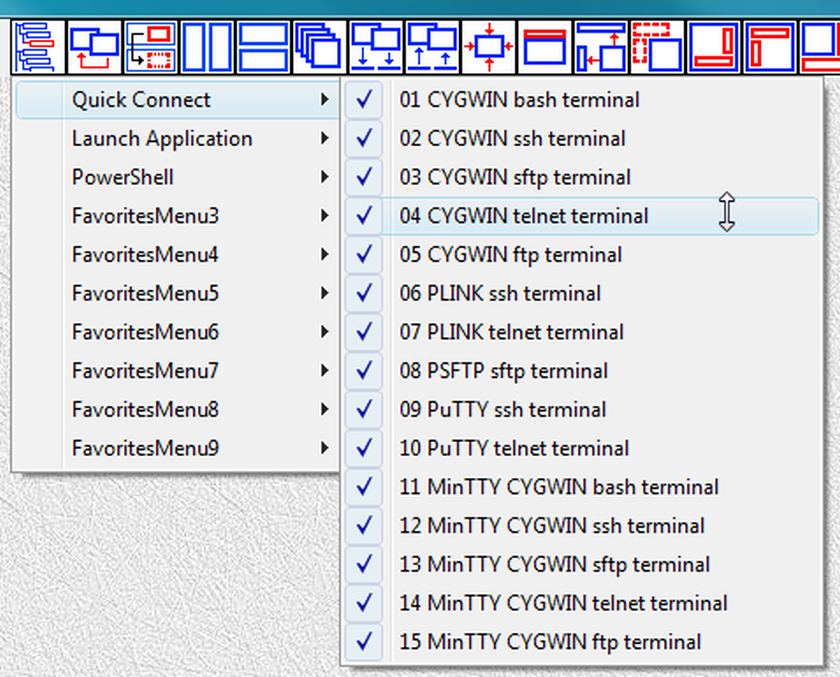
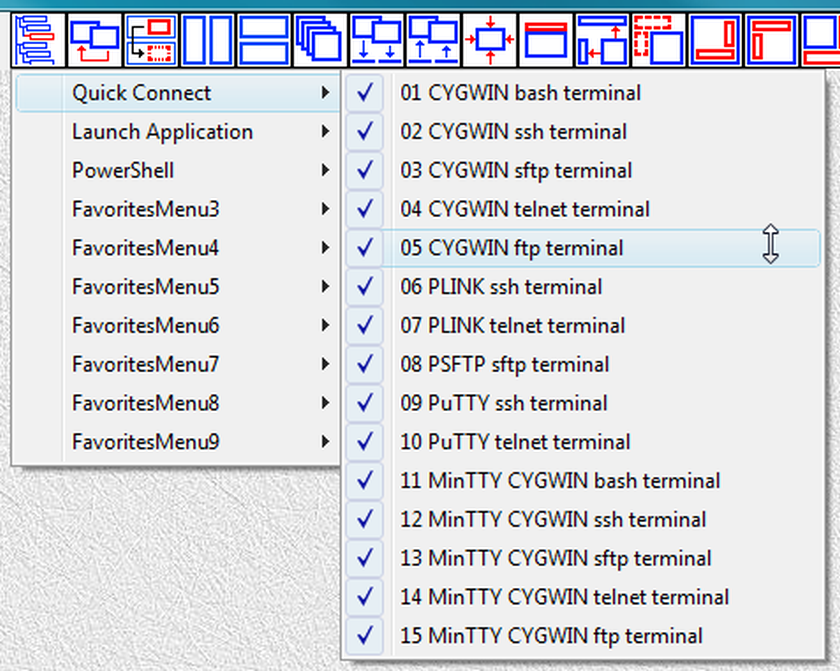
Fig.60. References to launchers in QuickConnect SUBTREE are placed into submenu QuickConnect of the LauncherTree Favorites button in the main window
Customized pre-configured versions can be added by user as needed via “Add Pre-Configured Launchers” Dialog.
This dialog is invoked by pressing New button which is the first button on the toolbar of the LauncherTree Window (fig. 61).
Fig.61. Button New on the toolbar of the LauncherTree window is invoking Add Pre-Configured Launchers Dialog
To add pre-configured launcher to LauncherTree:
Add button to add pre-configured launcher to the LauncherTree. Then you can modify some values on the page (for example, host IP address) and press Add again to add slightly different launcher. If you need to add another type of launcher, switch to another dialog page using the page selection tree on the left side of the dialog, fill needed values and press Add again.x button in the top right corner to close the dialog.After pre-configured launchers are added to the LauncherTree, they are ready to be used (executed) by double-clicking on them.
After pre-configured launchers are added to the LauncherTree, they can be further edited via TreeNode Edit Dialog (Middle Click on the Launcher to edit it) to add more customization. For example, SHELL-TERMINAL launcher that is using CYGWIN telnet can be further edited to add IP protocol version option on the command line of telnet program.
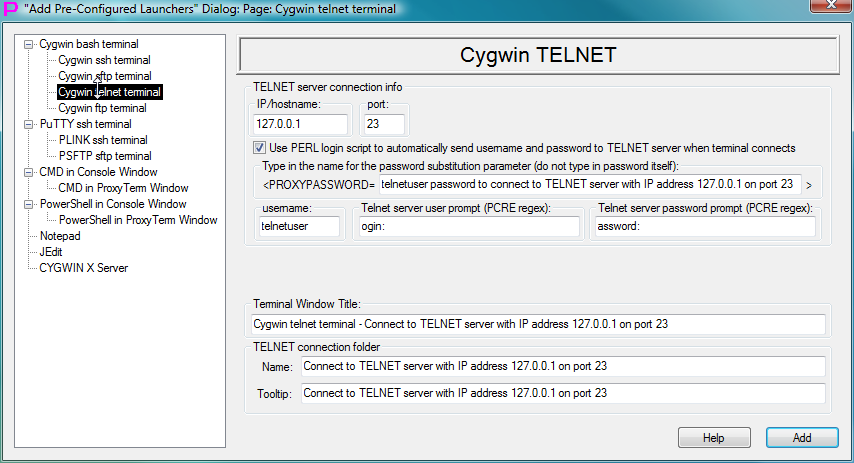
Fig.62. Template to create launcher for CYGWIN telnet terminal in the "Add Pre-Configured Launchers" Dialog
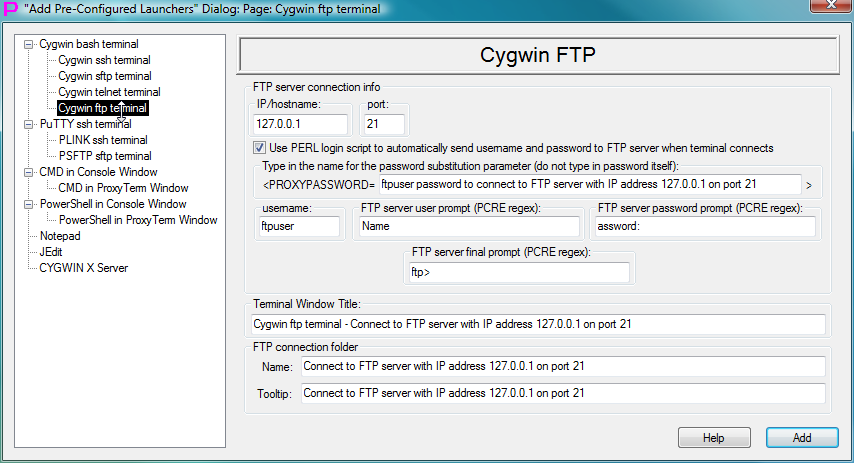
Fig.63. Template to create launcher for CYGWIN ftp terminal in the "Add Pre-Configured Launchers" Dialog
TELNET-TERMINAL and COM-PORT-TERMINAL launchers are created via Proxy32 TreeNode Editor using its dialog windows as templates
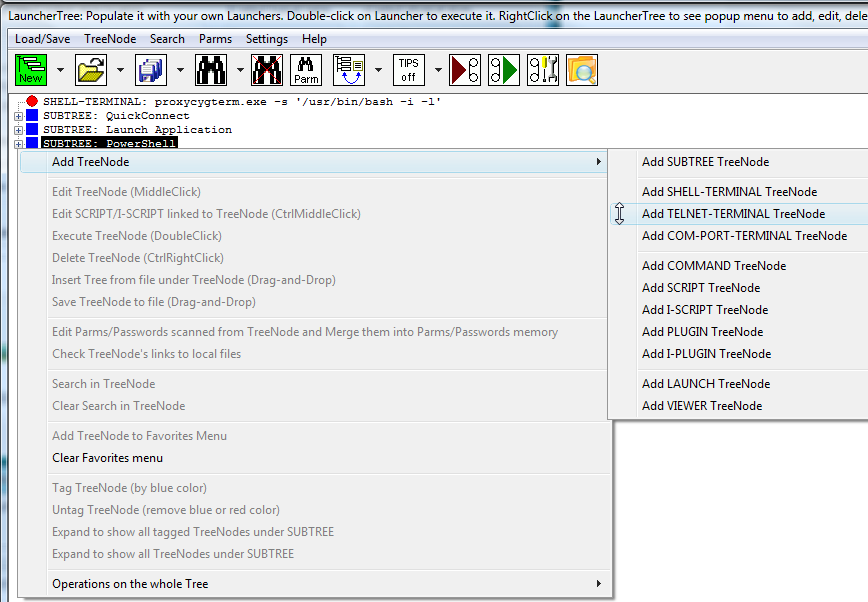
Fig.64. Adding TELNET-TERMINAL launcher via right click on the LauncherTree.
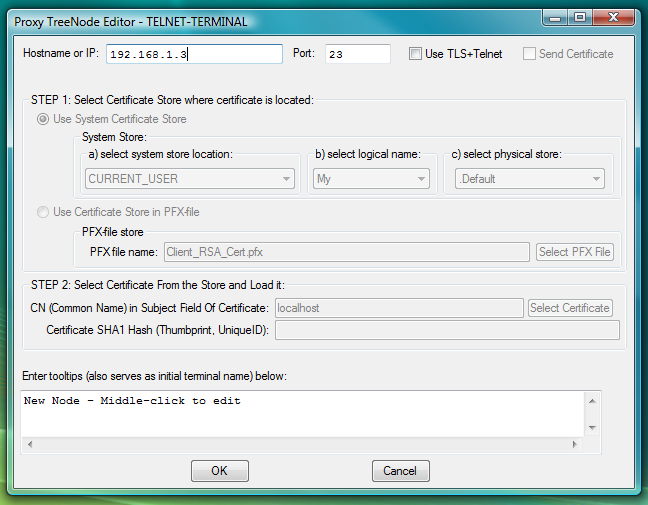
Fig.65. Dialog to add new TELNET-TERMINAL launcher (this launcher will use telnet client that is built-in into Proxy32 terminal).
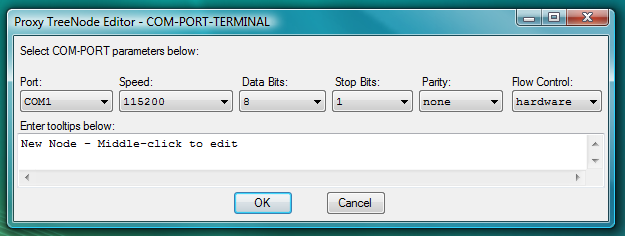
Fig.66. Dialog to add new COM-PORT-TERMINAL launcher (this launcher will use COM-PORT client that is built-in into Proxy32 terminal).
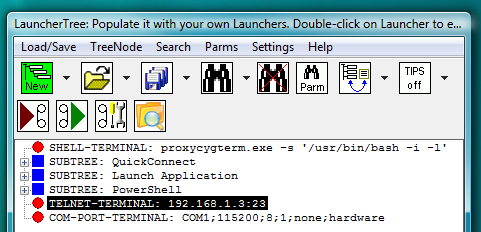
Fig.67. TELNET-TERMINAL and COM-PORT-TERMINAL launchers on the LauncherTree, ready to be executed.
On double click such launcher will create terminal window and connect it to the server, but user will have to type in user name and password manually in the terminal in response to login: and Password: prompt. To automatically type user name and password into terminal to complete login procedure it is necessary to add separate AUTOLOGIN I-SCRIPT or PLUGIN launcher.
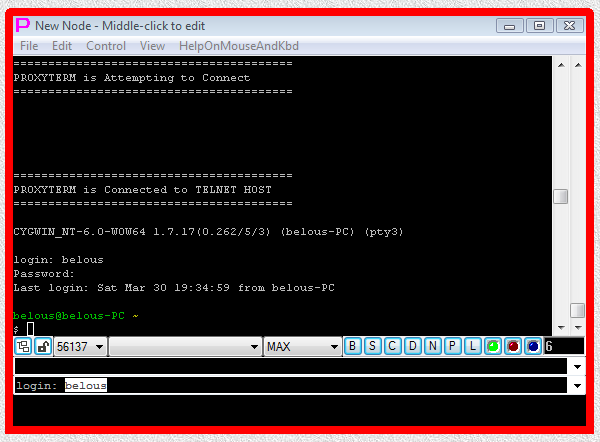
Fig.68. Execution of TELNET-TERMINAL launcher (user name and password have to be typed manually into terminal).
The AUTOLOGIN configuration to automate connection via TELNET-TERMINAL and COM-PORT-TERMINAL launchers is the same as described for "CYGWIN telnet/ftp clients" if one replaces SHELL-TERMINAL CYGWIN telnet launcher by TELNET-TERMINAL or COM-PORT-TERMINAL launcher. That means the same PLUGINs and I-SCRIPTs can be used as described in section 3.CYGWIN telnet/ftp clients. The rest of this section shows how PLUGIN from section 3.CYGWIN telnet/ftp clients can be used to automate connection via TELNET-TERMINAL launcher (Figures 69-73).
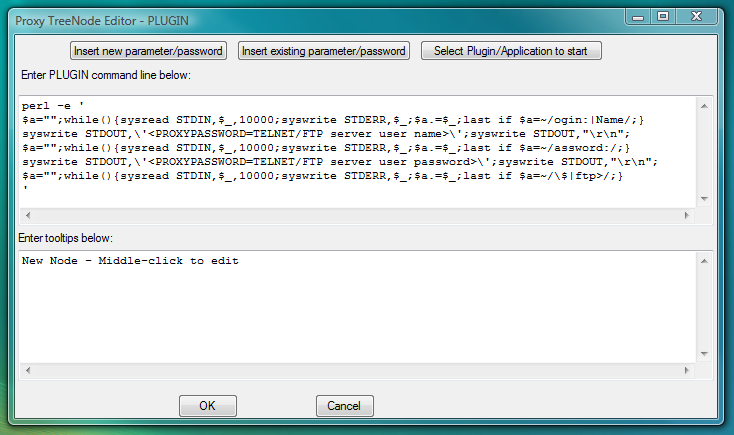
Fig.69. Dialog to add new PLUGIN launcher with command line designed to complete TELNET-TERMINAL login by sending user name and password into terminal in response to the server prompts.

Fig.70. TELNET-TERMINAL and COM-PORT-TERMINAL launchers on the LauncherTree (each coupled with its own AUTOLOGIN PLUGIN launcher), ready to be executed.
Fig.71. User is receiving parameter input dialog asking to supply values for "TELNET/FTP server user name" and "TELNET/FTP server user password".
Fig.72. User is supplying the values for "TELNET/FTP server user name" and "TELNET/FTP server user password" and then pressing OK button in parameter input dialog.
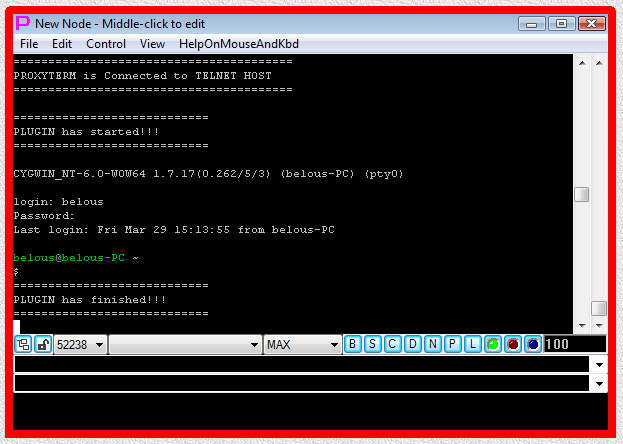
Fig.73. TELNET-TERMINAL launcher and then PLUGIN launcher are executed after user has pressed OK button in the parameter input dialog. Login sequence is completed.
One can use SHELL-TERMINAL launcher with following command line:
plink.exe -ssh -P 22 -l belous -pw <PROXYPASSWORD=SSH server user password> 192.168.1.3or for sftp:
psftp.exe -P 22 -l belous -pw <PROXYPASSWORD=SSH server user password> 192.168.1.3In this case there is no need to create additional PLUGIN or I-SCRIPT launchers to automate login as PLINK (in ssh mode) and PSFTP can do it themselves by taking user name and password from their command line.
One should edit IP address of the server and user name (to replace them by needed values) before inserting this command line into the SHELL-TERMINAL launcher.
To use above samples, create SHELL-TERMINAL launcher somewhere on LauncherTree and paste given sample SHELL-TERMINAL command line (edit IP address and user name first to the ones you need) in the command line text field of the SHELL-TERMINAL launcher.
Fig.74. Adding SHELL-TERMINAL launcher via right click on the LauncherTree.

Fig.75. Dialog to add new SHELL-TERMINAL launcher with command line to start PLINK ssh client as terminal shell.
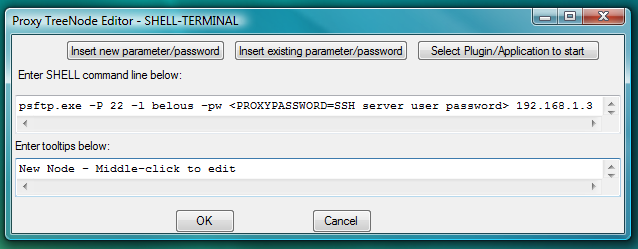
Fig.76. Dialog to add new SHELL-TERMINAL launcher with command line to start PSFTP sftp client as terminal shell.
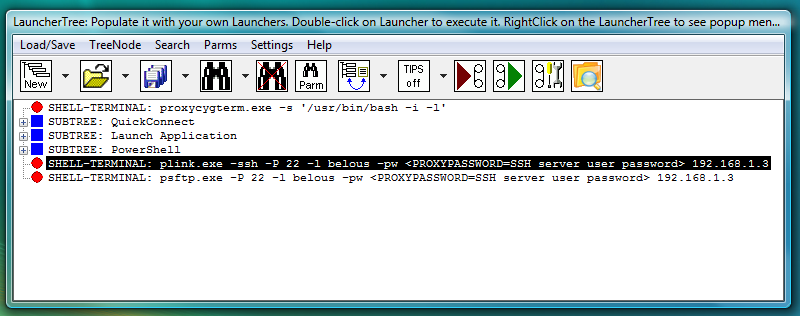
Fig.77. PLINK ssh and PSFTP sftp SHELL-TERMINAL launchers on the LauncherTree, ready to be executed.
SHELL-TERMINAL launcher command line contains named password (substitution parameter) <PROXYPASSWORD=SSH server user password> that allows to store and manage individual password and protect it. One can type in password directly into the SHELL-TERMINAL launcher command line in place of <PROXYPASSWORD=SSH server user password> , but that would be bad security practice as password would be visible in the SHELL-TERMINAL launcher command line. The name of the substitution parameter that stores password in this case is SSH server user password (the string delimited by equal sign and by closing angle bracket). This name can contain any string. The rule of the Thumb is to name storage for different passwords differently, so that later you would know for sure which password will be inserted in place of particular substitution parameter.
When one double clicks on SHELL-TERMINAL launcher, it will create terminal window, prompt user for password SSH server user password via parameter input dialog (because <PROXYPASSWORD=SSH server user password> was found in the SHELL-TERMINAL launcher command line), connect terminal to communication shell (PLINK ssh or PSFTP sftp) and then shell will automatically complete login with the server by sending user name that was given on the command line of the shell and the password that was previously supplied by the user via parameter input dialog. If user selects Do not ask again and Save on Exit checkmarks when supplying the password via parameter input dialog, this parameter input dialog will not appear next time when connecting to the same server.
Fig.78. User is receiving parameter input dialog asking to supply the value for password "SSH server user password".
Fig.79. User is supplying the value for password "SSH server user password" and then pressing OK button in parameter input dialog.
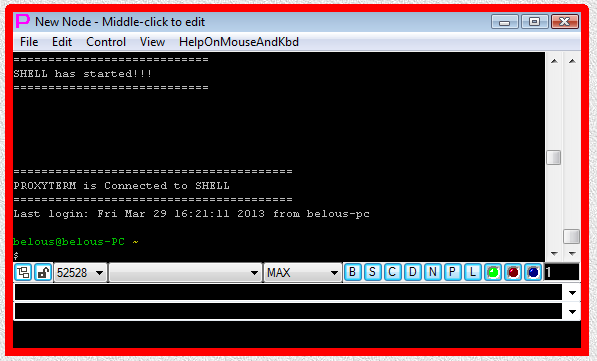
Fig.80. PLINK ssh SHELL-TERMINAL launcher is executed after user has pressed OK button in the parameter input dialog. Login sequence is completed.
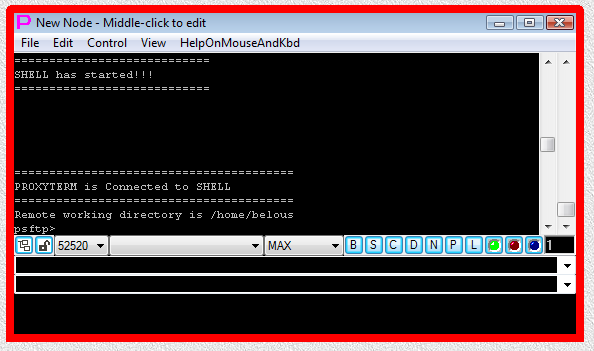
Fig.81. PSFTP sftp SHELL-TERMINAL launcher is executed after user has pressed OK button in the parameter input dialog. Login sequence is completed.
Universal (fully parametrized) pre-configured versions of PLINK ssh and PSFTP sftp launchers (SHELL-TERMINAL) are available in the LauncherTree created during Proxy32 installation (fig.82).
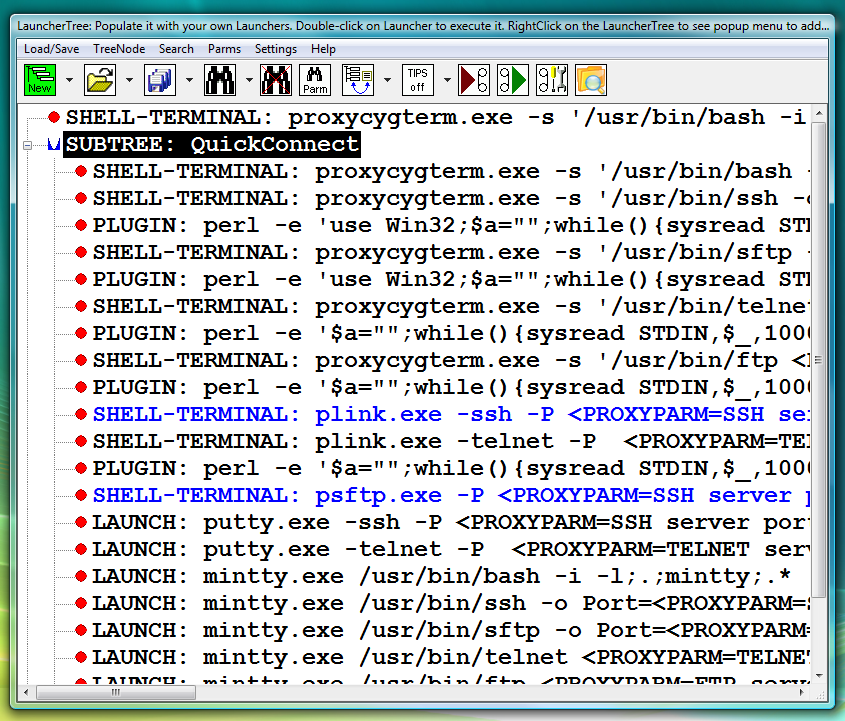
Fig.82. Pre-configured Launchers in the QuickConnect SUBTREE that was created during installation of Proxy32
They also can be executed from the menu of the "LauncherTree Favorites" button (fig.83) that is accessible from the main window and from terminal window.
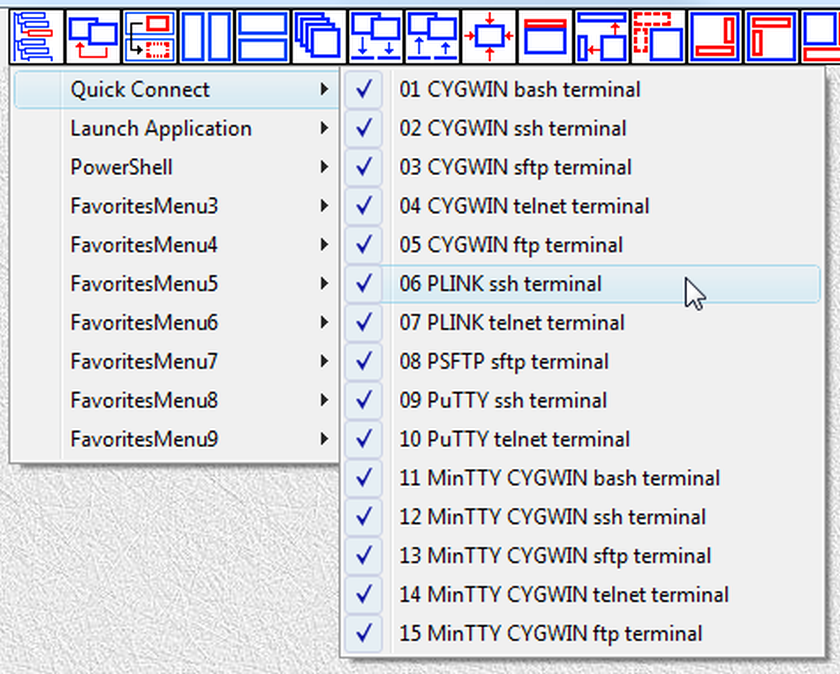
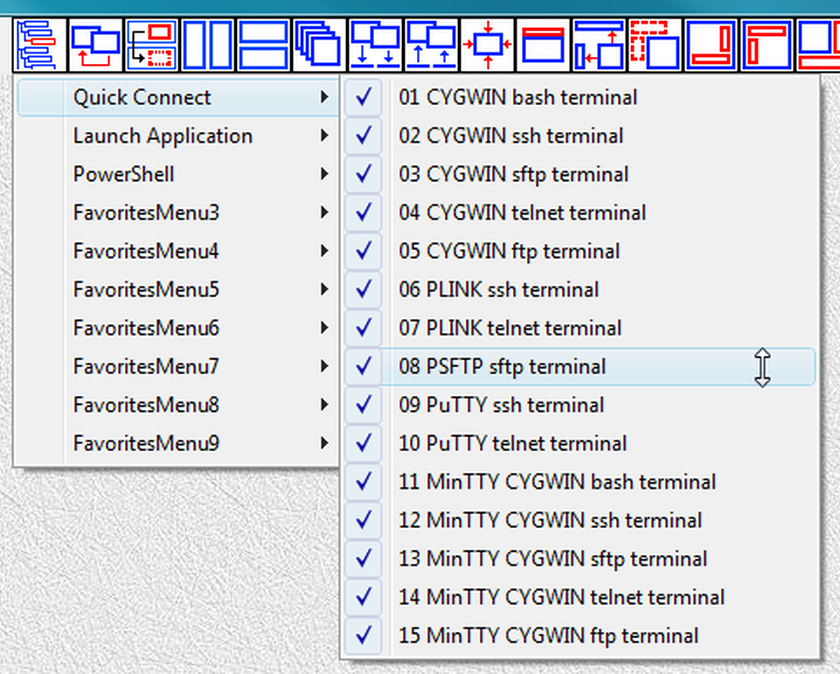
Fig.83. References to launchers in QuickConnect SUBTREE are placed into submenu QuickConnect of the "LauncherTree Favorites" button in the main window
Customized pre-configured versions can be added by user as needed via “Add Pre-Configured Launchers” Dialog.
This dialog is invoked by pressing “New” button which is the first button on the toolbar of the LauncherTree Window (fig. 84).
Fig.84. Button "New" on the toolbar of the LauncherTree window is invoking "Add Pre-Configured Launchers" Dialog
To add pre-configured launcher to LauncherTree:
After pre-configured launchers are added to the LauncherTree, they are ready to be used (executed) by double-clicking on them.
After pre-configured launchers are added to the LauncherTree, they can be further edited via “TreeNode Edit Dialog” (Middle Click on the Launcher to edit it) to add more customization. For example, SHELL-TERMINAL launcher that is using CYGWIN ssh can be further edited to add TCP forwarding options on the command line of SSH program.
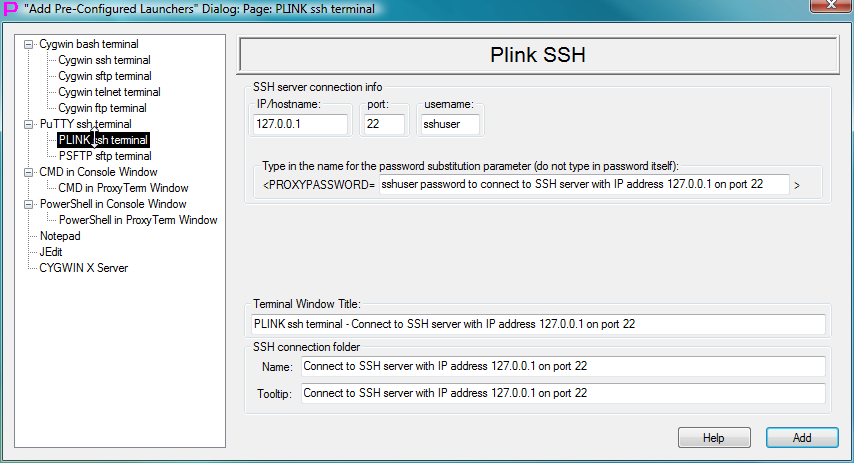
Fig.85. Template to create launcher for PLINK ssh terminal in the "Add Pre-Configured Launchers" Dialog
Fig.86. Template to create launcher for PSFTP sftp terminal in the "Add Pre-Configured Launchers" Dialog
One can use SHELL-TERMINAL launcher for PLINK telnet with following command line:
plink.exe -telnet -P 23 192.168.1.3or for PLINK serial port connection:
plink.exe -serial com1 -sercfg 19200,8,n,1,XOne should edit IP address and port of the server or com-port number and com-port config (to replace them by needed values) before inserting this command line into the SHELL-TERMINAL launcher.
Fig.87. Adding SHELL-TERMINAL launcher via right click on the LauncherTree.
Fig.88. Dialog to add new SHELL-TERMINAL launcher with command line to start PLINK telnet client as terminal shell.
Fig.89. Dialog to add new SHELL-TERMINAL launcher with command line to start PLINK COM-PORT client as terminal shell.
Fig.90. PLINK telnet and PLINK serial SHELL-TERMINAL launchers on the LauncherTree, ready to be executed.
On double click such launcher will create terminal window and connect it to the server, but user will have to type in user name and password manually in the terminal in response to login: and Password: prompt. To automatically type user name and password into terminal to complete login procedure it is necessary to add separate AUTOLOGIN I-SCRIPT or PLUGIN launcher.

Fig.91. Execution of PLINK telnet SHELL-TERMINAL launcher (user name and password have to be typed manually into terminal).
The AUTOLOGIN configuration to automate connection via PLINK telnet and PLINK serial SHELL-TERMINAL launchers is the same as described for "CYGWIN telnet/ftp clients" if one replaces SHELL-TERMINAL CYGWIN telnet launcher by PLINK telnet or PLINK serial SHELL-TERMINAL launchers. That means the same PLUGINs and I-SCRIPTs can be used as described in section 3.CYGWIN telnet/ftp clients. The rest of this section shows how PLUGIN from section 3.CYGWIN telnet/ftp clients can be used to automate connection via PLINK telnet SHELL-TERMINAL (Figures 92-96).
Fig.92. Dialog to add new PLUGIN launcher with command line designed to complete PLINK telnet SHELL-TERMINAL login by sending user name and password into terminal in response to the server prompts.
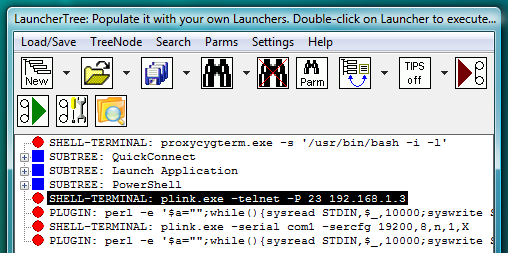
Fig.93. PLINK telnet and PLINK serial SHELL-TERMINAL launchers on the LauncherTree (each coupled with its own AUTOLOGIN PLUGIN launcher), ready to be executed.
Fig.94. User is receiving parameter input dialog asking to supply values for "TELNET/FTP server user name" and "TELNET/FTP server user password".
Fig.95. User is supplying the values for "TELNET/FTP server user name" and "TELNET/FTP server user password" and then pressing OK button in parameter input dialog.
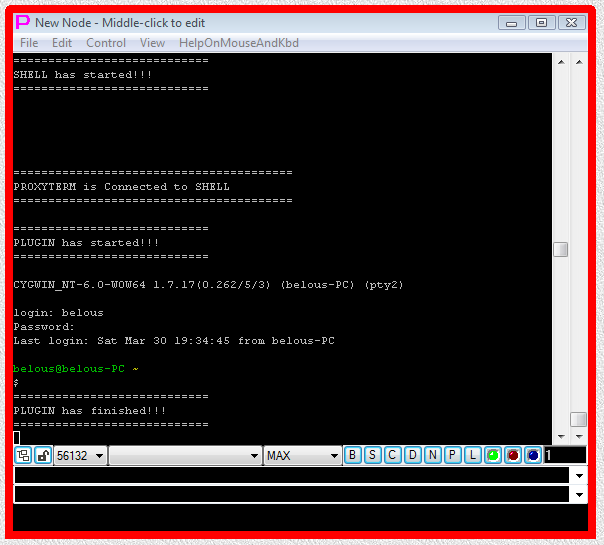
Fig.96. PLINK telnet SHELL-TERMINAL launchers and then PLUGIN launcher are executed after user has pressed OK button in the parameter input dialog. Login sequence is completed.
Universal (fully parametrized) pre-configured version of PLINK telnet launcher (SHELL-TERMINAL with associated PERL PLUGIN) is available in the LauncherTree created during Proxy32 installation (fig.97).
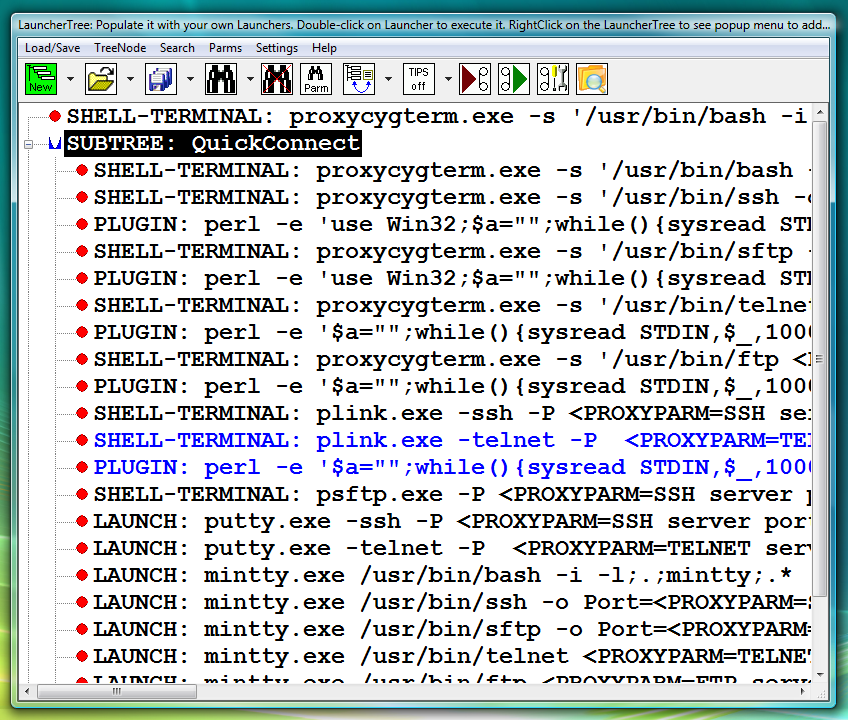
Fig.97. Pre-configured Launchers in the QuickConnect SUBTREE that was created during installation of Proxy32
They also can be executed from the menu of the "LauncherTree Favorites" button (fig.98) that is accessible from the main window and from terminal window.
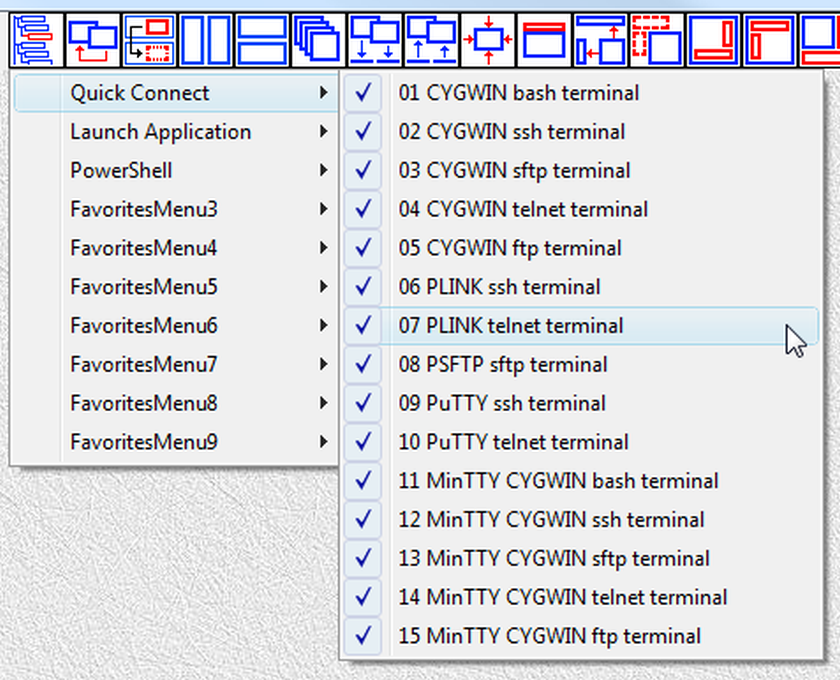
Fig.98. References to launchers in QuickConnect SUBTREE are placed into submenu QuickConnect of the "LauncherTree Favorites" button in the main window
PuTTY has its own terminal window, so it cannot be used as a shell connected to Proxy32 built-in terminal. Instead, LAUNCH launcher is used to start PuTTY from command line and to capture its own window into workspace. Using the LAUNCH launcher and capturing the window of external process into workspace is covered in detail in the section Windows of External Processes.
We will look at three types of PuTTY connections (ssh, telnet and serial). Only ssh mode allows to specify login information from the PuTTY command line. For telnet and serial connections user has to type user name and password manually into the PuTTY terminal window. PLUGIN/I-SCRIPT cannot be used here as they only work in the window of Proxy32 built-in terminal. Though, it is possible to send user name and password into PuTTY terminal window by executing COMMAND launcher, COMMAND launcher has to be executed by user manually after terminal is connected and server is asking for user name.
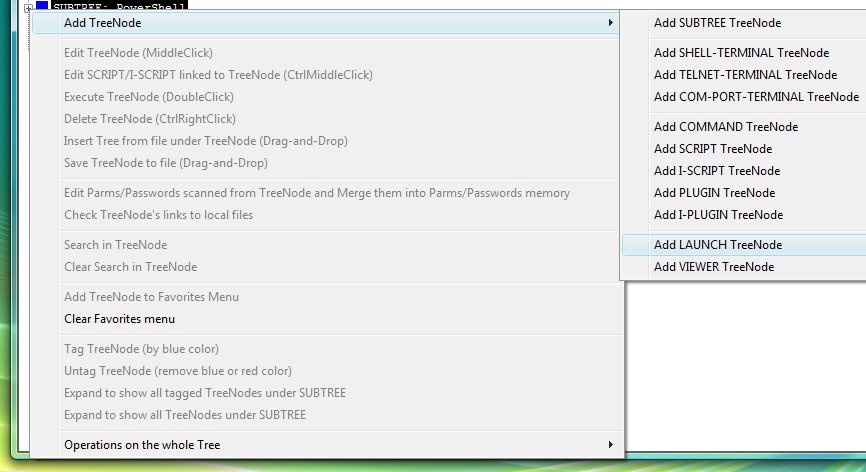
Fig.99. Adding LAUNCH launcher via right click on the LauncherTree.
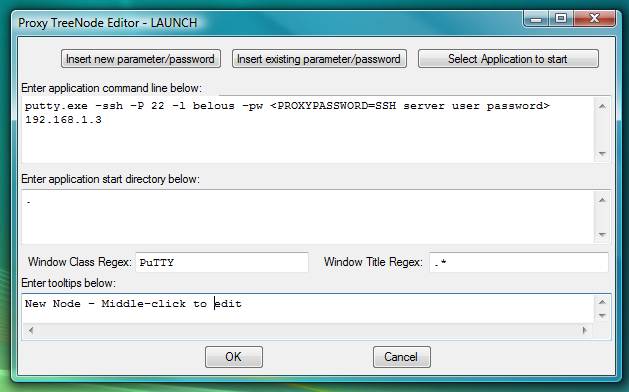
Fig.100. Dialog to add new LAUNCH launcher with command line to start PuTTY ssh client and capture its window into workspace.
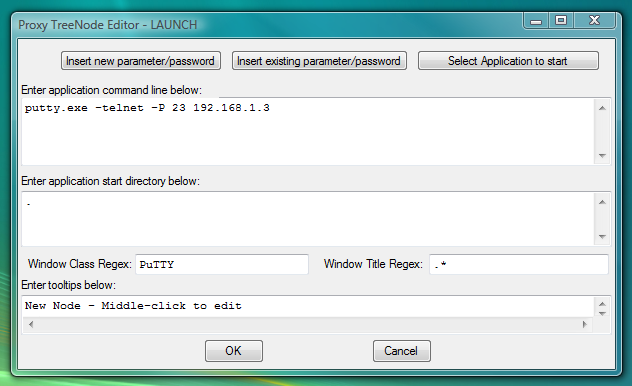
Fig.101. Dialog to add new LAUNCH launcher with command line to start PuTTY telnet client and capture its window into workspace.
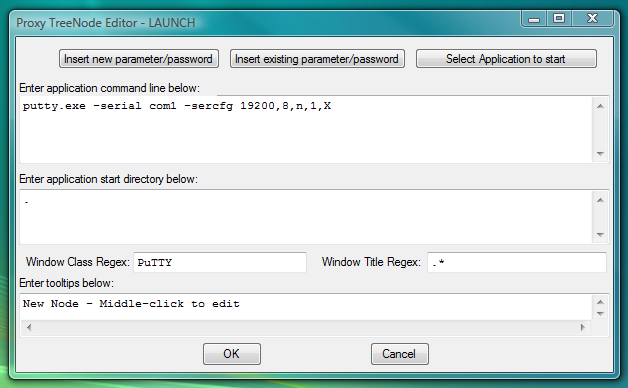
Fig.102. Dialog to add new LAUNCH launcher with command line to start PuTTY serial client and capture its window into workspace.
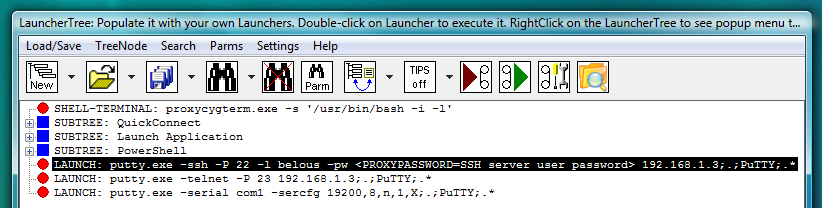
Fig.103. PuTTY ssh, telnet and serial LAUNCH launchers on the LauncherTree, ready to be executed.
LAUNCH launcher command line contains named password (substitution parameter) <PROXYPASSWORD=SSH server user password> that allows to store and manage individual password and protect it. One can type in password directly into the LAUNCH launcher command line in place of <PROXYPASSWORD=SSH server user password> , but that would be bad security practice as password would be visible in the LAUNCH launcher command line. The name of the substitution parameter that stores password in this case is "SSH server user password" (the string delimited by equal sign and by closing angle bracket). This name can contain any string. The rule of the Thumb is to name storage for different passwords differently, so that later you would know for sure which password will be inserted in place of particular substitution parameter.
When one double clicks on LAUNCH launcher for PuTTY ssh, it will prompt user for password "SSH server user password" via parameter input dialog (because <PROXYPASSWORD=SSH server user password> was found in the LAUNCH launcher command line), start PuTTY in ssh mode, capture PuTTY window into workspace and then PuTTY will automatically complete login with the server by sending user name that was given on the command line of PuTTY and the password that was previously supplied by the user via parameter input dialog. If user selects "Do not ask again" and "Save on Exit" checkmarks when supplying the password via parameter input dialog, this parameter input dialog will not appear next time when connecting to the same server.
Only ssh mode allows to specify login information from the PuTTY command line. For telnet and serial connections user has to type user name and password manually into the PuTTY terminal window.

Fig.104. User is receiving parameter input dialog asking to supply the value for password “SSH server user password”.

Fig.105. User is supplying the value for password “SSH server user password” and then pressing OK button in parameter input dialog.
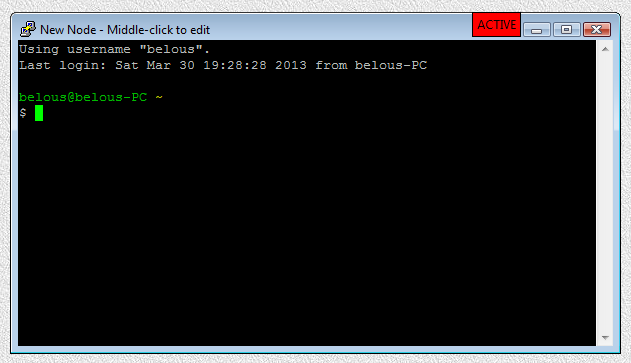
Fig.106. PuTTY ssh LAUNCH launcher is executed after user has pressed OK button in the parameter input dialog. Login sequence is completed.
Fig.107. Execution of PuTTY telnet LAUNCH launcher (user name and password have to be typed manually into terminal).
Universal (fully parametrized) pre-configured versions of PuTTY ssh and telnet launchers (LAUNCH) are available in the LauncherTree created during Proxy32 installation (fig.108).
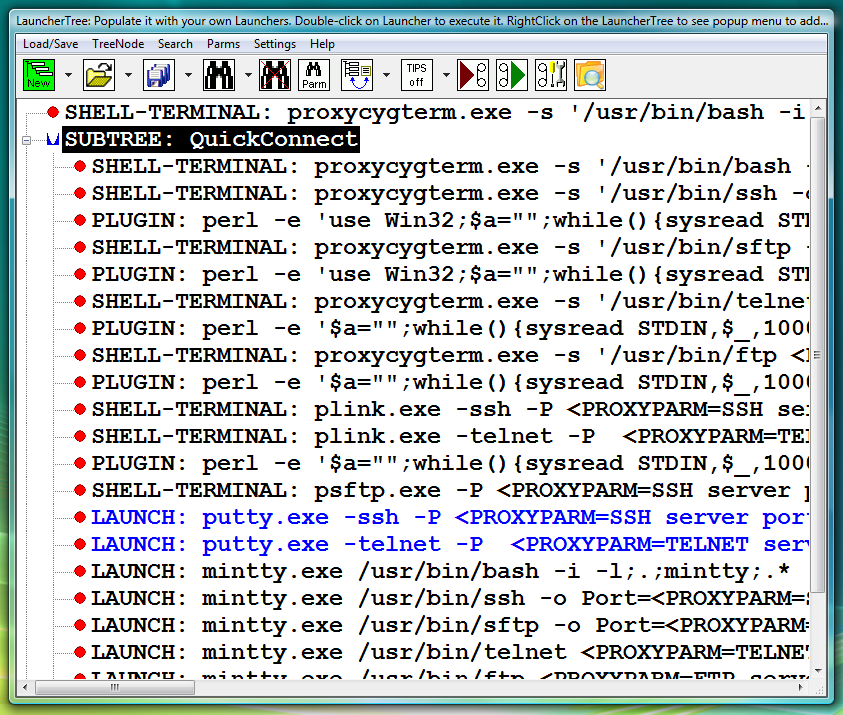
Fig.108. Pre-configured Launchers in the QuickConnect SUBTREE that was created during installation of Proxy32
They also can be executed from the menu of the "LauncherTree Favorites" button (fig.109) that is accessible from the main window and from terminal window.
Fig.109. References to launchers in QuickConnect SUBTREE are placed into submenu QuickConnect of the "LauncherTree Favorites" button in the main window
Customized pre-configured version of PuTTY ssh LAUNCH launcher can be added by user as needed via “Add Pre-Configured Launchers” Dialog.
This dialog is invoked by pressing “New” button which is the first button on the toolbar of the LauncherTree Window (fig. 110).
Fig.110. Button "New" on the toolbar of the LauncherTree window is invoking "Add Pre-Configured Launchers" Dialog
To add pre-configured launcher to LauncherTree:
After pre-configured launchers are added to the LauncherTree, they are ready to be used (executed) by double-clicking on them.
After pre-configured launchers are added to the LauncherTree, they can be further edited via “TreeNode Edit Dialog” (Middle Click on the Launcher to edit it) to add more customization. For example, SHELL-TERMINAL launcher that is using CYGWIN ssh can be further edited to add TCP forwarding options on the command line of SSH program.

Fig.111. Template to create launcher for PuTTY ssh terminal in the "Add Pre-Configured Launchers" Dialog
One can use SHELL-TERMINAL launcher with following command line:
proxycygterm.exe -s '/usr/bin/bash -i -l'instead of
proxycygterm.exe -s '/usr/bin/ssh -o Port=22 -o User=belous 192.168.1.3'This will create terminal that is connected to local bash shell. To connect to remote host user will have to type ssh -o Port=22 -o User=belous 192.168.1.3 at the bash command prompt. This can also be done by I-SCRIPT or PLUGIN (that can be started automatically on connection of the terminal to local bash shell - if I-SCRIPT or PLUGIN launcher is located immediately under SHELL-TERMINAL launcher being executed). Then the same I-SCRIPT or PLUGIN should continue to interact with ssh prompts to finish login.
This may have some advantages and disadvantages comparing to connecting terminal directly to CYGWIN ssh shell:
ssh connection drops, user got back local bash shell prompt. That may not be desirable when terminal is shared with remote user via TELNET/TLS sharing link or when terminal is in "Shared Input Mode" (and shared input will be executed into local bash prompt instead of remote prompt via ssh connection).bash shell which can be misleading.As an example:
one can use SHELL-TERMINAL launcher with following command line:
proxycygterm.exe -s '/usr/bin/bash -i -l'and then modify PLUGIN to type ssh -o Port=22 -o User=belous 192.168.1.3 at the bash command prompt to initiate ssh connection:
perl -e ' use Win32;
syswrite STDOUT,\'ssh -o Port=22 -o User=belous 192.168.1.3\';syswrite STDOUT,"\r\n";
$a="";while(){sysread STDIN,$_,10000;syswrite STDERR,$_;$a.=$_;last if $a=~/assword:|yes\/no/;}
if($a=~/yes\/no/)
{
my $iRetCode = Win32::MsgBox($a, 4, q{Never connected before to this server!});
if($iRetCode == 6)
{
syswrite STDOUT,\'yes\';syswrite STDOUT,"\r\n";
$a="";while(){sysread STDIN,$_,10000;syswrite STDERR,$_;$a.=$_;last if $a=~/assword:/;}
}
else
{
exit(0);
}
}
syswrite STDOUT,\'<PROXYPASSWORD=SSH server user password>\';syswrite STDOUT,"\r\n";'1.General information
2.CYGWIN OpenSSH ssh/sftp client
2.1.SHELL-TERMINAL launcher for CYGWIN ssh/sftp
2.2.PLUGIN launcher for CYGWIN ssh/sftp
2.3.I-SCRIPT launcher for CYGWIN ssh/sftp
2.4.Pre-configured launchers for CYGWIN ssh/sftp
2.5.SSH port forwarding for CYGWIN ssh
2.5.1.SSH port forwarding before login
2.5.2.SSH port forwarding after login
3.CYGWIN telnet/ftp clients
3.1.SHELL-TERMINAL launcher for CYGWIN telnet/ftp
3.2.PLUGIN launcher for CYGWIN telnet/ftp
3.3.I-SCRIPT launcher for CYGWIN telnet/ftp
3.4.Pre-configured launchers for CYGWIN telnet/ftp
4.Using TELNET and COM-PORT clients that are built into TERMINAL
4.1.TELNET-TERMINAL and COM-PORT-TERMINAL launchers
4.2.PLUGIN/I-SCRIPT launchers to automate connection via TELNET-TERMINAL and COM-PORT-TERMINAL launchers
5.Plink in ssh mode and Psftp
5.1.SHELL-TERMINAL launchers for Plink in ssh mode and Psftp
5.2.Pre-configured launchers for Plink in ssh mode and Psftp
6.Plink in telnet and serial mode
6.1.SHELL-TERMINAL launchers for Plink in telnet and serial mode
6.2.PLUGIN/I-SCRIPT launchers to automate connection via Plink in telnet and serial mode
6.3.Pre-configured launchers for Plink in in telnet mode
7.Putty in ssh, telnet or serial mode
7.1.LAUNCH launchers for Putty in ssh, telnet or serial mode
7.2.Pre-configured launchers for Putty in ssh or telnet mode
8.CYGWIN ssh/sftp/telnet/ftp in bash terminal